Showing posts with label with. Show all posts
Showing posts with label with. Show all posts
Sunday, February 15, 2015
Best Ways to Deal with Bad Links

Bad links are something that is going to damage your websites SEO. That is why it is a good idea to get rid of them. But, how do you do it? And, to what extent should these links be removed? Are all bad links so bad? Below you will find the answer to these questions and some top advice about how to get rid of bad links. There are four bad link varieties described in this article, but they are in no particular order.
Also Read: Best Way to Easily Find and Remove Broken Links from your Website or Blog
Also Read: The 5 Best Ways to Build Quality Backlinks for Your Website or Blog
What is SEO?
SEO stands for Search Engine Optimization, and it is a process that makes your website more search engine friendly. The search engines cannot read and comprehend what is on your website, they have to use clues in order to guess what the content is all about. Backlinks are used as clues, as are internal links. Backlinks are also used as a way of judging a website’s popularity.Bad link 1 - A backlink from a black-hat website
The most common version of this was the backlink that came from a link farm. This is a website that was built simply to upload content for the sake of adding a link to it. This is deemed as one of many type of black-hat website, and a link from here is bad news.How to deal with it
Try to have the backlink removed from the website. Do all that you can in order to remove the backlink? If you cannot, then copy your content and put in on a new URL. Then, remove the URL that the backlink points to. This breaks the link between your website and the black-hat website.
Bad link 2 - A backlink from black-hat methods
One of the most common ways this happens is when a spam bot places a link onto a number of comment sections. In many cases, the blog master will notice the spam and remove it.How to deal with it
If the blog master does not recognize or remove the spam link, then request that the spam link be moved. Some websites and blogs allow you to report spam, so you can simply report that it exists and the web master will remove it for you. Use a backlink checker to locate all of the backlinks that were spammed. If you cannot remove them all, then do as you did with bad link number one and discontinue the URL that they point towards.
Also Read: Tips on How to Have Better SEO Results with Link Building
Also Read: How to Find the Websites or Blogs that are Copying your Content?
Bad link 3 - An internal link that leads nowhere
This is known as a broken link, and they happen quite often for a number of reasons. They are not too bad in small numbers, but Google will start to penalize websites that have too many.How to deal with it
If you notice a lot of broken links, then you need to start being more meticulous when you start new pages, remove pages, and make updates to your website. Use a link checker to see how many of your internal links are broken. All you have to do is either fix the link so that it points to a working page, or remove the link if it no longer serves any purpose. The problem will then be resolved the next time that the search engines crawl your website.
Bad link 4 - An internal link that points to another URL that is not online
This happens quite a bit. It is where you link to another website page, but then the destination URL is deleted or the website goes offline, etc. Just link broken internal links, it does not matter if you only have a few of these. But, if you have lots, or if they happen on a regular occasions then Google may penalize you. It lowers your websites usability, which is one reason why you are penalized. Imagine if you have a list of products that you link to, and yet only 60% of the links work, it is going to be frustrating for your user (hence your website usability rating drops).Broken links that point to external websites are also a signature of a website that is selling backlinks or that has been hacked, which is another reason why you may be penalized.
Also Read: The 3 Basic Things You Should Know Before Creating a Blog to Become a Successful Blogger
How to deal with it
When you use a tool to check your internal links, they often show you if your external links are broken too. Go to the website of the broken link to see if it is still online. They may have messed around with the URL, or deleted the page completely. If you cannot fix the link, then you should delete it from your website.
About Author:
The article is provided by Sonia Jackson. If you have any problems with your accounting homework she’s ready to help you.

Saturday, February 14, 2015
printf scanf and comments in C with example
Hello everyone, I hope you must have done the practical test of our previous programs. Remember practical knowledge is utmost important in learning c language.
Anyways till we have covered the basic use of printf() function by which we can print values on the screen. Today we will learn how to take values from the user.
Note: Read previous article to know more about printf() function: First C Program - Hello World
scanf() in C
scanf() is used to take data from the user. Till now we have wrote programs in which we declared variables with some values. But in practice we need those programs which are general enough to make computations.
So with the help of scanf() function now we will make a general program for multiplication of two numbers. In this program we will ask the user to enter the values.
#include<stdio.h>

void main()
{
 int a,b,c;
 printf("Enter two values to do multiplication");
 scanf("%d%d",&a,&b);
 c=a*b;
 printf("Your answer is %d",c);
}
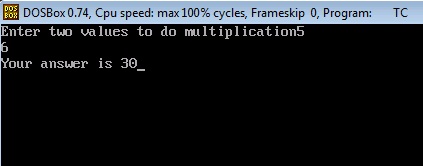
Now lets try to understand this program.
1. First two instructions are same like our previous programs.
2. In the third instruction we are declaring three variables of integer type.
3. In the fourth instruction we are printing the statement using printf() function.
4. In the fifth instruction we are taking input from the user through scanf() function.
In this scanf() function we have done two things.
a. We have given the format specifier %d to instruct the compiler that we want to input integer value.
b. We have used ampersand (&) which is also called "address of operator". By using this we instruct the compiler we want to store that input in that variable (a and b).
Why do we use ampersand operator (&)?
As I have said already it is a "address of operator". By using this operator we specify the address of variable to the compiler.
A bit confusion..? Ok, checkout the example below.
Suppose we have used &a. Now C compiler will receive the input and go to the address of a (which can be anything like 7635). After that it will store that value on that particular address. That’s it.
Lets write another program which is slightly complicated i.e. program to calculate simple interest.
C Program to Calculate Simple Interest
In this program I am assuming that you must know the formula and working of simple interest in mathematics. So I will not explain that formula to you.
/*Program to calculate simple interest
TheCrazyProgrammer date 21/12/14*/

#include<stdio.h>

void main()
{
 int p,n; //Here p is principle amount and n is number of years
 float r,si; //Here r is rate of interest and si is simple interest
 printf("Enter the values of p,n and r");
 scanf("%d%d%f",&p,&n,&r);
 si=(p*n*r)/100;
 printf("Simple interest is %f",si);
}
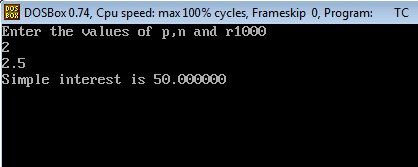
Lets try to understand this program step by step.
1. First two statements are comments.
Comments in C
Comments are generally used to increase the readability of program. At present we are making very small programs. But when we develop big programs then the program has to go through a long process of testing and debugging. Comments are not the part of program code and are not read by compiler.
It is very important to write comments in programs. So that other programmers can also read and understand your program easily. Writing comments is also a good programming practice. Start writing comments in the programs from the beginning itself.
C allows two types of comments
a. Single line comment: // first type of comment
b. Multiline comment: /* second type of comment*/
Single line comment is used to write comments in one line only. Multiline comment is used to write comments in multiple lines. All things that comes in between /* and */ is considered as comment. We can use anyone according to requirement.
2. After that next three instructions are same which includes C pre-processor directives, main() function, declaration of integer variables.
3. In the fourth instruction we have declared float variable r and si. Because rate of interest can be a floating point number. And to stay on safe side we also declared si variable as float. As the answer may come in floating point.
4. After that using printf() function we print a message to instruct the user to insert the values of p, n and r.
5. Using scanf() we are taking input from the user. Checkout we have used %f format specifier for r variable. We have declared r as float variable. So we have to use %f format specifier to print as well as receive values in r variable.
6. Now in the next statement we have calculated the simple interest using the formula.
7. In the last we have print the answer using printf() function. Notice we have used %f format specifier there. As si is also a float variable.
So these are the basic use of printf() and scanf() functions. These are one of the most used functions in C language. So you can estimate the importance of them. Now you can make 100s of programs by using these two functions.
Try making these programs yourself (take values from user)
1. Make a program to add two numbers.
2. Make a program which will convert distance in km to meter.
Virtual DJ pro v7 4 full version with All Sound Effects

VirtualDJ is the hottest AUDIO and VIDEO mixing software, targeting DJs from the bedroom, mobile, and professional superstars like Carl Cox.
With VirtualDJs breakthrough BeatLock engine, songs will always stay in beat, and the DJ works their mixes incredibly faster than they ever could.
The automatic seamless loop engine and synchronized sampler lets the DJ perform astounding remixes live, with no preparation at all. The visual representation and the cues allow a DJ to clearly see the song structure, and never be surprised by a break. The vinyl controls will let you scratch like on a real turntable, except that with the beatlock engine your scratches will never end out of the beat.
Add to that the infinite number of cue points a DJ can save for each song and large collection of wonderful automatically beat-synchronized effects.
And with VirtualDJs large collection of skin interfaces to suit everybody from the beginner to the professional DJ, the possibility to record the DJs mix to then burn to CDs, to broadcasting on the Internet and/or the DJs own radio station, to use headphones to preview the song, or use an external mixer to perform in a club; VirtualDJ is a DJs ULTIMATE mix software.
Lastly, enter the new era of DJs mixing video enhanced songs (DVD, DivX, MPEG...) which can be sent to monitors, TVs, a projector for display on a giant screen.
VirtualDJ brings all that and more to the DJ in the most easy-to-use way and at the most affordable price for the ULTIMATE DJ MIX EXPERIENCE Read more
Features:
up to 99 independent zero-latency players with:
Standard controls (play, pause, stop, cue)
Pitch control with Master Tempo (from -100% to +100%)
3 band equalizer High, Mid, and Low with Kill and +/-30db gain
Independant key control
Resonant filter
One-click beat matching and synchronization (FAME algorithm)
BeatLock engine for keeping songs in-sync and in-time
Dynamic beat-matching visualizer
Automatic beat-matched crossfading
Automatic BPM and KEY calculation
Automatic pitch matching
Automatic audio gain matching
Real scratch simulation
Automatic seamless and beat-aware LOOP functionality
Synchronized sampler with 12 instant record and playback slots
Time-Stretch and Master Tempo Pitch algorithms
Automatic first beat and last beat detection
Automatic 4/4 phase detection
Infinite number of cue points per song saved for instant recall each time the song is loaded
Beat-aware effect plugins (included: beatgrid, flippin doubles, vocal remover, frequency filter, flanger, backspin, brake, etc...)
VST effects compatibility (PC version Only)
Video mix with windowed or FULL SCREEN TV output using 2nd video output
Karaoke CDG+MP3 and/or ZIP support
FreeFrame and custom video effects
Infinite number of video effects applied simultaneously
DJ-specific video transition plugins
Song database engine with easy-to-use search feature
CoverFlow or text-only song browsing
Compatible with iTunes playlists (iTunes DRM files not supported)
MP3 ID3 Tag compatibility
User-defined automatic filter folders
Automatic Hot-Swap of external hard drives
Ready-to-burn recording of a DJs mix to CD
Broadcast on the Internet
CD to MP3 encoder
Multi-channel sound card, dual-sound card or Y-splitter output for real-time monitoring or external mixer use
ASIO soundcard compatibility
CoreAudio soundcard compatibility
Fully customizable skin engine and shortcut macro engine
VDJScript: powerful macro language used in skins, shortcuts, or controller mapping
Compatibility and customizable mapping with most external MIDI and HID controllers (more than 80 included, many more downloadable)
Optional automatic playlist mixing: VirtualDJ recognizes the style of the music (techno, hip hop, lounge) and adapts the mix accordingly
ContentUnlimited: search and play any song from our subscription plans with more than 15 million audio tracks, thousands of high quality video and karaoke files
LiveFeedback: get live recommendations based on what you play and the feedback from millions of other DJs around the world
System requirements:
MINIMUM system requirements:
Intel® Pentium® 4 or AMD Athlon™ XP
1024x768 resolution
DirectX compatible soundcard
512MB RAM
50MB free on the hard drive
RECOMENDED system requirements:
Intel® Core™ 2 or AMD Athlon™ X2
Microsoft® Windows 7 Professional (or newer)
1280x1024 resolution (or higher)
Multi-channel DirectX compatible soundcard
1024MB RAM
200MB free on the hard drive
Additional requirements for Video mixing:
2048MB (2GB) RAM
ATI™ or NVIDIA® video card w/256MB of Dedicated DDR3 RAM
Video card must support dual-screen output
Supported Operating System:
MINIMUM: Microsoft® Windows XP SP3 or newer
RECOMMENDED: Microsoft® Windows 7 Professional 32-bit
Microsoft® Windows 95, 98, ME, or older are not supported
 |  |  |
Password: 4hbest.blogspot.com
I hope you like it......!
Thursday, February 12, 2015
Need for Speed Underground 2 for PC full version with system requirements

In addition to the racing modes included in the previous Underground game (Circuit, Sprint, Drag and Drift races), four new variations of races have been provided in Underground 2. One racing mode was dropped, this being the Knockout competitions. Still, a Lap Knockout option is available when racing Circuit in non-career races. Underground 2 is unique among the games in the Need For Speed series in that it requires players to drive to a certain place in the city in order to begin a race (other games allow the player to select a race from a menu). Most races are marked on the in-game radar, but some are hidden and the player must search for them, should he decide to play them.
A circuit race is a standard race that involves up to four cars driving around a track that loops back to the start line of itself. A circuit race is typically a maximum of four laps and minimum of 2 laps. A sprint race is just like a circuit race except that the track does not loop back to the start line. Its a race from A to B involving a maximum of four vehicles, and because of the track design there is only one lap. Street X races are similar to Circuit races, but they take place on closed courses similar to Drift races.
Drifting is one of the easier types of racing (depending on difficulty level) in Need for Speed Underground 2. One difference to the drifting mode compared to the original Need for Speed Underground is that the player drifts with the other competitors at the same time. Players race against a maximum of three competitors. Points are awarded when the player successfully slide the car and finishes the drift without hitting any walls. Like the Street X mode, no nitrous oxide is allowed. There are also some special downhill drift races where the player starts at the top of a hill and has to slide down from top to bottom, a drifting equivalent of a sprint race (from point A to point B). In these races, there are no other racers, however there is normal city traffic. Players increase their points by sliding past city cars. Drag racing is a point-to-point race that forces players to use a manual transmission. Steering in this mode is simplified to simply allow for lane changes, while the game handles the steering along the lanes, and the player focuses more on maintaining an optimum speed for the car. The Nitrous Oxide meter is enlarged and displayed on the left side of the screen.
The Underground Racing League (URL) is a set of tournaments which takes place in a specific set of closed tracks outside city streets - either actual racing circuits or airport runways. URL tournaments typically consist of one to three races, with the player racing against five opponents. In tournaments with two or more races, a points system is used. At the end of each race, drivers receive a specific amount of points according to their standing in a race. The total score at the end of these races determines the winner of the tournament.
While cruising around the city, players can challenge other cruising opponents in a one-on-one race(these are called "Outrun Races"). The leader is given the freedom to pick his/her racing route, and must attempt to outrun the opponent and distance itself from him/her to as much as 300 metres (980 feet) to win. This racing formula is similar to that of Tokyo Xtreme Racer and Wangan Midnight video games, which uses health bars instead of distance to determine the winner. Once a certain amount of victories have been won by player in certain levels, the player is awarded a unique part free of charge by another racer. These parts are necessary to achieve 100% completion of the game. Read more
System requirements:
MINIMUM PC REQUIREMENTS
Windows 98/ME/2000/XP
933MHz Processor
256MB RAM
8X CD-ROM Drive
2GB Hard Disk Space
32MB DirectX compatible ATi Radeon 7500 or nVidia GeForce2 Class Video Card
DirectX compatible Sound Card
DirectX compatible Controller or Keyboard
DirectX 9.0c
MULTIPLAYER SYSTEM REQUIREMENTS
Broadband Internet Connection
Screen Shots; Click on the image to view large
 |  |  |
How to Download

File Size: 232 MB
Need for Speed: Under ground 2 for PC: Download
I hope you like it....!
Wednesday, February 11, 2015
Midtown Madness 2 for PC full version with system requirements

There are few sure things in life, but one of them is that if Microsoft puts out a racing game with "Madness" in the title, you might as well grab it as soon as it hits store shelves. Midtown Madness 2 is no exception to this rule. It doesnt matter whether youre a hard-core simulation fan or you simply crave speed, destruction, and mayhem in your games - if you want to play a very fun racing game, then Midtown Madness 2 is for you.
But thats not to say that Midtown Madness 2 is ideal. In fact, it seems as though it could have used a couple more weeks in testing. On several occasions the game completely locked up on a fairly standard system (Celeron 450MHz, 256MB RAM, TNT2 video card with the latest drivers), and only through uninstalling and reinstalling did the problem finally seem to go away. As in some other racing games, the brakes dont truly function as real-life brakes when both pedals are configured to use the y-axis: Slamming on the pedal doesnt lock the wheels but merely decelerates your car more quickly. An attempt to correct this by configuring the pedals to use two axes revealed a bug - the brakes worked in reverse, forcing you to keep the pedal down for no brakes and releasing it to stop. Your only true braking option is the hand brake, which tends to cause unpredictable slides when all you really want to do is slow down in a hurry. Also, at the beginning of one race, my car was positioned facing in the opposite direction of the other cars, and stepping on the gas sent me hurtling backward along with them even though I was in first gear. Fortunately, none of these problems were persistent or detrimental to how enjoyable the game turns out to be.
You can actually work your way around most of these issues, and in fact you might never experience a game crash yourself. But theres no getting past the games rather pathetic engine noises. When you see a 68 Mustang Fastback tearing through downtown San Francisco, you want to hear a mighty rumbling sound thatll make bystanders think the big earthquakes finally happening. Instead, the cars in Midtown Madness 2 give off a little purr that barely changes in tone even when youre redlining the tachometer. Even in an arcade-style racing game such as this, its good to be able to hear when you should change gears, rather than constantly have to check the tachometer.
The occasional bugs and the weak sound effects are the only low points in Midtown Madness 2, because otherwise, the game is a blast. Midtown Madness players whove grown used to screaming through Chicago will be happy to find two new venues featured in the sequel: San Francisco and London. As in the original game, both cities have been meticulously modeled to include many notable landscapes. In San Fran, youll see Coit Tower, the Palace of Fine Arts, and of course the Golden Gate Bridge; in London, you can tool around Trafalgar Square and even ram through the gates of Buckingham Palace and do a few donuts on the well-manicured lawn. Read more
System requirements:
CPU Type: Pentium II
CPU Speed in MHz: 266MHz
RAM: 32MB, 64MB (Windows 2000)
Hard Drive Space: 250MB
Sound Card: DrectSound Compatible
CD Drive Speed: 4X
Graphics Type: SVGA
Graphics Resolution(s): 800x600
Compatible Devices:
Software (DirectX 5.0, etc.): DirectX 7.0a
Screen Shots: Click on the image to view large
 |  |  |
How to Download
File Size: 157.3 MB
Midtown madness 2: Download
Midtown madness 2: Download
Password: 4hthebest.blogspot.com
Bloody Roar 2 for PC full version with system requirements

Bloody Roar II is a 3D versus fighter where 1 or 2 players can play as a variety of fighters who can transform into larger Beast forms. Each fighter is a Zoanthrope, a human who can transform into a large animal-human hybrid, a combination of the character and their token animal. This second form grants additional power to a player for as long as that power can be sustained. Rock solid graphics and fierce involved fighting are hallmarks of the Bloody Roar series. Some new features in the game since the previous one are: new story modes, 7 new characters, addition to the beast drive, more than 90 drawings in the game, and new cheats, including small head and big head.
Like Bloody Roar, the game was acclaimed for stunning graphics and special effects on the PSone. Both characters could transform and revert from a second form with no loading. Arenas were rendered in full 3D with destructible walls that would wear from collisions. It had directional lighting and shadow. It was also one of the few game to run at a smooth 60 frames per second and ,640x480 resolution on the PSone hardware.
Most charming of all, was the "player model" feature which made a return form BR1. With it the scale of character models can be changed. "Big Head" mode inflates the size of characters heads while "Kid" mode shrinks characters bodies two half their original size while their head and hands remain the same. Matches are not hampered by this mode and the technical game stays the same.
Gameplay is primarily based on taking advantage of the beast form which make fighters stronger, faster and feature special moves. To regulate a fighters beast form there is a power bar placed in the corner for each player. Players are always given the power to transform at the start of a match however when the bar is blue the character can only fight as a human. Taking and giving damage, both build the blue bar till it begins a yellow bar that overlapping the blue bar. With just a sliver of yellow in their power bar, fighters can transform into their beast form. However the yellow bar indicates how much damage the beast form can take before it depletes and reverts the character to their human form. So player would prefer to build this yellow gauge before transforming. The yellow bar does not increase while supporting the beast form. Building up the yellow bar without taking too much damage is the balance players consider as they compete. Read more
System requirements:
Cpu: 700Mhz
Ram:256 Mb
Video Memory:32 Mb
Windows Xp,7,Vista,8
Screen Shots: Click on the image to view large
 |  |  |
How to Download

File Size: 20.53 MB
Bloody Roar 2 for PC: Download
Bloody Roar 2 for PC: Download
I hope you like it....!
Tuesday, February 10, 2015
Installing Python with gdal on a Windows computer
Getting a new computer gave me the chance to try again installing Python with gdal. There may be various ways, but this works for me. It can be a bit tricky to get all working, so these resources helped me a lot:
My Computer: Windows 7, 64-bit
1) Download and install Python 2.7 (the 3er versions do not support all libraries yet (?) and my code is all 2.7)
2) For installing gdal I follow these instructions. This installs both the command line gdal utilities and the python bindings to use gdal within python. I need the command line utilities also to call them with "os.system" from within python.
[A day later I realize -- the bindings from the above mentioned webpage link the command line installation to python. For some reason in my new computer I dont get this to work. Solving that quickly and being lazy: Install the Python gdal bindings from the link at point 3 below. The difference is that these bindings contain the whole gdal. BUT if you only install these, you wont have the command line utilities available]
3) At this great page, "all" libraries are available in different version, especially Windows 64-bit:
I use it for installing additional libraries like Numpy, Pil, etc
4) I use Spyder for writing code (looks a bit like Matlab and works really great!). First install the Python GUI library "PyQt 4" from http://www.riverbankcomputing.com/software/pyqt/download and then Spyder, available here https://code.google.com/p/spyderlib/ or at http://www.lfd.uci.edu/~gohlke/pythonlibs/
[today, 1/3/2013, the 4.10 PyQt version had an issue with Spyder but that should be resolved soon in the download]

Read more »
My Computer: Windows 7, 64-bit
1) Download and install Python 2.7 (the 3er versions do not support all libraries yet (?) and my code is all 2.7)
2) For installing gdal I follow these instructions. This installs both the command line gdal utilities and the python bindings to use gdal within python. I need the command line utilities also to call them with "os.system" from within python.
[A day later I realize -- the bindings from the above mentioned webpage link the command line installation to python. For some reason in my new computer I dont get this to work. Solving that quickly and being lazy: Install the Python gdal bindings from the link at point 3 below. The difference is that these bindings contain the whole gdal. BUT if you only install these, you wont have the command line utilities available]
3) At this great page, "all" libraries are available in different version, especially Windows 64-bit:
I use it for installing additional libraries like Numpy, Pil, etc
4) I use Spyder for writing code (looks a bit like Matlab and works really great!). First install the Python GUI library "PyQt 4" from http://www.riverbankcomputing.com/software/pyqt/download and then Spyder, available here https://code.google.com/p/spyderlib/ or at http://www.lfd.uci.edu/~gohlke/pythonlibs/
[today, 1/3/2013, the 4.10 PyQt version had an issue with Spyder but that should be resolved soon in the download]
Wednesday, February 4, 2015
Obsessed with lists how I organize my life
A little while back, I wrote about my obsession with the apocalypse. Today, Im going to talk about a slightly different obsession: lists. To be honest, not many people see this side of me. However, its a big part of who I am and how I get things done, and perhaps by sharing it, itll help others. Or perhaps youll realize Im an OCD maniac and end up avoiding me in the hallways.

Write down everything
I have long since accepted the fact that my memory is fallible and limited, so I tend to write down just about everything. Paper and digital media tend to be much more reliable and easier to search than my mind. As youll see in the rest of this blog post, I keep lists for everything you can think of, from my agenda for the day, to the groceries I need to buy, to the books I want to read.
A big part of making this an effective system is developing the discipline to (a) write down everything, as soon as possible and (b) strong search/organization skills so I can then find the relevant information in my many lists. When I get it right, I can very quickly access data from all aspects of my life in a matter of seconds.
Tools of the trade
One of the things I struggle with is picking the right tools for my many lists. Ive tried a huge variety with varying degrees of success and am continuously on the lookout for better options - if you know of any, please let me know in the comments. Ive found that with note & list tools, there are a number of trade-offs to consider: speed, searchability, accessibility, price, support for sharing, and tuning for specific tasks. The rest of this blog post will be a list - go figure - of some of the tools that I currently use and their pros and cons.

Even though Im a die-hard technologist, I find that pen and paper is still the best choice in certain circumstances. In particular, for my daily agenda, note taking, and shopping lists, I have not found a single digital device that can compare in terms of speed & efficiency. I had high hopes the iPad would finally replace my notebook, but I found typing to be too clunky (especially since I diagram and doodle a lot), finger drawing too imprecise, and the whole device just a little too heavy, both physically and in terms of UI. Perhaps a stylus and a well tuned app would do the trick, but I havent seen it yet.
Pros:
Text documents, spreadsheets, presentations and drawings in the cloud. For free. This is my weapon of choice for the VAST majority of things that dont need quite the speed of pen & paper. I keep so much info in Google Docs at this point that Id be in a lot of trouble if anything ever happened to the service.
Pros:
Technically a "note app", but it also supports storing a huge variety of items: bookmarks, tasks, events, wines, movies, products and more. There is an HTML5 web interface, iPhone app and browser plugins for both Firefox and Chrome.
Pros:
Google tasks
Very simple task tracking application. I primarily use it because its integrated into gmail, so I see it all the time.
Pros:
Living Social
Most people know LivingSocial as a daily deal site. However, before they got into deals, they had a great app for tracking books, movies, tv shows, video games and more. You could add books/movies/shows/games to your "collection" as something you had read/watched/played (along with a rating and review) or something that you wanted to read/watch/play. The ability to track all of these types of media in one place attracted me to the service and I used it fairly heavily: I had 260 books, 500 movies and 60 tv shows in my collection.
Unfortunately, ever since their daily deals business got big, they stopped developing features for the "media" site, didnt fix bugs, and didnt respond to requests. Today, I found out they are shutting the whole service down - if you use it, make sure to export your data before its gone. Im pretty disappointed by this and will now have to find a new place to track all the different types of media I interact with.
Pros:
GoodReads
A service built specifically to help you build a collection of books, both those youve already read (and optionally reviewed) as well as those you want to read. I actually used goodreads a few years ago, but switched to LivingSocial because they also had movies, tv shows, video games, etc. Now that LivingSocial is dead, I might go back to goodreads.
Pros:
Google calendar
Not exactly a list, but I couldnt talk about keeping my life organized without mentioning Google Calendar. In the same way that gmail is vastly superior to every email client ever built by Microsoft or Apple, Google Calendar is head and shoulders above Exchange, Outlook, iCal, etc. All my other calendars feed into it. My phone is synced to it. My life revolves around it.
Pros:
Read more »
Write down everything
I have long since accepted the fact that my memory is fallible and limited, so I tend to write down just about everything. Paper and digital media tend to be much more reliable and easier to search than my mind. As youll see in the rest of this blog post, I keep lists for everything you can think of, from my agenda for the day, to the groceries I need to buy, to the books I want to read.
A big part of making this an effective system is developing the discipline to (a) write down everything, as soon as possible and (b) strong search/organization skills so I can then find the relevant information in my many lists. When I get it right, I can very quickly access data from all aspects of my life in a matter of seconds.
Tools of the trade
One of the things I struggle with is picking the right tools for my many lists. Ive tried a huge variety with varying degrees of success and am continuously on the lookout for better options - if you know of any, please let me know in the comments. Ive found that with note & list tools, there are a number of trade-offs to consider: speed, searchability, accessibility, price, support for sharing, and tuning for specific tasks. The rest of this blog post will be a list - go figure - of some of the tools that I currently use and their pros and cons.
Pen and Paper
Even though Im a die-hard technologist, I find that pen and paper is still the best choice in certain circumstances. In particular, for my daily agenda, note taking, and shopping lists, I have not found a single digital device that can compare in terms of speed & efficiency. I had high hopes the iPad would finally replace my notebook, but I found typing to be too clunky (especially since I diagram and doodle a lot), finger drawing too imprecise, and the whole device just a little too heavy, both physically and in terms of UI. Perhaps a stylus and a well tuned app would do the trick, but I havent seen it yet.
Pros:
- Lightning fast
- Good for writing and drawing
- Not searchable
- Hard to organize: post-it notes, tabs, and bookmarks are fairly clunky
- Not easily sharable
- Easily lost
- Not always available ("doh, I left it at the office!")
- Daily agenda: a short list of items I plan on getting done for the day.
- Note taking: I have not found anything that can match pen and paper when taking notes while listening to a live speaker or presentation.
- Grocery list: another short list that I put together in a hurry and then dispose of.
Google Docs
 |
| http://docs.google.com |
Text documents, spreadsheets, presentations and drawings in the cloud. For free. This is my weapon of choice for the VAST majority of things that dont need quite the speed of pen & paper. I keep so much info in Google Docs at this point that Id be in a lot of trouble if anything ever happened to the service.
Pros:
- Accessible everywhere you have the internet - even editable on a smartphone!
- Searchable
- Easy to organize using tags/folders
- Easy to share and collaborate
- Not quite as fast as pen and paper, especially for quick sketches
Use cases:
Springpad
- Packing lists: I create a new list for each trip I take, no matter how short or long. Creating a new one is a snap nowadays, as I just copy & paste from a few existing ones and tweak as necessary.
- Travel TODOs: I keep a list of all the places I want to travel and slowly check things off as I get them done.
- Idea list: all the ideas I come up with for side projects and hackdays go into a google doc. I have over 200 ideas written down now, many of which Ive actually built, such as Resume Builder.
- Writing list: a list of things I want to write about, either in my blog or the occasional short story in my spare time.
- What I did at work: every project I do at work gets added to this list. Very useful when the annual review process rolls around, as I can just grab the list and put it straight into my self-evaluation. Also handy for updating my LinkedIn profile.
- Project TODO lists: for each long-term project, I keep a list of tasks that I need to get done. For example, I have one for the LinkedIn Engineering Blog so I can keep track of posts I need to put up and another one for the Intern Hackday site to make sure to add the necessary features as the competition draws closer.
- Long term notes: if I have notes that I need to reference for more than a few days, pen & paper no longer suffice. I transfer them into a google doc, paying the penalty of time, but gaining the assurance that Ill always be able to find the notes when I need them.
- Workout schedule: I take workouts from the Crossfit mainsite, Crossfit Football and Crossfit Endurance and plug them into a schedule thats customized for the extra strength training I do and the equipment Ill have available that day (ie, whether Ill be at Crossfit Sunnyvale or just doing something on a football field).
- Recipes: every time I learn to cook something new and complicated, I write it down. Most recently, I learned to make borscht!
- Travel itineraries: for planning and organizing trips.
- Car information: last time I had an oil change, inspections, VIN, license plate number, year, etc.
Springpad
 |
| http://www.springpadit.com |
Pros:
- Great interface for capturing webpages (bookmarks), as the browser plugins can scrape the page you are viewing, grab a thumbnail, the URL, title and description all from one click.
- Supports tags for effective organization
- Accessible on a wide variety of devices
- Agonizingly slow. Because of this, Im slowly migrating off of SpringPad and really only use it for bookmarks now.
- Buggy: the Firefox plugin sometimes randomly vanishes from the browser. Text entry and auto complete are both clunky.
- Storing bookmarks: I bookmark anything I might want later - primarily software tools and guides - and tag it. For example, the 3 web development tools and 3 more web development tools blog posts were created by just going into SpringPad, clicking "bookmarks" and selecting my "Web Developer" tag.
Google tasks
 |
| http://mail.google.com/mail/help/tasks/ |
Pros:
- Simple and easy to use
- Integrated into gmail, gcal and iPhone
- Clunky UI
- No reminders
- Unimportant or on-going tasks: since its in gmail, I know that anything I put in here will get seen very often. I often put on-going tasks in here so I get reminded of them daily.
Living Social
 |
| http://books.livingsocial.com |
Unfortunately, ever since their daily deals business got big, they stopped developing features for the "media" site, didnt fix bugs, and didnt respond to requests. Today, I found out they are shutting the whole service down - if you use it, make sure to export your data before its gone. Im pretty disappointed by this and will now have to find a new place to track all the different types of media I interact with.
Pros:
- Huge database with images and descriptions
- Decently sized user-base, including quite a few of my facebook friends
- Decent UI for adding items to your collection, tagging them and rating/reviewing them
- One place for all types of media
- The service is now dead.
- Media tracking: books, movies, tv shows, video games
GoodReads
 |
| http://www.goodreads.com/ |
A service built specifically to help you build a collection of books, both those youve already read (and optionally reviewed) as well as those you want to read. I actually used goodreads a few years ago, but switched to LivingSocial because they also had movies, tv shows, video games, etc. Now that LivingSocial is dead, I might go back to goodreads.
Pros:
- Huge database of books
- Lots of authors seem to use the site
- Good reviews and ratings from the memberbase
- UI well tuned for tracking books
- Not too many of my friends are using it
- Only tracks books
- Tracking books: reviews, to-read lists
Google calendar
 |
| https://www.google.com/calendar |
Not exactly a list, but I couldnt talk about keeping my life organized without mentioning Google Calendar. In the same way that gmail is vastly superior to every email client ever built by Microsoft or Apple, Google Calendar is head and shoulders above Exchange, Outlook, iCal, etc. All my other calendars feed into it. My phone is synced to it. My life revolves around it.
Pros:
- Clean, easy to use UI
- Very flexible reminders/alerts
- Accessible from any browser and my iPhone
- We still use exchange at work for some reason
- Scheduling: if its not on my calendar, its not happening.
Adobe Photoshop CS5 Online Training Courses with a Free 7 day Trial
Ive rounded up some excellent Photoshop CS5 online training courses from the web. These courses are self-paced, video-based training titles that you can access 24/7. And they range from beginner to advanced level training. Below, youll find video introductions for each course. And as a special promotion, our visitors can get a free 7-day trial pass to gain full access to every single course listed below.
These video training courses are from lynda.com - one of the best training sites in the web today. They have over 1000+ training courses on I.T., programming, multimedia, photography, home computing, business, and more! They get the best experts, and they come out with new training titles on a regular basis. A single membership for as little as $25 gives you one month of full access to their entire training library.
What are the benefits of taking online video training courses?
With online video training courses, you can work at your own pace from the comfort of your own home. You get to see exactly what the author is doing on his or her computer as you watch on your own screen, and you can pause and rewind to suit your desired training pace. With a lynda.com membership, you can access their training library anytime, so its much easier on your busy schedule.
 or
or 
Photoshop CS5 Essential Training
Level: Beginner
Get started with Photoshop CS5 in Photoshop CS5 Essential Training. In this Photoshop CS5 online training course, author Michael Ninness demonstrates how to produce the highest quality images with fantastic detail in the shortest amount of time, using a combination of Photoshop CS5, Adobe Bridge, and Camera Raw. This course shows the most efficient ways to perform common editing tasks, including noise reduction, shadow and highlight detail recovery, retouching, and combining multiple images. Along the way, Michael shares the secrets of non-destructive editing, utilizing and mastering Adobe Bridge, Camera Raw, layers, adjustment layers, blending modes, layer masks, and much more.
Photoshp CS5 One-on-One: Fundamentals
Level: Beginner
In Photoshop CS5 One-on-One: Fundamentals, author and Photoshop expert Deke McLelland will walk you through Photoshop as if in a classroom environment with just you and him. In this Photoshop CS5 online training course, hell teach you the essential topics - everything you need to know to get started with Photoshop. Topics include: Adobe Bridge, Zooming and Scrolling, Resolution, Cropping and Straightening Images, Color Correction, Photo Retouching, Layers, Printing, Saving for the Web, and more!
Photoshop CS5 One-on-One: Advanced
Level: Intermediate
Photoshop CS5 One-on-One: Advanced, the second part of the popular and comprehensive series, updated for CS5, follows internationally renowned Photoshop guru Deke McClelland as he dives into the workings of Photoshop. In this Photoshop CS5 online training course, he explores such digital-age wonders as the Levels and Curves commands, edge-detection filters, advanced compositing techniques, vector-based text, the Liquify filter, and Camera Raw. Deke also teaches tried-and-true methods for sharpening details, smoothing over wrinkles and imperfections, and enhancing colors without harming the original image.
Photoshop CS5 One-on-One: Mastery
Level: Advanced
In Photoshop CS5 One-on-One: Mastery, author and Photoshop expert Deke McClelland will take you through Photoshop CS5s most mysterious features - ones that you are least likely to learn through trial and error, but are also the ones that are most likely to have the most profound effect on the quality of your work. In this Photoshop CS5 online training course, youll learn how to become more efficient at Photoshop CS5, and how to make your artwork look more impeccable. Topics include: The Pen Tool, Masking, Blend Modes, Smart Objects and Smart Filters, Bristle and Mixer Brushes, HDR Pro, Recording Actions, Batch Processing Images, and more!
So if you are ready to start with these Photoshop CS5 online training courses, sign up for a lynda.com membership today. A single membership gives you access to all these courses listed above, as well as all the other 1000+ courses in the lynda.com training library.
or
Read more »
These video training courses are from lynda.com - one of the best training sites in the web today. They have over 1000+ training courses on I.T., programming, multimedia, photography, home computing, business, and more! They get the best experts, and they come out with new training titles on a regular basis. A single membership for as little as $25 gives you one month of full access to their entire training library.
What are the benefits of taking online video training courses?
With online video training courses, you can work at your own pace from the comfort of your own home. You get to see exactly what the author is doing on his or her computer as you watch on your own screen, and you can pause and rewind to suit your desired training pace. With a lynda.com membership, you can access their training library anytime, so its much easier on your busy schedule.
START LEARNING TODAY!
or ADOBE PHOTOSHOP CS5 ONLINE TRAINING COURSES
Photoshop CS5 Essential Training
Level: Beginner
Get started with Photoshop CS5 in Photoshop CS5 Essential Training. In this Photoshop CS5 online training course, author Michael Ninness demonstrates how to produce the highest quality images with fantastic detail in the shortest amount of time, using a combination of Photoshop CS5, Adobe Bridge, and Camera Raw. This course shows the most efficient ways to perform common editing tasks, including noise reduction, shadow and highlight detail recovery, retouching, and combining multiple images. Along the way, Michael shares the secrets of non-destructive editing, utilizing and mastering Adobe Bridge, Camera Raw, layers, adjustment layers, blending modes, layer masks, and much more.
Photoshop CS5 Essential Training
Click the link above to go to the course details page.
Youll find more information about the course, and some free sample videos.
Photoshp CS5 One-on-One: Fundamentals
Level: Beginner
In Photoshop CS5 One-on-One: Fundamentals, author and Photoshop expert Deke McLelland will walk you through Photoshop as if in a classroom environment with just you and him. In this Photoshop CS5 online training course, hell teach you the essential topics - everything you need to know to get started with Photoshop. Topics include: Adobe Bridge, Zooming and Scrolling, Resolution, Cropping and Straightening Images, Color Correction, Photo Retouching, Layers, Printing, Saving for the Web, and more!
Photoshop CS5 One-on-One: Fundamentals
Click the link above to go to the course details page.
Youll find more information about the course, and some free sample videos.
Photoshop CS5 One-on-One: Advanced
Level: Intermediate
Photoshop CS5 One-on-One: Advanced, the second part of the popular and comprehensive series, updated for CS5, follows internationally renowned Photoshop guru Deke McClelland as he dives into the workings of Photoshop. In this Photoshop CS5 online training course, he explores such digital-age wonders as the Levels and Curves commands, edge-detection filters, advanced compositing techniques, vector-based text, the Liquify filter, and Camera Raw. Deke also teaches tried-and-true methods for sharpening details, smoothing over wrinkles and imperfections, and enhancing colors without harming the original image.
Photoshop CS5 One-on-One: Advanced
Click the link above to go to the course details page.
Youll find more information about the course, and some free sample videos.
Photoshop CS5 One-on-One: Mastery
Level: Advanced
In Photoshop CS5 One-on-One: Mastery, author and Photoshop expert Deke McClelland will take you through Photoshop CS5s most mysterious features - ones that you are least likely to learn through trial and error, but are also the ones that are most likely to have the most profound effect on the quality of your work. In this Photoshop CS5 online training course, youll learn how to become more efficient at Photoshop CS5, and how to make your artwork look more impeccable. Topics include: The Pen Tool, Masking, Blend Modes, Smart Objects and Smart Filters, Bristle and Mixer Brushes, HDR Pro, Recording Actions, Batch Processing Images, and more!
Photoshop CS5 One-on-One: Mastery
Click the link above to go to the course details page.
Youll find more information about the course, and some free sample videos.
So if you are ready to start with these Photoshop CS5 online training courses, sign up for a lynda.com membership today. A single membership gives you access to all these courses listed above, as well as all the other 1000+ courses in the lynda.com training library.
START LEARNING TODAY!
or Tuesday, February 3, 2015
Zoom your presentations with pptPlex

pptPlex uses Plex technology to zoom in and out of slide sections and move directly between slides that are not sequential in your presentation. You can arrange all slides on a stunning canvas and can zoom in or zoom out slides during presentation besides navigating in a non-linear fashion. You need not to go slide by slide, just double click any slide thumb on the canvas and slide will appear with smooth zoom effect.
pptPlex also lets you add live content from other Office documents(Word, excel) in your PowerPoint presentations. Live content means if you have added some excel sheet and source data gets changed, your presentation will always have the updated data as will read the data from excel sheet itself.
You can download pptPlex from Microsoft labs. You would also require to download and install XPS or Save as PDF add-in in order to use pptPlex on PowerPoint 2007.
pptPlex is quite easy to use and for sure it will add some seasoning to the way you give presentations.
![Reblog this post [with Zemanta]](https://lh3.googleusercontent.com/blogger_img_proxy/AEn0k_v-FV0LR9LbJnWlkPq4S_2yOvtgN8mxXl82-njRNJk4CNVIEk9FMjAfIuWlW3JxNKSS9pVIb-U42Ma-jfL5bnDWAh9iElEMP0ctJApNdE9y40q304EqO5jv2C8gdxSGVI3klwlHjWc0u5q5sIw3NBUJ=s0-d)
Saturday, January 31, 2015
Drupal 7 Tutorials Video Training Course with Demos
Drupal is one of the most well-known and widely-used open source content management systems out there today, and it powers millions of sites and applications throughout the web. As of this posting, the latest version is Drupal 7, which was released on January 5, 2011. For those interested in learning its new features, lynda.com online tutorials has released a series of Drupal 7 tutorials. In Drupal 7 Essential Training, computer journalist Tom Geller presents a series of video tutorials that will show you how to get the most out of this powerful and robust content management system (CMS). By the end of the course, you will have learned the necessary skills that will enable you to build a website using Drupal. The course will go through the basics of how to download and install Drupal, add content and graphics to a site, change the layout and design elements, control visitor interactions, and expand the sites capabilities beyond what’s available in Drupal core. Youll also learn about established best practices to ensure that your site remains streamlined, secure, and up-to-date.
Watch these selected videos to get a good idea of the pace and flow of this course:
If you liked these videos, then go ahead and sign up for a lynda.com online tutorials membership. For $25, you get 1-month unlimited access to not just this training course, but all of Lynda.coms 900+ training courses. No long-term commitment required. You can cancel your membership at any time. And as a special promotion for visitors of this site, you can get a FREE 7-day trial pass to lynda.com. This free trial gives you access to all of their 900+ training titles so that you can see for yourself what a great learning resource this website is.
The course is 7 hours and 25 minutes in total length, and the tutorials are divided into 17 chapters. Here is a more detailed outline of the course:
Title: Drupal 7 Essential Training
Author: Tom Geller
Level: Beginner
Duration: 7hrs 25mins
Date of Release: 14 January 2011
Chapter 1: Defining Drupal
Managing content with Drupal 7
Comparing Drupal with other content management systems
Deciding whether to use Drupal
Looking at Drupal-built sites
Exploring the Drupal universe
Getting help with Drupal issues
Chapter 2: Understanding How Drupal Works
Checking Drupals requirements
Investigating Drupals inner workings
Learning Drupals basic workflow
Understanding key terms in Drupal
Touring Drupals interface
Chapter 3: Installing Drupal on Mac OS X or Windows
Installing the Acquia Drupal stack installer (DAMP)
Importing core Drupal into DAMP
Running Drupals installer on top of DAMP
Chapter 4: Installing Drupal on a Server
Uploading Drupal with SFTP
Uploading Drupal with SSH
Creating Drupals MySQL database
Running Drupals installer
Installing Drupal using Acquias Debian/Ubuntu package
Chapter 5: Controlling Drupal 7
Using the toolbar
Using the shortcut bar
Touring the administrative controls
Customizing the Dashboard
Differentiating administrator and visitor views
Chapter 6: Building a Drupal Site
Understanding nodes
Creating basic content
Changing site information, graphics, and interface
Giving visitors a way to contact you
Chapter 7: Controlling Content
Creating content summaries
Revising content
Categorizing content with tags
Going further with content categories
Publishing content via RSS
Using text formats to prevent content damage
Setting the comment policy
Managing comments
Chapter 8: Enabling Other Content Types
Adding blogs
Adding discussion groups
Adding polls
Subscribing to RSS feeds
Categorizing RSS feeds
Chapter 9: Extending Content
Creating new content types
Adding fields to content types
Exploring field types and options
Adjusting field display
Customizing field display by context
Modifying image styles
Chapter 10: Managing Users
Defining new user policies
Creating user accounts
Setting up user profiles
Defining user roles
Controlling access permissions
Canceling user accounts
Chapter 11: Changing a Sites Interface
Understanding Drupal 7 page layout
Taking advantage of block regions
Creating and modifying blocks
Selecting and installing downloaded themes
Building themes the traditional way
Chapter 12: Helping Users Find Their Way Around
Understanding Drupal 7 default menus
Creating multilevel menus
Creating easy-to-navigate books
Chapter 13: Expanding a Sites Capabilities with Modules
Installing and uninstalling modules
Configuring modules
Surveying popular modules
Enabling styled text with a WYSIWYG editor
Chapter 14: Displaying Information with Views
Understanding views
Creating views
Modifying views
Chapter 15: Administrating Drupal
Launching a Drupal site
Troubleshooting a Drupal 7 installation
Backing up and restoring a Drupal site
Updating Drupal
Deleting Drupal
Chapter 16: Going Further with Drupal
Monitoring performance
Improving administration skills
Reviewing security and permissions
Adopting best practices
Chapter 17: Developing for Drupal
Programming modules
Joining the Drupal community
So if youre ready to start with Drupal 7 Essential Training, sign-up for a lynda.com online tutorials membership today.
Read more »
Watch these selected videos to get a good idea of the pace and flow of this course:
Drupal 7 Essential Training - Welcome
Drupal 7 Essential Training - Getting a Drupal site up fast
Drupal 7 Essential Training - Deciding whether to use Drupal
Drupal 7 Essential Training - Investigating Drupals inner workings
Drupal 7 Essential Training - Understanding nodes
Drupal 7 Essential Training - Adding fields to content types
Drupal 7 Essential Training - Modifying image styles
Drupal 7 Essential Training - Selecting and installing downloaded themes
Drupal 7 Essential Training - Enabling styled text with a WYSIWYG editor
Drupal 7 Essential Training - Launching a Drupal site
If you liked these videos, then go ahead and sign up for a lynda.com online tutorials membership. For $25, you get 1-month unlimited access to not just this training course, but all of Lynda.coms 900+ training courses. No long-term commitment required. You can cancel your membership at any time. And as a special promotion for visitors of this site, you can get a FREE 7-day trial pass to lynda.com. This free trial gives you access to all of their 900+ training titles so that you can see for yourself what a great learning resource this website is.
[Get a FREE 7-day trial pass to lynda.com TODAY]
The course is 7 hours and 25 minutes in total length, and the tutorials are divided into 17 chapters. Here is a more detailed outline of the course:
Title: Drupal 7 Essential Training
Author: Tom Geller
Level: Beginner
Duration: 7hrs 25mins
Date of Release: 14 January 2011
Chapter 1: Defining Drupal
Managing content with Drupal 7
Comparing Drupal with other content management systems
Deciding whether to use Drupal
Looking at Drupal-built sites
Exploring the Drupal universe
Getting help with Drupal issues
Chapter 2: Understanding How Drupal Works
Checking Drupals requirements
Investigating Drupals inner workings
Learning Drupals basic workflow
Understanding key terms in Drupal
Touring Drupals interface
Chapter 3: Installing Drupal on Mac OS X or Windows
Installing the Acquia Drupal stack installer (DAMP)
Importing core Drupal into DAMP
Running Drupals installer on top of DAMP
Chapter 4: Installing Drupal on a Server
Uploading Drupal with SFTP
Uploading Drupal with SSH
Creating Drupals MySQL database
Running Drupals installer
Installing Drupal using Acquias Debian/Ubuntu package
Chapter 5: Controlling Drupal 7
Using the toolbar
Using the shortcut bar
Touring the administrative controls
Customizing the Dashboard
Differentiating administrator and visitor views
Chapter 6: Building a Drupal Site
Understanding nodes
Creating basic content
Changing site information, graphics, and interface
Giving visitors a way to contact you
Chapter 7: Controlling Content
Creating content summaries
Revising content
Categorizing content with tags
Going further with content categories
Publishing content via RSS
Using text formats to prevent content damage
Setting the comment policy
Managing comments
Chapter 8: Enabling Other Content Types
Adding blogs
Adding discussion groups
Adding polls
Subscribing to RSS feeds
Categorizing RSS feeds
Chapter 9: Extending Content
Creating new content types
Adding fields to content types
Exploring field types and options
Adjusting field display
Customizing field display by context
Modifying image styles
Chapter 10: Managing Users
Defining new user policies
Creating user accounts
Setting up user profiles
Defining user roles
Controlling access permissions
Canceling user accounts
Chapter 11: Changing a Sites Interface
Understanding Drupal 7 page layout
Taking advantage of block regions
Creating and modifying blocks
Selecting and installing downloaded themes
Building themes the traditional way
Chapter 12: Helping Users Find Their Way Around
Understanding Drupal 7 default menus
Creating multilevel menus
Creating easy-to-navigate books
Chapter 13: Expanding a Sites Capabilities with Modules
Installing and uninstalling modules
Configuring modules
Surveying popular modules
Enabling styled text with a WYSIWYG editor
Chapter 14: Displaying Information with Views
Understanding views
Creating views
Modifying views
Chapter 15: Administrating Drupal
Launching a Drupal site
Troubleshooting a Drupal 7 installation
Backing up and restoring a Drupal site
Updating Drupal
Deleting Drupal
Chapter 16: Going Further with Drupal
Monitoring performance
Improving administration skills
Reviewing security and permissions
Adopting best practices
Chapter 17: Developing for Drupal
Programming modules
Joining the Drupal community
[Get a FREE 7-day pass to lynda.com TODAY]
So if youre ready to start with Drupal 7 Essential Training, sign-up for a lynda.com online tutorials membership today.
Thursday, January 29, 2015
MyPhone Ocean Mini Firmware Stock ROM with mini tutorial
UPDATED this post. The previous firmware has a password, I updated the file already.
You have 50% chance to fix MyPhone Ocean Mini if "/mount data error" appears in Android System Recovery. And also if Android System Recovery is damaged.
UPDATE 2: I experience one time that when you select factory reset in android system recovery the "/mount data error" appears. Try to wipe the cache first before wiping or factory resetting the phone. This is not guaranteed to work. I had only experienced this one time.
You have 50% chance to fix MyPhone Ocean Mini if "/mount data error" appears in Android System Recovery. And also if Android System Recovery is damaged.
UPDATE 2: I experience one time that when you select factory reset in android system recovery the "/mount data error" appears. Try to wipe the cache first before wiping or factory resetting the phone. This is not guaranteed to work. I had only experienced this one time.
UPDATE 3: if you encounter S_BROM error, you should format first your phone or select Format All+Dowload in the latest version of Flashtool. Load first the scatter file before proceeding. I encountered one time that if you ever encounter the BROM error after you successfully the phone it will stuck up in MyPhone Logo only. If this happen hard reset your phone or flash the phone (download only)

VCOM Driver -->VCOM Manual
SPFlashTool --> SPFlashTool
SPFlashTool --> LatestVersion
"Extract the files to your desired folder" See picture below"
"If you encounter an error in Flashtool, use different version of it"

Installing Driver
When installing it manually your phone must be turned off, then connect it to your computer/laptop while pressing VOLUME UP or VOLUME DOWN. This will detect and look for the driver.

1. This is the first time that you will connect your phone and it will search for the correct driver. You can connect your phone without battery in it.


3. If the driver is successfully installed MediaTek DA USB VCOM will appear in the New Hardware Wizard.
Reference Video Installing the Driver (watch it in HD)
Reference Video Flashing your phone (watch it in HD)
Video Flashing your phone (please watch in HD)
Flashing
1. Launch FlashTool
2. Click on Scatter-Loading, and load your scatter file. (see example below with loaded file in Flash Tool


3. After you load the file, press F9 or Press Download to Flash your Phone.
4. If Download is not possible, you can press Firmware Upgrade.
5. After you press Download or Firmware Upgrade re-insert your battery and connect your Phone to the PC. Press Volume Down or Volume Up while connecting to PC.
"Hard reset your phone after flashing"
I hope this tutorial help you. Please drop a comment if something is not clear to you.
Subscribe to:
Posts (Atom)