Showing posts with label tutorial. Show all posts
Showing posts with label tutorial. Show all posts
Thursday, February 5, 2015
Android beginner tutorial Part 2 Creating a project in Eclipse
Today well learn how to create Android projects in Eclipse.
Launch the Eclipse IDE with Android SDK built in. It will ask you to perform some one-time tasks, such as create a workspace on your hard drive.
When thats done, we can start creating our first application. To begin creating a new Android project, select File > New > Android Application Project.
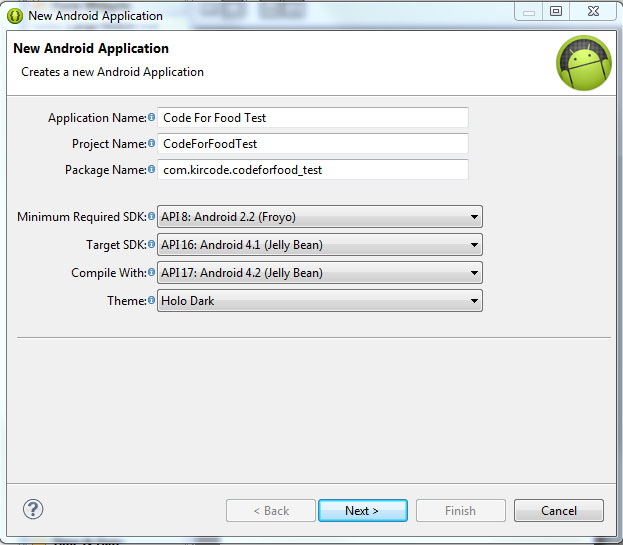
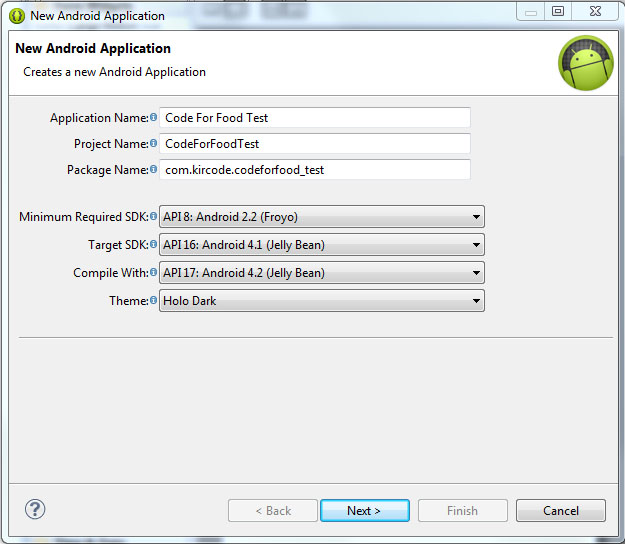
A dialog box pops up, which requires us to fill out some of the general settings for our future application. The first field is called "Application Name". This is the title of your application - it appears as the name of your app in the Play Store, Manage Applications screen, etc.
The second field is called Project Name. Unlike Application Name, this isnt shown to anyone but the developer when using Eclipse. Usually, the Application Name and Project Name are the same.
The third field is called Package Name. This is basically the id of your application - usually its not shown to the user, but it is required to stay the same for all of the versions of your application. This is similar to ids in Adobe AIR descriptor files. The format is the same as packages in AS3, for example - com.kircode.codeforfood_test
Then we are required to select Minimum Required SDK. This is basically the Android version that is required to run your application. Keep in mind that the lower the version is, the bigger your audience is, but your application wont be able to use some of the newer SDK features. It is recommended to set this value to API 8, this way, according to Android development center, youre targeting 95% of the users. Thats good enough.
The next field is Target SDK. Set this to the highest API version that your application will run on. This value informs the system that the application has been tested on this API and is supposed to work without the sytem having to do any compatibility processes. If youre unsure what to select here, pick one of the modern versions - this way your application wont look dated and will still be compatible with older versions (up to Minimum Required SDK).
The next field is Compile With. This is the API version that the application will be compiled with. If the default value isnt the most recent version, its recommended to pick that.
And finally theres Theme. Pick the color theme that will suit your application. You will, of course, be able to customize every element of your application manually if you want, but choosing a Theme here is a good alternative too.
Hit next, and you should be taken to the next configuration step. Here youll see a few check boxes and fields. The first checkbox, "Create custom launcher icon", can be selected if you want to create a custom icon for your application. I do! So I always have this checked.
The next checkbox is "Create activity". Check this, because we want to generate ourselves an Activity. I will explain what an Activity is in details a bit later.
This isnt going to be a library, so dont check "Mark this project as a library". If you have "Create Project in Workspace" checked, the application project folder will be created in the workspace that you defined when you first launched Eclipse. If its unchecked, youll be able to set a custom location for your project. I think its nice to keep things organized and all development projects should be in the development workspace, so I leave this checked.
The next part consists of a checkbox and a selection menu. Its labeled as "Working sets" and the checkbox asks us if we want to add our project to a working set. Working sets are basically groups of projects that are displayed together in the menu when youre working on one of those projects. This is a useful feature and might come in handy when working on multiple applications of the same sort, or of the same purpose, or grouped together for some other reason. Right now we dont want to include our projects in any working sets.
Hit next. We can now set a Launcher Icon for our application. If you have an image ready for that, you can import it here. You can create a new icon using any of the preset clipart images or enter some text to act as an icon. You have several other tools in this window to style your icon.

Click next, and now were asked to choose what kind of activity we want to create. Now, simply put, an Activity is a window in Android. You probably know that there arent really any windows in Android at all, except for some dialog boxes, and thats true. But the way Activities behave are similar to windows in computer operating systems. For example, if we launch a game on Android, we are first taken to the main menu screen. This is an Activity. If we click "play", the game itself launches where we can actually play it. This is another Activity. It should be noted that if we didnt purposefully close the previous (main menu) activity when launching the game, it doesnt close. The main menu is still there, under the game, not visible to the user, just "sleeping" and waiting to be opened again.
The Activities have a complex life cycle, which I will explain in later tutorials. For now, you just need to understand that an Activity is a single screen that contains some content, it can be opened, paused, stopped, etc.
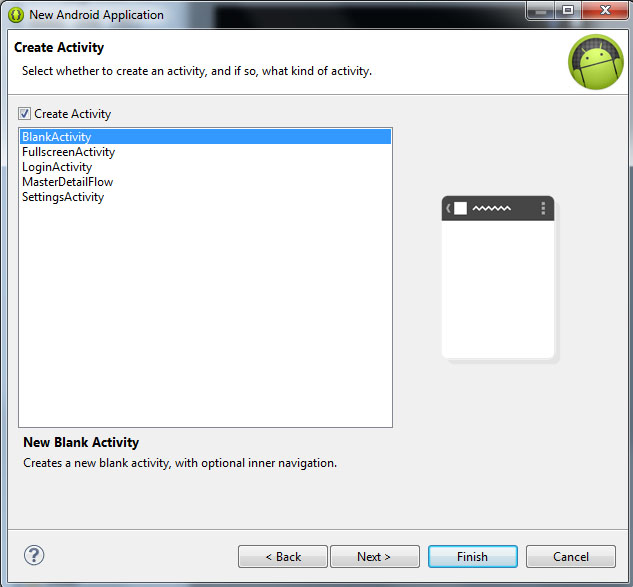
So right now were on the Create Activity screen, with 5 available activity types - BlankActivity, FullscreenActivity, LoginActivity, MasterDetailFlow and SettingsActivity. Think of these as of templates.
The BlankActivity is a blank page that we can fill with content.
The FullscreenActivity is a blank page also, but it hides all the UI elements of the device. This is probably most suited for games and video applications.
The LoginActivity is a simple template used for registering or logging in using email and password.
The MasterDetailFlow is a template that has a menu and a content area. It should be noted that the template is displayed differently on tablets and phones (it creates 2 columns on bigger screens where possible, and 1 column on smaller screens).
The SettingsActivity is a simple page with UI components lined up like in the settings screen of your device.
Pick BlankActivity and click Next.
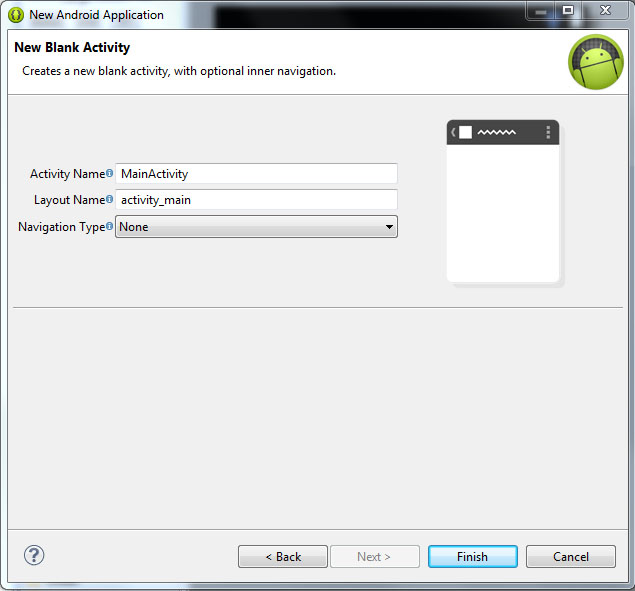
Here we are asked to set the Activity Name, Layout Name and Navigation Type for our main Activity. Leave their values as they are by default - MainActivity, activity_main and None. The names are basically for the developer to remember which Activity is which. The Navigation Type dropdown box lets you select a default navigation method for your Activity. There are multiple nice and useful pre-set navigation features here, but well leave this field None for our first project.
Click Finish, wait, and youre done!
Well continue next time!
Thanks for reading!
Read more »
Launch the Eclipse IDE with Android SDK built in. It will ask you to perform some one-time tasks, such as create a workspace on your hard drive.
When thats done, we can start creating our first application. To begin creating a new Android project, select File > New > Android Application Project.
A dialog box pops up, which requires us to fill out some of the general settings for our future application. The first field is called "Application Name". This is the title of your application - it appears as the name of your app in the Play Store, Manage Applications screen, etc.
The second field is called Project Name. Unlike Application Name, this isnt shown to anyone but the developer when using Eclipse. Usually, the Application Name and Project Name are the same.
The third field is called Package Name. This is basically the id of your application - usually its not shown to the user, but it is required to stay the same for all of the versions of your application. This is similar to ids in Adobe AIR descriptor files. The format is the same as packages in AS3, for example - com.kircode.codeforfood_test
Then we are required to select Minimum Required SDK. This is basically the Android version that is required to run your application. Keep in mind that the lower the version is, the bigger your audience is, but your application wont be able to use some of the newer SDK features. It is recommended to set this value to API 8, this way, according to Android development center, youre targeting 95% of the users. Thats good enough.
The next field is Target SDK. Set this to the highest API version that your application will run on. This value informs the system that the application has been tested on this API and is supposed to work without the sytem having to do any compatibility processes. If youre unsure what to select here, pick one of the modern versions - this way your application wont look dated and will still be compatible with older versions (up to Minimum Required SDK).
The next field is Compile With. This is the API version that the application will be compiled with. If the default value isnt the most recent version, its recommended to pick that.
And finally theres Theme. Pick the color theme that will suit your application. You will, of course, be able to customize every element of your application manually if you want, but choosing a Theme here is a good alternative too.
Hit next, and you should be taken to the next configuration step. Here youll see a few check boxes and fields. The first checkbox, "Create custom launcher icon", can be selected if you want to create a custom icon for your application. I do! So I always have this checked.
The next checkbox is "Create activity". Check this, because we want to generate ourselves an Activity. I will explain what an Activity is in details a bit later.
This isnt going to be a library, so dont check "Mark this project as a library". If you have "Create Project in Workspace" checked, the application project folder will be created in the workspace that you defined when you first launched Eclipse. If its unchecked, youll be able to set a custom location for your project. I think its nice to keep things organized and all development projects should be in the development workspace, so I leave this checked.
The next part consists of a checkbox and a selection menu. Its labeled as "Working sets" and the checkbox asks us if we want to add our project to a working set. Working sets are basically groups of projects that are displayed together in the menu when youre working on one of those projects. This is a useful feature and might come in handy when working on multiple applications of the same sort, or of the same purpose, or grouped together for some other reason. Right now we dont want to include our projects in any working sets.
Hit next. We can now set a Launcher Icon for our application. If you have an image ready for that, you can import it here. You can create a new icon using any of the preset clipart images or enter some text to act as an icon. You have several other tools in this window to style your icon.
Click next, and now were asked to choose what kind of activity we want to create. Now, simply put, an Activity is a window in Android. You probably know that there arent really any windows in Android at all, except for some dialog boxes, and thats true. But the way Activities behave are similar to windows in computer operating systems. For example, if we launch a game on Android, we are first taken to the main menu screen. This is an Activity. If we click "play", the game itself launches where we can actually play it. This is another Activity. It should be noted that if we didnt purposefully close the previous (main menu) activity when launching the game, it doesnt close. The main menu is still there, under the game, not visible to the user, just "sleeping" and waiting to be opened again.
The Activities have a complex life cycle, which I will explain in later tutorials. For now, you just need to understand that an Activity is a single screen that contains some content, it can be opened, paused, stopped, etc.
So right now were on the Create Activity screen, with 5 available activity types - BlankActivity, FullscreenActivity, LoginActivity, MasterDetailFlow and SettingsActivity. Think of these as of templates.
The BlankActivity is a blank page that we can fill with content.
The FullscreenActivity is a blank page also, but it hides all the UI elements of the device. This is probably most suited for games and video applications.
The LoginActivity is a simple template used for registering or logging in using email and password.
The MasterDetailFlow is a template that has a menu and a content area. It should be noted that the template is displayed differently on tablets and phones (it creates 2 columns on bigger screens where possible, and 1 column on smaller screens).
The SettingsActivity is a simple page with UI components lined up like in the settings screen of your device.
Pick BlankActivity and click Next.
Here we are asked to set the Activity Name, Layout Name and Navigation Type for our main Activity. Leave their values as they are by default - MainActivity, activity_main and None. The names are basically for the developer to remember which Activity is which. The Navigation Type dropdown box lets you select a default navigation method for your Activity. There are multiple nice and useful pre-set navigation features here, but well leave this field None for our first project.
Click Finish, wait, and youre done!
Well continue next time!
Thanks for reading!
Tuesday, February 3, 2015
Android beginner tutorial Part 25 RatingBar widget
Today we will learn about a widget called RatingBar.
The RatingBar class is a subcless of ProgressBar and is on the same level as SeekBar. It displays several stars that the user can drag on (similarly to SeekBar) to set a rating value. The number of stars, initial rating, step size and more settings like that are customizable both using xml and java.
Go to activity_main.xml layout file of your testing application and create a simple layout with a TextView and a RatingBar.
Now go to the MainActivity.java class file. Here we will do two things - set the settings for our RatingBar and add an event listener, which changes the TextViews value when the rating is changed.
First, implement an OnRatingBarChangeListener interface in the class definition line:
Then declare 2 variables - RatingBar and TextView:
Then, inside the onCreate() function, set the values of ratingBar and textView objects to our "rating" and "text" objects in the layout. Set the amount of stars, the step size and default rating for the RatingBar object using setNumStars(), setStepSize() and setRating() methods.
After that, set the text of our TextView to display the current rating. Add an event listener to the RatingBar instance using setOnRatingBarChangeListener() method.
Note that you can also use decimal values in setStepSize() and setRating() method parameters. If you do so, put (float) before the number values so that the compiler understands these as float type values (because the methods expect floats).
Then create a function called onRatingChanged() and handle the event by updating the TextViews value:
Full class code:
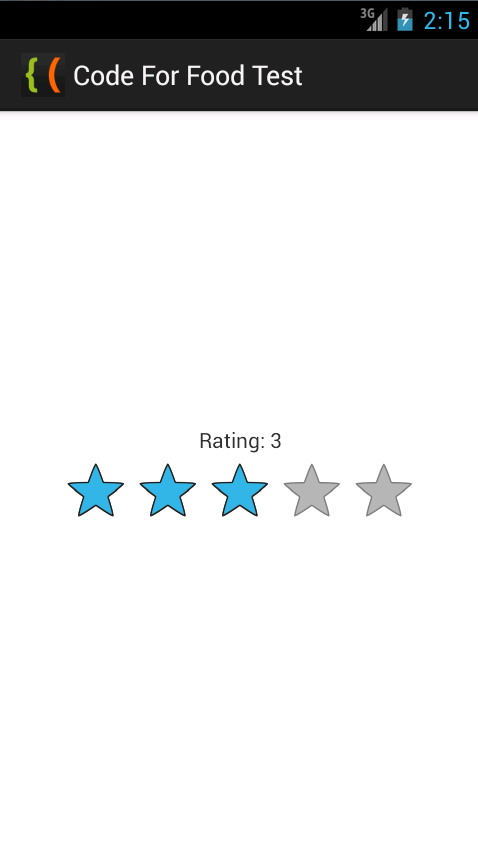
The results look like this if you test the application:
Thats all for today.
Thanks for reading!
Read more »
The RatingBar class is a subcless of ProgressBar and is on the same level as SeekBar. It displays several stars that the user can drag on (similarly to SeekBar) to set a rating value. The number of stars, initial rating, step size and more settings like that are customizable both using xml and java.
Go to activity_main.xml layout file of your testing application and create a simple layout with a TextView and a RatingBar.
<LinearLayout xmlns:android="http://schemas.android.com/apk/res/android"
    xmlns:tools="http://schemas.android.com/tools"
    android:layout_width="match_parent"
    android:layout_height="match_parent"
    android:orientation="vertical"
    android:gravity="center"
    tools:context=".MainActivity" >

    <TextView android:id="@+id/text"
        android:layout_width="match_parent"
        android:layout_height="wrap_content"
        android:gravity="center"
        />

    <RatingBar
        android:id="@+id/rating"
        android:layout_width="wrap_content"
        android:layout_height="wrap_content"/>

</LinearLayout>
Now go to the MainActivity.java class file. Here we will do two things - set the settings for our RatingBar and add an event listener, which changes the TextViews value when the rating is changed.
First, implement an OnRatingBarChangeListener interface in the class definition line:
public class MainActivity extends Activity implements OnRatingBarChangeListener{
Then declare 2 variables - RatingBar and TextView:
private RatingBar ratingBar;
private TextView textView;
Then, inside the onCreate() function, set the values of ratingBar and textView objects to our "rating" and "text" objects in the layout. Set the amount of stars, the step size and default rating for the RatingBar object using setNumStars(), setStepSize() and setRating() methods.
After that, set the text of our TextView to display the current rating. Add an event listener to the RatingBar instance using setOnRatingBarChangeListener() method.
@Override
protected void onCreate(Bundle savedInstanceState) {
super.onCreate(savedInstanceState);
setContentView(R.layout.activity_main);

ratingBar = (RatingBar)findViewById(R.id.rating);
textView = (TextView)findViewById(R.id.text);

ratingBar.setNumStars(5);
ratingBar.setStepSize(1);
ratingBar.setRating(3);

textView.setText("Rating: " + ratingBar.getProgress());
ratingBar.setOnRatingBarChangeListener(this);
}
Note that you can also use decimal values in setStepSize() and setRating() method parameters. If you do so, put (float) before the number values so that the compiler understands these as float type values (because the methods expect floats).
Then create a function called onRatingChanged() and handle the event by updating the TextViews value:
@Override
public void onRatingChanged(RatingBar rb, float rating, boolean fromUser){
textView.setText("Rating: " + ratingBar.getProgress());
}
Full class code:
package com.kircode.codeforfood_test;

import android.app.Activity;
import android.os.Bundle;
import android.view.Menu;
import android.widget.RatingBar;
import android.widget.RatingBar.OnRatingBarChangeListener;
import android.widget.TextView;

public class MainActivity extends Activity implements OnRatingBarChangeListener{

private RatingBar ratingBar;
private TextView textView;

@Override
protected void onCreate(Bundle savedInstanceState) {
super.onCreate(savedInstanceState);
setContentView(R.layout.activity_main);

ratingBar = (RatingBar)findViewById(R.id.rating);
textView = (TextView)findViewById(R.id.text);

ratingBar.setNumStars(5);
ratingBar.setStepSize(1);
ratingBar.setRating(3);

textView.setText("Rating: " + ratingBar.getProgress());
ratingBar.setOnRatingBarChangeListener(this);
}

@Override
public void onRatingChanged(RatingBar rb, float rating, boolean fromUser){
textView.setText("Rating: " + ratingBar.getProgress());
}

@Override
public boolean onCreateOptionsMenu(Menu menu) {
// Inflate the menu; this adds items to the action bar if it is present.
getMenuInflater().inflate(R.menu.activity_main, menu);
return true;
}

}
The results look like this if you test the application:
Thats all for today.
Thanks for reading!
Saturday, January 31, 2015
Android beginner tutorial Part 81 RingtonePreference
In this part we will learn how to create and handle a RingtonePreference object.
A RingtonePreference is a settings item that lets the user pick a ringtone from their system. The selected ringtones URI address is saved in the preferences file, which can then be used by the application.
Firstly go to preferences.xml file and add a new RingtonePreference object. The attributes were going to set are android:key, android:title, android:summary, android:showDefault and android:showSilent. The first 3 were already used and explained in the previous tutorials, the last 2 are boolean values that determine whether the ringtone list should display the options to select default ringtone or set ringtone to silent.
So far the preferences.xml file looks like this:
Heres the updated strings.xml file with the new string values:
In the onResume() function of MainActivity.java, add a line that displays the URI of the ringtone:
Full class code looks like this:
And thats it. If you test your application now, youll see that theres a new preference item in the settings of your application.
The ringtone list lets you preview and select from default ringtones as well as the music library.
Thats all for today!
Thanks for reading!
Read more »
A RingtonePreference is a settings item that lets the user pick a ringtone from their system. The selected ringtones URI address is saved in the preferences file, which can then be used by the application.
Firstly go to preferences.xml file and add a new RingtonePreference object. The attributes were going to set are android:key, android:title, android:summary, android:showDefault and android:showSilent. The first 3 were already used and explained in the previous tutorials, the last 2 are boolean values that determine whether the ringtone list should display the options to select default ringtone or set ringtone to silent.
    <RingtonePreference
        android:key="pref_tone"
        android:title="@string/pref_tone"
        android:summary="@string/pref_tone_summ"
        android:showDefault="true"
        android:showSilent="true"/>
So far the preferences.xml file looks like this:
<?xml version="1.0" encoding="utf-8"?>
<PreferenceScreen xmlns:android="http://schemas.android.com/apk/res/android">
    <CheckBoxPreference
        android:key="pref_mute"
        android:title="@string/pref_mute"
        android:summary="@string/pref_mute_summ"
        android:defaultValue="false" />
    <EditTextPreference
        android:key="pref_textsize"
        android:title="@string/pref_textsize"
        android:dialogTitle="@string/pref_textsize_descr"
        android:summary="@string/pref_textsize_summ"
        android:defaultValue="14" />
    <ListPreference
        android:key="pref_theme"
        android:title="@string/pref_theme"
        android:dialogTitle="@string/pref_theme_descr"
        android:summary="@string/pref_theme_summ"
        android:entries="@array/theme_colors"
        android:entryValues="@array/theme_colors"
        android:defaultValue="Blue" />
    <RingtonePreference
        android:key="pref_tone"
        android:title="@string/pref_tone"
        android:summary="@string/pref_tone_summ"
        android:showDefault="true"
        android:showSilent="true"/>
</PreferenceScreen>
Heres the updated strings.xml file with the new string values:
<?xml version="1.0" encoding="utf-8"?>
<resources>

    <string name="app_name">CodeForFood Test Two</string>
    <string name="pref_mute">Mute</string>
    <string name="pref_mute_summ">Disable all the sound in the application</string>
    <string name="pref_textsize">Text size</string>
    <string name="pref_textsize_descr">Enter text size</string>
    <string name="pref_textsize_summ">Set text size of the interface</string>
    <string name="pref_theme">Theme</string>
    <string name="pref_theme_descr">Pick a color</string>
    <string name="pref_theme_summ">Set the applications color theme</string>
    <string name="pref_tone">Ringtone</string>
    <string name="pref_tone_summ">Set ringtone</string>
    <string name="menu_settings">Settings</string>
    <string name="clear_settings">Reset settings</string>

</resources>
In the onResume() function of MainActivity.java, add a line that displays the URI of the ringtone:
Toast.makeText(this, "Ringtone: " + prefs.getString("pref_tone", "none"), Toast.LENGTH_SHORT).show();
Full class code looks like this:
package com.example.codeforfoodtest_two;

import android.app.Activity;
import android.content.Intent;
import android.content.SharedPreferences;
import android.content.SharedPreferences.Editor;
import android.os.Bundle;
import android.preference.PreferenceManager;
import android.view.Menu;
import android.view.MenuItem;
import android.view.View;
import android.view.View.OnClickListener;
import android.widget.Button;
import android.widget.Toast;

public class MainActivity extends Activity{

static final int IDM_SETTINGS = 101;
public SharedPreferences prefs;

@Override
protected void onCreate(Bundle savedInstanceState) {
super.onCreate(savedInstanceState);
setContentView(R.layout.activity_main);

Button btn_clear = (Button)findViewById(R.id.clearButton);
btn_clear.setOnClickListener(new OnClickListener() {

@Override
public void onClick(View arg0) {
Editor editor = prefs.edit();
editor.clear();
editor.commit();
onResume();
}
});
}

@Override
public void onResume(){
prefs = PreferenceManager.getDefaultSharedPreferences(this);
if(prefs.getBoolean("pref_mute", false)){
Toast.makeText(this, "Muted!", Toast.LENGTH_SHORT).show();
}else{
Toast.makeText(this, "Not muted!", Toast.LENGTH_SHORT).show();
}
Toast.makeText(this, "Text size: " + prefs.getString("pref_textsize", "14"), Toast.LENGTH_SHORT).show();
Toast.makeText(this, "Theme color: " + prefs.getString("pref_theme", "Blue"), Toast.LENGTH_SHORT).show();
Toast.makeText(this, "Ringtone: " + prefs.getString("pref_tone", "none"), Toast.LENGTH_SHORT).show();

super.onResume();
}

@Override
public boolean onCreateOptionsMenu(Menu menu){
menu.add(Menu.NONE, IDM_SETTINGS, Menu.NONE, R.string.menu_settings);
return(super.onCreateOptionsMenu(menu));
}

@Override
public boolean onOptionsItemSelected(MenuItem item){
if(item.getItemId()==IDM_SETTINGS){
Intent intent = new Intent();
intent.setClass(this, TestPreferences.class);
startActivity(intent);
}
return true;
}
}
And thats it. If you test your application now, youll see that theres a new preference item in the settings of your application.
The ringtone list lets you preview and select from default ringtones as well as the music library.
Thats all for today!
Thanks for reading!
Thursday, January 29, 2015
MyPhone Ocean Mini Firmware Stock ROM with mini tutorial
UPDATED this post. The previous firmware has a password, I updated the file already.
You have 50% chance to fix MyPhone Ocean Mini if "/mount data error" appears in Android System Recovery. And also if Android System Recovery is damaged.
UPDATE 2: I experience one time that when you select factory reset in android system recovery the "/mount data error" appears. Try to wipe the cache first before wiping or factory resetting the phone. This is not guaranteed to work. I had only experienced this one time.
UPDATE 3: if you encounter S_BROM error, you should format first your phone or select Format All+Dowload in the latest version of Flashtool. Load first the scatter file before proceeding. I encountered one time that if you ever encounter the BROM error after you successfully the phone it will stuck up in MyPhone Logo only. If this happen hard reset your phone or flash the phone (download only)
VCOM Driver -->VCOM Manual
SPFlashTool --> SPFlashTool
SPFlashTool --> LatestVersion
"Extract the files to your desired folder" See picture below"
"If you encounter an error in Flashtool, use different version of it"

Installing Driver
When installing it manually your phone must be turned off, then connect it to your computer/laptop while pressing VOLUME UP or VOLUME DOWN. This will detect and look for the driver.

1. This is the first time that you will connect your phone and it will search for the correct driver. You can connect your phone without battery in it.


3. If the driver is successfully installed MediaTek DA USB VCOM will appear in the New Hardware Wizard.
Reference Video Installing the Driver (watch it in HD)
Reference Video Flashing your phone (watch it in HD)
Video Flashing your phone (please watch in HD)
Flashing
1. Launch FlashTool
2. Click on Scatter-Loading, and load your scatter file. (see example below with loaded file in Flash Tool


3. After you load the file, press F9 or Press Download to Flash your Phone.
4. If Download is not possible, you can press Firmware Upgrade.
5. After you press Download or Firmware Upgrade re-insert your battery and connect your Phone to the PC. Press Volume Down or Volume Up while connecting to PC.
"Hard reset your phone after flashing"
I hope this tutorial help you. Please drop a comment if something is not clear to you.
Tuesday, January 27, 2015
Bootstrap Forms Tutorial
Hai everyone today i will show how to create forms using Bootstrap. Twitter Bootstrap is a best front-end framework for developing and designing web applications. Using bootstrap we can easily design the web pages without any designing knowledge, it makes developing css much faster, it is less weight and very helpfull to web designers. I used bootstrap for creating stylish forms, buttons, grids and everything according to your need. First of all download the twitter bootstrap form the official website :[ http://getbootstrap.com/ ] and go to dist folder it will contains js, css, fonts folder.

In this tutorial i have included the bootstrap v.3.0.3 and i have designed textbox, textarea, select,
checkbox, button and added characters to form fields everything using bootstrap.
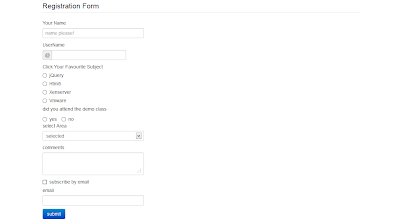
Screenshot
Copy the below code in notepad and save it as .html file or .jsp file (server side technology) and include the exact path of bootstrap.min.css file. If any doubt leave a comment.
Source code
<!doctype html>
<html>
<head>
<meta charset="utf-8">
<title>Twitter Bootstrap Forms</title>
<meta name="viewport" content="width=device-width, initial-scale=1.0">
<link href="css/bootstrap.min.css" rel="stylesheet" type="text/css"/>
</head>
<body>
<div class="container">
<div class="row">
<div class="span12">
<form>
<fieldset>
<legend>Registration Form</legend>
<label>Your Name</label>
<input type="text" name="name" class="span4" placeholder="name please!">
<label>UserName</label>
<div class="input-prepend">
<span class="add-on">@</span><input type="text" name="twitter" class="span3">
</div>
<label>Click Your Favourite Subject</label>
<label class="radio"><input type="radio" name="subject" value="html5">jQuery
</label>
<label class="radio"><input type="radio" name="subject" value="css3">Html5
</label>
<label class="radio"><input type="radio" name="subject" value="jQuery">Xenserver
</label>
<label class="radio"><input type="radio" name="subject" value="javascript">
Vmware</label>
<label>did you attend the demo class</label>
<label class="radio inline">
<input type="radio" name="studywithdemo" value="yes">yes
</label>
<label class="radio inline">
<input type="radio" name="studywithdemo" value="no">no
</label>
<label>select</label>
<select name="continent" size="1" class="span4">
<option selected>selected</option>
<option value="a">Hyderabad</option>
<option value="b">Vijayawada</option>
<option value="c">Bangalore</option>
<option value="d">Bhimavaram</option>
</select>
<label>comments</label>
<textarea name="comments" class="span4"></textarea>
<label class="checkbox"><input type="checkbox" name="subscribe" value="html5">
subscribe by email</label>
<label>email</label>
<input type="text" name="email" class="span4">
<p><button type="submit" class="btn btn-primary">submit</button></p>
</fieldset>
</form>
</div>
</div>
</div>
</body>
</html>
Monday, January 26, 2015
Hibernate Beginners Tutorial
This simple tutorial specially for beginners of Hibernate and who are planing to use NetBeans IDE for their Hibernate project.
Hibernate is an object-relational mapping (ORM) library for the Java language. In this tutorial Im going to illustrate how we can easily map java objects with relational database using Hibernate. I have used NetBeans IDE for this task because complete version of NetBeans comes with all the tools needed. No additional downloads. First you need to download NetBeans and MySQL server
- Download NetBeans (Download NetBeans bundle with all packs)
- Download MySQL Server (Note : You can also use WAMP Server or any other server environment with MySQL if you like)
To complete this tutorial we need MySQL server & NetBeans installed. I have used MySQL server 5.5 & NetBeans 7.1.
First we have to create a database. I have a simple MySQL database with single table. Im going to use that database for the tutorial.
Here are the codes for create the database. You can use this database or your own database.
1. Create the database
1.1 Create table customers
2. Creating the java program
2.1. Create new java application.
File > New project > Java > Java Application > Next
Name it as HibernateTest. Then click Finish to create the project.
2.2. Create a POJO class
Hibernate use java classes to map to the relational databases. These classes are called POJO(Plain Old Java Objects) classes. Here we are going to create a POJO class
Right click the package (hibernatetest) & select New > Java Class
Name it as Customer. Click Finish to create the class.(Dont change the main class)
We have to use variables to map with the database columns.
Here is the code for POJO class
To generate getters and setters easily in NetBeans, right click on the code and select Insert Code Then choose Getter... or Setter...
Variable customerName will map with the name column of the customers table.
Variable customerID will map with the C_ID column of the customers table. It is integer & auto incremented. So POJO class variable also should be int.
Variable customerAddress will map with the address column of the customers table.
Variable customerEmail will map with the email column of the customers table.
Then we have to connect to the database we have already created. In my case it is retailer.
(Before doing this we have to connect NetBeans with MySQL)
(Afret connecting NetBeans with MySQL start the server.)
Select Services tab lying next to the Projects tab.
Expand Databases. Expand MySQL Server. There we can see the all databases on MySQL sever

Right click the database retailer. Select Connect...
3. Creating the configuration XML
Hibernate need a configuration file to create the connection.
Right click package hibernatetest select New > Other > Hibernate > Hibernate Configuration Wizard Click Next
In next window click the drop down menu of Database Connection and select retailer database connection.

Click Finish to create the file.
Here is the complete code for configuration file.
Line 13 :
<mapping resource="customersmapping.hbm.xml"/>
My configuration and mapping documents are in the same package. If they are not in the same package we have to use packagename.mapping document name.hbm.xml
4. Creating the mapping file
Mapping file will map relevant java object with relevant database table column.
Right click project select New > Other > Hibernate > Hibernate Mapping Wizard click Next name it as customersmapping.hbm click Next
Next window we have to select Class to Map and Database Table.
Select a class to map


After selecting correct class click OK
Select Database Table
Click drop down list and select the table you want to map.
Code for mapping file.
Here
Line 2 :
<class name="hibernatetest.Customer" table="customers">
class name = packagename.classname
table = table we are going to map with java class
Line 3 & 4 :
<id column="C_ID" name="customerID" type="int">
<generator class="native">
id column = primary key column of the table
name = variable name of the POJO class which maps with the primary key of the table
type = type of the primary key
generator class = if you are using auto increment primary key use "native" other vice it should be "assigned"
Line 6 & 7 :
<property name="customerName">
<column name="name">
property name = variable name of the POJO class
column name = database column that maps with previous variable
To populate the database you can use this sample code.
Part of the output.

To retreave values we have to use HQL statements.
Here is a sample code for retrieve values from the table where customer id = 2
Customer = class name
customers = table name
customers.customerID = table name.javavariable name
Result :

You can download sample project here
Password : hibernatetest
If you find this post helpful dont forget to leave a comment. Your comments always encourage me to write more!
Read more »
Hibernate is an object-relational mapping (ORM) library for the Java language. In this tutorial Im going to illustrate how we can easily map java objects with relational database using Hibernate. I have used NetBeans IDE for this task because complete version of NetBeans comes with all the tools needed. No additional downloads. First you need to download NetBeans and MySQL server
- Download NetBeans (Download NetBeans bundle with all packs)
- Download MySQL Server (Note : You can also use WAMP Server or any other server environment with MySQL if you like)
To complete this tutorial we need MySQL server & NetBeans installed. I have used MySQL server 5.5 & NetBeans 7.1.
First we have to create a database. I have a simple MySQL database with single table. Im going to use that database for the tutorial.
Here are the codes for create the database. You can use this database or your own database.
1. Create the database
CREATE DATABASE retailer;
1.1 Create table customers
CREATE TABLE customers(
name varchar(20),
C_ID int NOT NULL AUTO_INCREMENT,
address  varchar(20),
email varchar(50),
PRIMARY KEY(C_ID)
);
2. Creating the java program
2.1. Create new java application.
File > New project > Java > Java Application > Next
Name it as HibernateTest. Then click Finish to create the project.
2.2. Create a POJO class
Hibernate use java classes to map to the relational databases. These classes are called POJO(Plain Old Java Objects) classes. Here we are going to create a POJO class
Right click the package (hibernatetest) & select New > Java Class
Name it as Customer. Click Finish to create the class.(Dont change the main class)
We have to use variables to map with the database columns.
Here is the code for POJO class
package hibernatetest;

/**
 *
 * @author Chathura
 */
public class Customer {
    private String customerName;
    private int customerID;
    private String customerAddress;
    private String customerEmail;

    public void setCustomerAddress(String customerAddress) {
        this.customerAddress = customerAddress;
    }

    public void setCustomerEmail(String customerEmail) {
        this.customerEmail = customerEmail;
    }

    public void setCustomerID(int customerID) {
        this.customerID = customerID;
    }

    public void setCustomerName(String customerName) {
        this.customerName = customerName;
    }

    public String getCustomerAddress() {
        return customerAddress;
    }

    public String getCustomerEmail() {
        return customerEmail;
    }

    public int getCustomerID() {
        return customerID;
    }

    public String getCustomerName() {
        return customerName;
    }
}
To generate getters and setters easily in NetBeans, right click on the code and select Insert Code Then choose Getter... or Setter...
Variable customerName will map with the name column of the customers table.
Variable customerID will map with the C_ID column of the customers table. It is integer & auto incremented. So POJO class variable also should be int.
Variable customerAddress will map with the address column of the customers table.
Variable customerEmail will map with the email column of the customers table.
Then we have to connect to the database we have already created. In my case it is retailer.
(Before doing this we have to connect NetBeans with MySQL)
(Afret connecting NetBeans with MySQL start the server.)
Select Services tab lying next to the Projects tab.
Expand Databases. Expand MySQL Server. There we can see the all databases on MySQL sever
Right click the database retailer. Select Connect...
3. Creating the configuration XML
Hibernate need a configuration file to create the connection.
Right click package hibernatetest select New > Other > Hibernate > Hibernate Configuration Wizard Click Next
In next window click the drop down menu of Database Connection and select retailer database connection.
Click Finish to create the file.
Here is the complete code for configuration file.
Highlighted lines 5 and 6 configure the database password and username. Replace those properties according to your database.
    com.mysql.jdbc.Driver
    jdbc:mysql://localhost:3306/retailer
    root
    chathura
    10
    org.hibernate.dialect.MySQLDialect
    thread
    org.hibernate.cache.NoCacheProvider
    true
    update
Line 13 :
<mapping resource="customersmapping.hbm.xml"/>
My configuration and mapping documents are in the same package. If they are not in the same package we have to use packagename.mapping document name.hbm.xml
4. Creating the mapping file
Mapping file will map relevant java object with relevant database table column.
Right click project select New > Other > Hibernate > Hibernate Mapping Wizard click Next name it as customersmapping.hbm click Next
Next window we have to select Class to Map and Database Table.
Select a class to map
After selecting correct class click OK
Select Database Table
Click drop down list and select the table you want to map.
Code for mapping file.
Here
Line 2 :
<class name="hibernatetest.Customer" table="customers">
class name = packagename.classname
table = table we are going to map with java class
Line 3 & 4 :
<id column="C_ID" name="customerID" type="int">
<generator class="native">
id column = primary key column of the table
name = variable name of the POJO class which maps with the primary key of the table
type = type of the primary key
generator class = if you are using auto increment primary key use "native" other vice it should be "assigned"
Line 6 & 7 :
<property name="customerName">
<column name="name">
property name = variable name of the POJO class
column name = database column that maps with previous variable
To populate the database you can use this sample code.
package hibernatetest;

import org.hibernate.Session;
import org.hibernate.SessionFactory;

/**
 *
 * @author Chathura
 */
public class HibernateTest {

    /**
     * @param args the command line arguments
     */
    public static void main(String[] args) {
        Session session = null;
    try{
        SessionFactory sessionFactory = new org.hibernate.cfg.Configuration().configure().buildSessionFactory();
        session =sessionFactory.openSession();
        session.beginTransaction();

        System.out.println("Populating the database !");
        Customer customer = new Customer();
        customer.setCustomerName("Chathura");
        customer.setCustomerAddress("221B,Moratuwa");
        customer.setCustomerEmail("priyankarahac@gmail.com");

        session.save(customer);
        session.getTransaction().commit();

        System.out.println("Done!");
        }

    catch(Exception e){
        System.out.println(e.getMessage());
    }

  finally{
    session.flush();
    session.close();
  }
 }
}
Part of the output.
To retreave values we have to use HQL statements.
Here is a sample code for retrieve values from the table where customer id = 2
package hibernatetest;Line 23 :
import java.util.Iterator;
import org.hibernate.Session;
import org.hibernate.SessionFactory;
/**
*
* @author Chathura
*/
public class HibernateTest {
/**
* @param args the command line arguments
*/
public static void main(String[] args) {
Session session = null;
try{
SessionFactory sessionFactory = new org.hibernate.cfg.Configuration().configure().buildSessionFactory();
session =sessionFactory.openSession();
session.beginTransaction();
String HQL_QUERY ="from Customer customers where customers.customerID = :customerId";
org.hibernate.Query query = session.createQuery(HQL_QUERY);
//Prepared statement
query.setParameter("customerId",2);
System.out.println("Reading values");
for(Iterator it=query.iterate();it.hasNext();){
Customer customer = (Customer) it.next();
System.out.println(customer.getCustomerName());
System.out.println(customer.getCustomerAddress());
System.out.println(customer.getCustomerEmail());
System.out.println(customer.getCustomerID());
}
session.getTransaction().commit();
System.out.println("Done!");
}
catch(Exception e){
System.out.println(e.getMessage());
}
finally{
session.flush();
session.close();
}
}
}
String HQL_QUERY ="from Customer customers where customers.customerID = :customerId";
Customer = class name
customers = table name
customers.customerID = table name.javavariable name
Result :
You can download sample project here
Password : hibernatetest
If you find this post helpful dont forget to leave a comment. Your comments always encourage me to write more!
Sunday, January 25, 2015
Android beginner tutorial Part 65 Receiving system broadcasts
In this tutorial were going to catch a broadcast sent by the system.
The Android system sends out broadcasts just like applications do. They are Intents that can be caught by BroadcastReceivers. Using a receiver, we can listen to actions such as phone calls, SMS text messages, battery status change, timezone change and so on.
In this tutorial were going to catch an SMS text message and display it using a Toast.
Were only going to use one Application, which will have the BroadcastReceiver.
Go to the AndroidManifest.xml file of that application and declare a new BroadcastReceiver. Set its filters action field to android.provider.Telephony.SMS_RECEIVED. The android.provider.Telephony class is used by the system and isnt a part of the Public API Android SDK, so we cant refer to it directly. But we can still simply set the value to a string, like shown below:
After the application tags, add permissions for reading and receiving SMS:
Now the TestReceiver will respond to new SMS.
Open TestReceiver.java class. Inside the onReceive() function well use the intent.getAction() value and compare it to "android.provider.Telephony.SMS_RECEIVED" to make sure that were responding to the correct Intent.
Extract the extras out of the Intent, create a new StringBuilder object, which will let us compose a message for the Toast out of multiple strings.
Check if the bundle isnt null. If it isnt, create a new array of objects out of "pdus" object from the extras. This is an array that contains data of the received message. The pdu itself isnt used though, first it is convered to an understandable format using createFromPdu() method of the SmsMessage class.
Use the getOriginatingAddress() and getMessageBody() methods of the SmsMessage object to get the sender and the text.
Display it all using a Toast.
Thats all!
After installing the application on your device, whenever you receive SMS messages they will be displayed in a Toast.
If you test this on an emulator, you can use DDMS to send mock sms messages to your emulator. To do that, open th DDMS tab in Eclipse, select your emulator/device in the left side of the screen, then open the Emulator Control tab on the right, set the Incoming number to 5554 (or whatever your emulators port number is - it is displayed near the emulators name). Select SMS and write a message, then hit Send.
Thanks for reading!
Read more »
The Android system sends out broadcasts just like applications do. They are Intents that can be caught by BroadcastReceivers. Using a receiver, we can listen to actions such as phone calls, SMS text messages, battery status change, timezone change and so on.
In this tutorial were going to catch an SMS text message and display it using a Toast.
Were only going to use one Application, which will have the BroadcastReceiver.
Go to the AndroidManifest.xml file of that application and declare a new BroadcastReceiver. Set its filters action field to android.provider.Telephony.SMS_RECEIVED. The android.provider.Telephony class is used by the system and isnt a part of the Public API Android SDK, so we cant refer to it directly. But we can still simply set the value to a string, like shown below:
        <receiver android:name="TestReceiver" android:exported="true" android:enabled="true">
            <intent-filter>
                <action android:name="android.provider.Telephony.SMS_RECEIVED" />
            </intent-filter>
        </receiver>
After the application tags, add permissions for reading and receiving SMS:
    <uses-permission android:name="android.permission.RECEIVE_SMS" />
    <uses-permission android:name="android.permission.READ_SMS" />
Now the TestReceiver will respond to new SMS.
Open TestReceiver.java class. Inside the onReceive() function well use the intent.getAction() value and compare it to "android.provider.Telephony.SMS_RECEIVED" to make sure that were responding to the correct Intent.
Extract the extras out of the Intent, create a new StringBuilder object, which will let us compose a message for the Toast out of multiple strings.
Check if the bundle isnt null. If it isnt, create a new array of objects out of "pdus" object from the extras. This is an array that contains data of the received message. The pdu itself isnt used though, first it is convered to an understandable format using createFromPdu() method of the SmsMessage class.
Use the getOriginatingAddress() and getMessageBody() methods of the SmsMessage object to get the sender and the text.
Display it all using a Toast.
package com.example.codeforfoodtest_two;

import android.content.BroadcastReceiver;
import android.content.Context;
import android.content.Intent;
import android.os.Bundle;
import android.telephony.SmsMessage;
import android.widget.Toast;

public class TestReceiver extends BroadcastReceiver {

@Override
public void onReceive(Context context, Intent intent) {
if(intent.getAction().equals("android.provider.Telephony.SMS_RECEIVED")){
Bundle extras = intent.getExtras();
StringBuilder sb = new StringBuilder();

if(extras!=null){
Object[] pdus = (Object[])extras.get("pdus");
for(int i=0; i<pdus.length; i++){
SmsMessage smsMessage = SmsMessage.createFromPdu((byte[]) pdus[i]);
sb.append("
From: " + smsMessage.getOriginatingAddress());
sb.append("
From: " + smsMessage.getMessageBody());
}
}

Toast.makeText(context, "New SMS message" + sb.toString(), Toast.LENGTH_LONG).show();
}
}

}
Thats all!
After installing the application on your device, whenever you receive SMS messages they will be displayed in a Toast.
If you test this on an emulator, you can use DDMS to send mock sms messages to your emulator. To do that, open th DDMS tab in Eclipse, select your emulator/device in the left side of the screen, then open the Emulator Control tab on the right, set the Incoming number to 5554 (or whatever your emulators port number is - it is displayed near the emulators name). Select SMS and write a message, then hit Send.
Thanks for reading!
Subscribe to:
Comments (Atom)