Showing posts with label android. Show all posts
Showing posts with label android. Show all posts
Saturday, February 14, 2015
IOS vs Android Difference and Comparison Infographic
Apple’s iOS and Google’s Android both are very popular mobile operating systems. It’s still a debate topic that which one is the best Android or iOS?
In this article, iOS and Android are differentiated over various perspectives.
Globally, around 1 billion units of smartphones have been sold out of which android has 80% market share and iOS has a 15 % market share. Thus, the global revenue generated by smartphones is approx. $265 billion.
Also Read: Top 100 Android Apps 2014
Also Read: iCloud - How to Backup iPhone Data
Also Read: Top 100 Android Apps 2014
Also Read: iCloud - How to Backup iPhone Data
The reason behind the largest market share by android is that it is also available at cheaper rates that make it popular in emerging countries where per capita income is low. Out of 227 countries, Android has leadership in 138 countries and iOS is popular in 38 countries which are developed countries with high capita income.
![IOS vs Android - Difference and Comparison [Infographic]](https://blogger.googleusercontent.com/img/b/R29vZ2xl/AVvXsEiOw084IjGbVswb74mUYnL2je4Cv_HLaa5Hwf5m48taJV5K7Ss_wUkjjX0KKpZnXE2UNr90nmOapadLCT5YF6VlUF-YxAdmDhi3dr72LO087QJx_u19xGgmOrgsHPhDu04ytBlZsgoXFxaK/s400/IOS+vs+Android.jpg "IOS vs Android - Difference and Comparison [Infographic]")
There are 1.4 million android apps, 85% of which are available for free while out of around 1.3 million iOS apps only 25% apps are free. Apple’s iTunes charges $99 per year and Play Store charges $25 per year to publish any app.
If we look at revenues and profits, iOS make more profit than android apps. There are 67% shopping apps for iOS and 33% for android. iOS users spend an average amount of $93.94 per order, while Android users spend average amount $48.10 per order.
It is also considered that iOS users are more internet savvy than Android users as share of web traffic comes more from iOS devices that is 62% than android devices that is 38%. It makes more employment in iPhone app development as 60%, while 40% employment in android development.
Find more interesting facts regarding iOS and android in the following infographic.
IOS vs Android Infographic

Image courtesy: Nine Hertz

Thursday, February 5, 2015
Android beginner tutorial Part 2 Creating a project in Eclipse
Today well learn how to create Android projects in Eclipse.
Launch the Eclipse IDE with Android SDK built in. It will ask you to perform some one-time tasks, such as create a workspace on your hard drive.
When thats done, we can start creating our first application. To begin creating a new Android project, select File > New > Android Application Project.
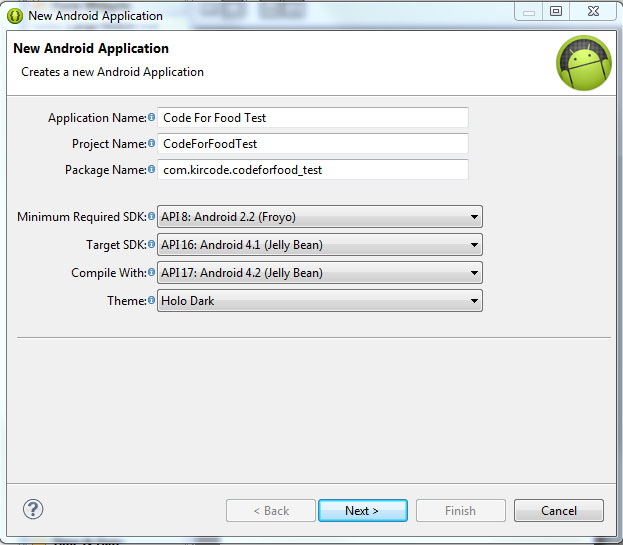
A dialog box pops up, which requires us to fill out some of the general settings for our future application. The first field is called "Application Name". This is the title of your application - it appears as the name of your app in the Play Store, Manage Applications screen, etc.
The second field is called Project Name. Unlike Application Name, this isnt shown to anyone but the developer when using Eclipse. Usually, the Application Name and Project Name are the same.
The third field is called Package Name. This is basically the id of your application - usually its not shown to the user, but it is required to stay the same for all of the versions of your application. This is similar to ids in Adobe AIR descriptor files. The format is the same as packages in AS3, for example - com.kircode.codeforfood_test
Then we are required to select Minimum Required SDK. This is basically the Android version that is required to run your application. Keep in mind that the lower the version is, the bigger your audience is, but your application wont be able to use some of the newer SDK features. It is recommended to set this value to API 8, this way, according to Android development center, youre targeting 95% of the users. Thats good enough.
The next field is Target SDK. Set this to the highest API version that your application will run on. This value informs the system that the application has been tested on this API and is supposed to work without the sytem having to do any compatibility processes. If youre unsure what to select here, pick one of the modern versions - this way your application wont look dated and will still be compatible with older versions (up to Minimum Required SDK).
The next field is Compile With. This is the API version that the application will be compiled with. If the default value isnt the most recent version, its recommended to pick that.
And finally theres Theme. Pick the color theme that will suit your application. You will, of course, be able to customize every element of your application manually if you want, but choosing a Theme here is a good alternative too.
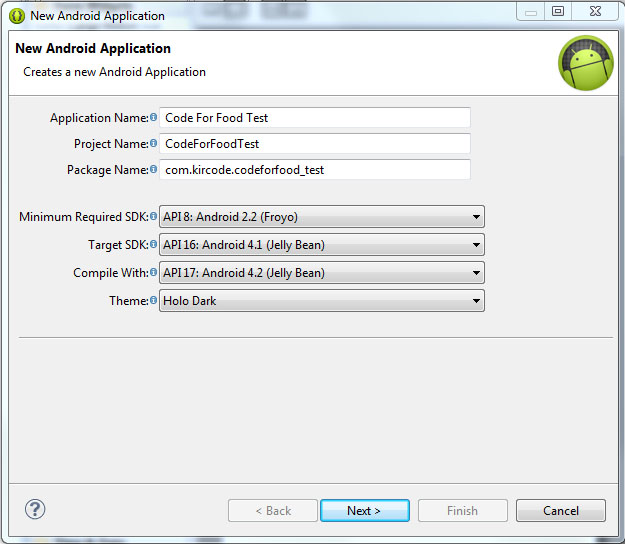
Hit next, and you should be taken to the next configuration step. Here youll see a few check boxes and fields. The first checkbox, "Create custom launcher icon", can be selected if you want to create a custom icon for your application. I do! So I always have this checked.
The next checkbox is "Create activity". Check this, because we want to generate ourselves an Activity. I will explain what an Activity is in details a bit later.
This isnt going to be a library, so dont check "Mark this project as a library". If you have "Create Project in Workspace" checked, the application project folder will be created in the workspace that you defined when you first launched Eclipse. If its unchecked, youll be able to set a custom location for your project. I think its nice to keep things organized and all development projects should be in the development workspace, so I leave this checked.
The next part consists of a checkbox and a selection menu. Its labeled as "Working sets" and the checkbox asks us if we want to add our project to a working set. Working sets are basically groups of projects that are displayed together in the menu when youre working on one of those projects. This is a useful feature and might come in handy when working on multiple applications of the same sort, or of the same purpose, or grouped together for some other reason. Right now we dont want to include our projects in any working sets.
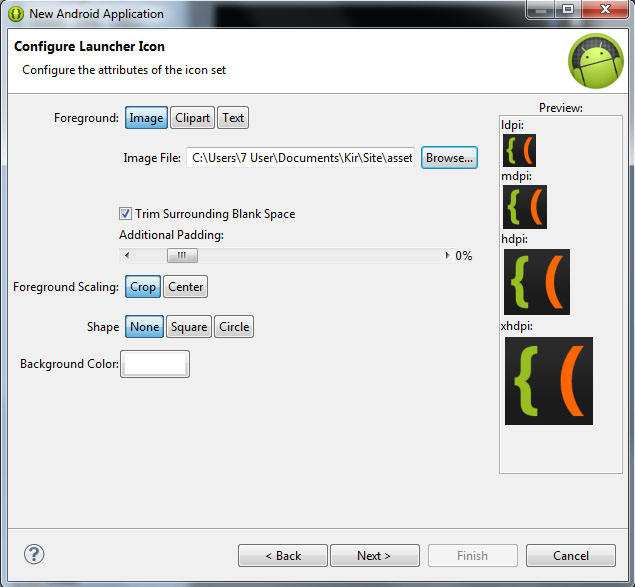
Hit next. We can now set a Launcher Icon for our application. If you have an image ready for that, you can import it here. You can create a new icon using any of the preset clipart images or enter some text to act as an icon. You have several other tools in this window to style your icon.
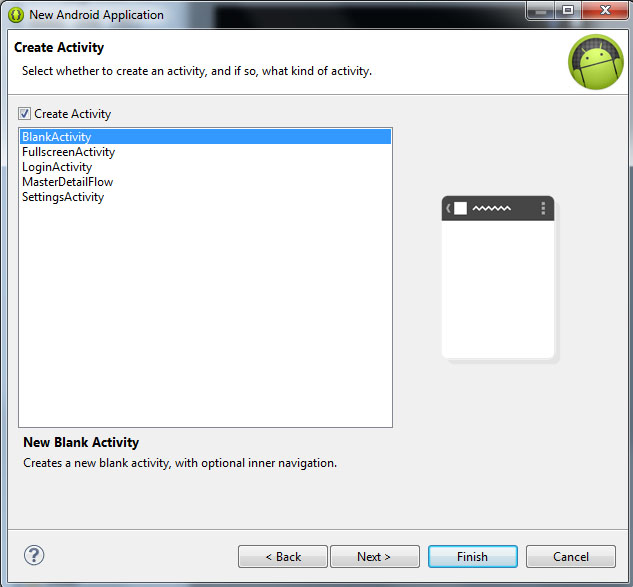
Click next, and now were asked to choose what kind of activity we want to create. Now, simply put, an Activity is a window in Android. You probably know that there arent really any windows in Android at all, except for some dialog boxes, and thats true. But the way Activities behave are similar to windows in computer operating systems. For example, if we launch a game on Android, we are first taken to the main menu screen. This is an Activity. If we click "play", the game itself launches where we can actually play it. This is another Activity. It should be noted that if we didnt purposefully close the previous (main menu) activity when launching the game, it doesnt close. The main menu is still there, under the game, not visible to the user, just "sleeping" and waiting to be opened again.
The Activities have a complex life cycle, which I will explain in later tutorials. For now, you just need to understand that an Activity is a single screen that contains some content, it can be opened, paused, stopped, etc.
So right now were on the Create Activity screen, with 5 available activity types - BlankActivity, FullscreenActivity, LoginActivity, MasterDetailFlow and SettingsActivity. Think of these as of templates.
The BlankActivity is a blank page that we can fill with content.
The FullscreenActivity is a blank page also, but it hides all the UI elements of the device. This is probably most suited for games and video applications.
The LoginActivity is a simple template used for registering or logging in using email and password.
The MasterDetailFlow is a template that has a menu and a content area. It should be noted that the template is displayed differently on tablets and phones (it creates 2 columns on bigger screens where possible, and 1 column on smaller screens).
The SettingsActivity is a simple page with UI components lined up like in the settings screen of your device.
Pick BlankActivity and click Next.
Here we are asked to set the Activity Name, Layout Name and Navigation Type for our main Activity. Leave their values as they are by default - MainActivity, activity_main and None. The names are basically for the developer to remember which Activity is which. The Navigation Type dropdown box lets you select a default navigation method for your Activity. There are multiple nice and useful pre-set navigation features here, but well leave this field None for our first project.
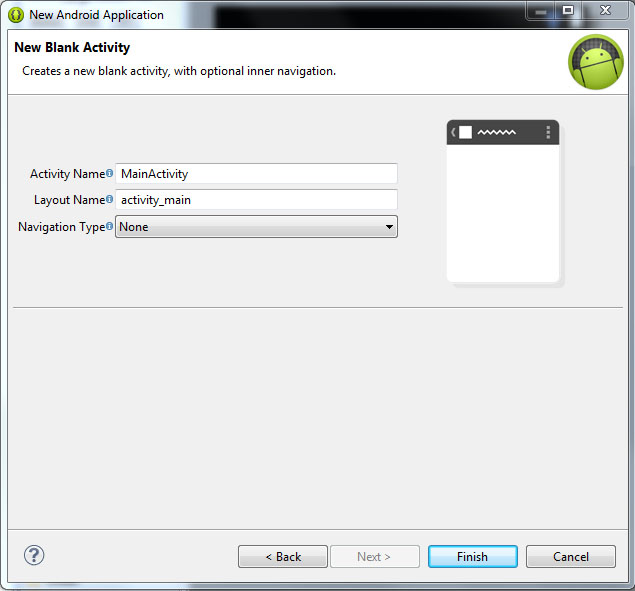
Click Finish, wait, and youre done!
Well continue next time!
Thanks for reading!
Read more »
Launch the Eclipse IDE with Android SDK built in. It will ask you to perform some one-time tasks, such as create a workspace on your hard drive.
When thats done, we can start creating our first application. To begin creating a new Android project, select File > New > Android Application Project.
A dialog box pops up, which requires us to fill out some of the general settings for our future application. The first field is called "Application Name". This is the title of your application - it appears as the name of your app in the Play Store, Manage Applications screen, etc.
The second field is called Project Name. Unlike Application Name, this isnt shown to anyone but the developer when using Eclipse. Usually, the Application Name and Project Name are the same.
The third field is called Package Name. This is basically the id of your application - usually its not shown to the user, but it is required to stay the same for all of the versions of your application. This is similar to ids in Adobe AIR descriptor files. The format is the same as packages in AS3, for example - com.kircode.codeforfood_test
Then we are required to select Minimum Required SDK. This is basically the Android version that is required to run your application. Keep in mind that the lower the version is, the bigger your audience is, but your application wont be able to use some of the newer SDK features. It is recommended to set this value to API 8, this way, according to Android development center, youre targeting 95% of the users. Thats good enough.
The next field is Target SDK. Set this to the highest API version that your application will run on. This value informs the system that the application has been tested on this API and is supposed to work without the sytem having to do any compatibility processes. If youre unsure what to select here, pick one of the modern versions - this way your application wont look dated and will still be compatible with older versions (up to Minimum Required SDK).
The next field is Compile With. This is the API version that the application will be compiled with. If the default value isnt the most recent version, its recommended to pick that.
And finally theres Theme. Pick the color theme that will suit your application. You will, of course, be able to customize every element of your application manually if you want, but choosing a Theme here is a good alternative too.
Hit next, and you should be taken to the next configuration step. Here youll see a few check boxes and fields. The first checkbox, "Create custom launcher icon", can be selected if you want to create a custom icon for your application. I do! So I always have this checked.
The next checkbox is "Create activity". Check this, because we want to generate ourselves an Activity. I will explain what an Activity is in details a bit later.
This isnt going to be a library, so dont check "Mark this project as a library". If you have "Create Project in Workspace" checked, the application project folder will be created in the workspace that you defined when you first launched Eclipse. If its unchecked, youll be able to set a custom location for your project. I think its nice to keep things organized and all development projects should be in the development workspace, so I leave this checked.
The next part consists of a checkbox and a selection menu. Its labeled as "Working sets" and the checkbox asks us if we want to add our project to a working set. Working sets are basically groups of projects that are displayed together in the menu when youre working on one of those projects. This is a useful feature and might come in handy when working on multiple applications of the same sort, or of the same purpose, or grouped together for some other reason. Right now we dont want to include our projects in any working sets.
Hit next. We can now set a Launcher Icon for our application. If you have an image ready for that, you can import it here. You can create a new icon using any of the preset clipart images or enter some text to act as an icon. You have several other tools in this window to style your icon.
Click next, and now were asked to choose what kind of activity we want to create. Now, simply put, an Activity is a window in Android. You probably know that there arent really any windows in Android at all, except for some dialog boxes, and thats true. But the way Activities behave are similar to windows in computer operating systems. For example, if we launch a game on Android, we are first taken to the main menu screen. This is an Activity. If we click "play", the game itself launches where we can actually play it. This is another Activity. It should be noted that if we didnt purposefully close the previous (main menu) activity when launching the game, it doesnt close. The main menu is still there, under the game, not visible to the user, just "sleeping" and waiting to be opened again.
The Activities have a complex life cycle, which I will explain in later tutorials. For now, you just need to understand that an Activity is a single screen that contains some content, it can be opened, paused, stopped, etc.
So right now were on the Create Activity screen, with 5 available activity types - BlankActivity, FullscreenActivity, LoginActivity, MasterDetailFlow and SettingsActivity. Think of these as of templates.
The BlankActivity is a blank page that we can fill with content.
The FullscreenActivity is a blank page also, but it hides all the UI elements of the device. This is probably most suited for games and video applications.
The LoginActivity is a simple template used for registering or logging in using email and password.
The MasterDetailFlow is a template that has a menu and a content area. It should be noted that the template is displayed differently on tablets and phones (it creates 2 columns on bigger screens where possible, and 1 column on smaller screens).
The SettingsActivity is a simple page with UI components lined up like in the settings screen of your device.
Pick BlankActivity and click Next.
Here we are asked to set the Activity Name, Layout Name and Navigation Type for our main Activity. Leave their values as they are by default - MainActivity, activity_main and None. The names are basically for the developer to remember which Activity is which. The Navigation Type dropdown box lets you select a default navigation method for your Activity. There are multiple nice and useful pre-set navigation features here, but well leave this field None for our first project.
Click Finish, wait, and youre done!
Well continue next time!
Thanks for reading!
S5300 JXD Android Tablet Fimrware
JXD S5300 7inch Tablet Firmware
Click here to download firmware.
iJoy Hexen 8GB 7 inch Android Tablet Firmware
i-Joy Hexen 8GB, 4.1
7 inch tablet Android Firmware & Software installationBoxchip Rockchip RK3088
China Android Tablets Firmware Collection
Tablet Specifications:
LCD | 7 inch Capacitive Touch Screen 5 Points |
Screen Resolution | 800x480 |
Processor | 1.2 Ghz ARM Dual Core A9 GPU Mali 400 Quad Core |
Chipset / Boxchip | Rockchip RK3066 |
RAM | 1 GB DDR3 |
Built in Memory | 8 GB |
External Memory | Support Micro Card (MAX. 32GB) |
Wifi | 802.11 b/g/n supported |
Blue tooth | N/A |
3G | Support USB 3G Dongle, EVDO/WCDMA |
Camera | 0.3 MP Front |
HDMI | 1.4 + Micro Usb |
Speaker | N/A |
Weight | 300g |
Android Version | 4.1 |
Battery | 3.7V |
Technical Support .
The following firmware / ROM file will be used when your tablets facing various problems . In case of
1. Forgotten Pattern Lock ,
2.Too many pattern attampt / Reset user lock
3. Tablet Android stuck on Gmail account
4. Android Tablet stuck on Android logo
5. Tablets hang on start up
you can use this Tablet firmware , ROM to make your Android tablets working again .
Flashing stock firmware should be last option.
Recommended Downloads :
Flashing Tool : RKbatch Tool
Flashing Tutorials: Flashing Tutorial for Rockchip
Flashing Tutorials: Flashing Tutorial for Rockchip
DOWNLOAD OFFICIAL FIRMWARE
Video Review : Youtube
Wednesday, February 4, 2015
Android soap web service access using ksoap2 Handlers
Here I use Android Handlers to perform the background task.
To access SOAP based web service from Android we can easily use ksoap2 library. It is a lightweight and efficient SOAP client library specially designed for the Android platform. (http://code.google.com/p/ksoap2-android/). in this post Im going to show how we can access a SOAP web service from Android.
This post consists two parts. In the first part Im accessing free live .NET web service Currency Converter provided by http://www.webservicex.net/. In the second part Im going to create a soap call for a java web service hosted in my own PC.
1. Access .NET web service.
Quick demo :

Code for the main activity :
Add ksoap2 to the java build path of your Android project (You can download latest version of ksoap2 from here : http://code.google.com/p/ksoap2-android/wiki/HowToUse?tm=2 click the url under "with a direct download url of ")
Add internet permission to AndroidManifest
Code for the activity_main.xml
2. Access java web service
We have to create two project for this. One is for the web service and the other one is the Android project. For these two projects keep separate two Eclipse installations.
2.1. Web service project.
Here I have accessed a locally hosted java web service on my PC. If you want to know how to create a java soap web service refer following two posts. (do not need to create the java client described in the 3rd post)
1. http://codeoncloud.blogspot.com/2012/12/create-java-web-service-in-eclipse.html
2. http://codeoncloud.blogspot.com/2012/12/create-java-web-service-in-eclipse_8.html
Here only thing that you need to change is "sayHello" method in the second post.
2.2.Android project
Quick demo :
 Code for the main activity :
Add ksoap2 to the java build path of your Android project (You can download latest version of ksoap2 from here : http://code.google.com/p/ksoap2-android/wiki/HowToUse?tm=2 click the url under "with a direct download url of ")
Change following variables according to your WSDL.
First open the WDL using a web browser (How to open the WSDL)
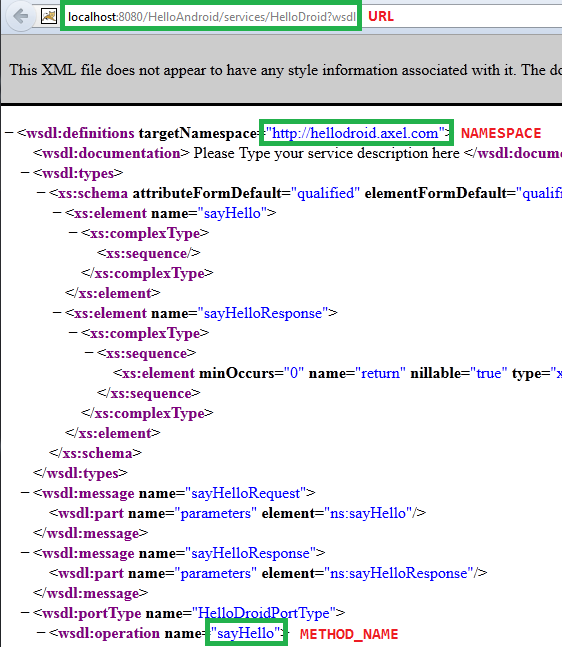
NAMESPACE "targetNamespace"
URL is the URL of WSDL . (replace localhost with ip 10.0.2.2)
SOAP_ACTION "NAMESPACE/METHOD_NAME"
METHOD_NAME "WSDL operation"
Add internet permission for the Manifest file. Code of the Manifest.xml after adding permissions should like follows.
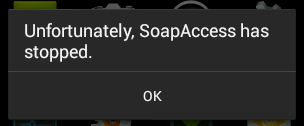
If you are getting "Unfortunately stopped" error this post may helpful.
Was above information helpful?
Your comments always encourage me to write more...
Read more »
To access SOAP based web service from Android we can easily use ksoap2 library. It is a lightweight and efficient SOAP client library specially designed for the Android platform. (http://code.google.com/p/ksoap2-android/). in this post Im going to show how we can access a SOAP web service from Android.
This post consists two parts. In the first part Im accessing free live .NET web service Currency Converter provided by http://www.webservicex.net/. In the second part Im going to create a soap call for a java web service hosted in my own PC.
1. Access .NET web service.
Quick demo :
Code for the main activity :
Add ksoap2 to the java build path of your Android project (You can download latest version of ksoap2 from here : http://code.google.com/p/ksoap2-android/wiki/HowToUse?tm=2 click the url under "with a direct download url of ")
package com.axel.androidsoap;

import org.ksoap2.SoapEnvelope;
import org.ksoap2.serialization.PropertyInfo;
import org.ksoap2.serialization.SoapObject;
import org.ksoap2.serialization.SoapPrimitive;
import org.ksoap2.serialization.SoapSerializationEnvelope;
import org.ksoap2.transport.HttpTransportSE;

import android.os.Bundle;
import android.os.Handler;
import android.app.Activity;
import android.view.Menu;
import android.widget.TextView;

public class MainActivity extends Activity {

   private final String NAMESPACE = "http://www.webserviceX.NET/";
   private final String URL = "http://www.webservicex.net/CurrencyConvertor.asmx";
   private final String SOAP_ACTION = "http://www.webserviceX.NET/ConversionRate";
   private final String METHOD_NAME = "ConversionRate";

   private String webResponse = "";
   private TextView textView;
   private Thread thread;
   private Handler handler = new Handler();

   private String fromCurrency = "USD";
   private String toCurrency = "LKR";

    /** Called when the activity is first created. */

 @Override
 protected void onCreate(Bundle savedInstanceState) {
  super.onCreate(savedInstanceState);
  setContentView(R.layout.activity_main);
  textView = (TextView) findViewById(R.id.textView1);
  startWebAccess();
 }


 public void startWebAccess(){
  thread = new Thread(){
   public void run(){
    try{
      SoapObject request = new SoapObject(NAMESPACE, METHOD_NAME);
         PropertyInfo fromProp =new PropertyInfo();
         fromProp.setName("FromCurrency");
         fromProp.setValue(fromCurrency);
         fromProp.setType(String.class);
         request.addProperty(fromProp);

         PropertyInfo toProp =new PropertyInfo();
         toProp.setName("ToCurrency");
         toProp.setValue(toCurrency);
         toProp.setType(String.class);
         request.addProperty(toProp);

         SoapSerializationEnvelope envelope = new SoapSerializationEnvelope(SoapEnvelope.VER11);
         envelope.dotNet = true;
         envelope.setOutputSoapObject(request);
         HttpTransportSE androidHttpTransport = new HttpTransportSE(URL);

         androidHttpTransport.call(SOAP_ACTION, envelope);
         SoapPrimitive response = (SoapPrimitive)envelope.getResponse();
         webResponse = response.toString();
    }

    catch(Exception e){
     e.printStackTrace();
    }

    handler.post(createUI);
   }
  };

  thread.start();
 }


 final Runnable createUI = new Runnable() {

  public void run(){

  textView.setText("1 "+fromCurrency+" = "+webResponse+" "+toCurrency);
  }
  };


 @Override
 public boolean onCreateOptionsMenu(Menu menu) {
  // Inflate the menu; this adds items to the action bar if it is present.
  getMenuInflater().inflate(R.menu.main, menu);
  return true;
 }

}
Add internet permission to AndroidManifest
<?xml version="1.0" encoding="utf-8"?>
<manifest xmlns:android="http://schemas.android.com/apk/res/android"
    package="com.axel.androidsoap"
    android:versionCode="1"
    android:versionName="1.0" >
    <uses-sdk
        android:minSdkVersion="8"
        android:targetSdkVersion="17" />
    <uses-permission android:name="android.permission.INTERNET"/>
    <application
        android:allowBackup="true"
        android:icon="@drawable/ic_launcher"
        android:label="@string/app_name"
        android:theme="@style/AppTheme" >
        <activity
            android:name="com.axel.androidsoap.MainActivity"
            android:label="@string/app_name" >
            <intent-filter>
                <action android:name="android.intent.action.MAIN" />
                <category android:name="android.intent.category.LAUNCHER" />
            </intent-filter>
        </activity>
    </application>
</manifest>
Code for the activity_main.xml
<RelativeLayout xmlns:android="http://schemas.android.com/apk/res/android"
    xmlns:tools="http://schemas.android.com/tools"
    android:layout_width="match_parent"
    android:layout_height="match_parent"
    android:paddingBottom="@dimen/activity_vertical_margin"
    android:paddingLeft="@dimen/activity_horizontal_margin"
    android:paddingRight="@dimen/activity_horizontal_margin"
    android:paddingTop="@dimen/activity_vertical_margin"
    tools:context=".MainActivity" >

    <TextView
        android:id="@+id/textView1"
        android:layout_width="wrap_content"
        android:layout_height="wrap_content"
        android:layout_alignParentLeft="true"
        android:layout_alignParentTop="true"
        android:layout_marginLeft="32dp"
        android:layout_marginTop="60dp"
        android:text=""
        android:textAppearance="?android:attr/textAppearanceMedium" />

</RelativeLayout>
2. Access java web service
We have to create two project for this. One is for the web service and the other one is the Android project. For these two projects keep separate two Eclipse installations.
2.1. Web service project.
Here I have accessed a locally hosted java web service on my PC. If you want to know how to create a java soap web service refer following two posts. (do not need to create the java client described in the 3rd post)
1. http://codeoncloud.blogspot.com/2012/12/create-java-web-service-in-eclipse.html
2. http://codeoncloud.blogspot.com/2012/12/create-java-web-service-in-eclipse_8.html
Here only thing that you need to change is "sayHello" method in the second post.
 public String sayHello(String name) {
    return "Hello !!! " + name;
 }
Replace it with following code public String sayHello(){
return "Hello Jelly Bean";
}
2.2.Android project
Quick demo :
Add ksoap2 to the java build path of your Android project (You can download latest version of ksoap2 from here : http://code.google.com/p/ksoap2-android/wiki/HowToUse?tm=2 click the url under "with a direct download url of ")
package com.axis.soapaccess;

import org.ksoap2.SoapEnvelope;
import org.ksoap2.serialization.SoapObject;
import org.ksoap2.serialization.SoapPrimitive;
import org.ksoap2.serialization.SoapSerializationEnvelope;
import org.ksoap2.transport.HttpTransportSE;

import android.os.Bundle;
import android.os.Handler;
import android.app.Activity;
import android.view.Menu;
import android.widget.TextView;

public class MainActivity extends Activity {

 //change following variables according to the WSDL
 private final String NAMESPACE = "http://hellodroid.axel.com";
 private final String URL = "http://10.0.2.2:8080/HelloAndroid/services/HelloDroid?wsdl";
 private final String SOAP_ACTION = "http://hellodroid.axel.com/sayHello";
 private final String METHOD_NAME = "sayHello";

 private String Webresponse = "";
 private TextView textView;
 private Thread thread;
 private Handler handler = new Handler();

 @Override
 protected void onCreate(Bundle savedInstanceState) {
  super.onCreate(savedInstanceState);
  setContentView(R.layout.activity_main);
  textView = (TextView) findViewById(R.id.textView1);
  webAccess();
 }


 public void webAccess(){
  thread = new Thread(){
   public void run(){
    try{
      SoapObject request = new SoapObject(NAMESPACE, METHOD_NAME);
         SoapSerializationEnvelope envelope = new SoapSerializationEnvelope(SoapEnvelope.VER11);
         //envelope.dotNet = true;
         envelope.setOutputSoapObject(request);
         HttpTransportSE androidHttpTransport = new HttpTransportSE(URL);
         androidHttpTransport.call(SOAP_ACTION, envelope);
            SoapPrimitive response = (SoapPrimitive)envelope.getResponse();
            Webresponse = response.toString();
    }

    catch(Exception e){
     e.printStackTrace();
    }

    handler.post(createUI);
   }
  };

  thread.start();
 }


 final Runnable createUI = new Runnable() {
  public void run(){
  textView.setText(Webresponse);
 }
 };

 @Override
 public boolean onCreateOptionsMenu(Menu menu) {
  // Inflate the menu; this adds items to the action bar if it is present.
  getMenuInflater().inflate(R.menu.main, menu);
  return true;
 }

}
Change following variables according to your WSDL.
private final String NAMESPACE = "http://hellodroid.axel.com";
private final String URL = "http://10.0.2.2:8080/HelloAndroid/services/HelloDroid?wsdl";
private final String SOAP_ACTION = "http://hellodroid.axel.com/sayHello";
private final String METHOD_NAME = "sayHello";
First open the WDL using a web browser (How to open the WSDL)
NAMESPACE "targetNamespace"
URL is the URL of WSDL . (replace localhost with ip 10.0.2.2)
SOAP_ACTION "NAMESPACE/METHOD_NAME"
METHOD_NAME "WSDL operation"
Add internet permission for the Manifest file. Code of the Manifest.xml after adding permissions should like follows.
<?xml version="1.0" encoding="utf-8"?>Code for the layout
<manifest xmlns:android="http://schemas.android.com/apk/res/android"
package="com.axis.soapaccess"
android:versionCode="1"
android:versionName="1.0" >
<uses-sdk
android:minSdkVersion="17"
android:targetSdkVersion="17" />
<uses-permission android:name="android.permission.INTERNET"/>
<application
android:allowBackup="true"
android:icon="@drawable/ic_launcher"
android:label="@string/app_name"
android:theme="@style/AppTheme" >
<activity
android:name="com.axis.soapaccess.MainActivity"
android:label="@string/app_name" >
<intent-filter>
<action android:name="android.intent.action.MAIN" />
<category android:name="android.intent.category.LAUNCHER" />
</intent-filter>
</activity>
</application>
</manifest>
<RelativeLayout xmlns:android="http://schemas.android.com/apk/res/android"Thats it.
xmlns:tools="http://schemas.android.com/tools"
android:layout_width="match_parent"
android:layout_height="match_parent"
android:paddingBottom="@dimen/activity_vertical_margin"
android:paddingLeft="@dimen/activity_horizontal_margin"
android:paddingRight="@dimen/activity_horizontal_margin"
android:paddingTop="@dimen/activity_vertical_margin"
tools:context=".MainActivity" >
<TextView
android:id="@+id/textView1"
android:layout_width="wrap_content"
android:layout_height="wrap_content"
android:layout_alignParentTop="true"
android:layout_centerHorizontal="true"
android:layout_marginTop="113dp"
android:text="Medium Text"
android:textAppearance="?android:attr/textAppearanceMedium" />
</RelativeLayout>
If you are getting "Unfortunately stopped" error this post may helpful.
Was above information helpful?
Your comments always encourage me to write more...
Tuesday, February 3, 2015
Android beginner tutorial Part 25 RatingBar widget
Today we will learn about a widget called RatingBar.
The RatingBar class is a subcless of ProgressBar and is on the same level as SeekBar. It displays several stars that the user can drag on (similarly to SeekBar) to set a rating value. The number of stars, initial rating, step size and more settings like that are customizable both using xml and java.
Go to activity_main.xml layout file of your testing application and create a simple layout with a TextView and a RatingBar.
Now go to the MainActivity.java class file. Here we will do two things - set the settings for our RatingBar and add an event listener, which changes the TextViews value when the rating is changed.
First, implement an OnRatingBarChangeListener interface in the class definition line:
Then declare 2 variables - RatingBar and TextView:
Then, inside the onCreate() function, set the values of ratingBar and textView objects to our "rating" and "text" objects in the layout. Set the amount of stars, the step size and default rating for the RatingBar object using setNumStars(), setStepSize() and setRating() methods.
After that, set the text of our TextView to display the current rating. Add an event listener to the RatingBar instance using setOnRatingBarChangeListener() method.
Note that you can also use decimal values in setStepSize() and setRating() method parameters. If you do so, put (float) before the number values so that the compiler understands these as float type values (because the methods expect floats).
Then create a function called onRatingChanged() and handle the event by updating the TextViews value:
Full class code:
The results look like this if you test the application:
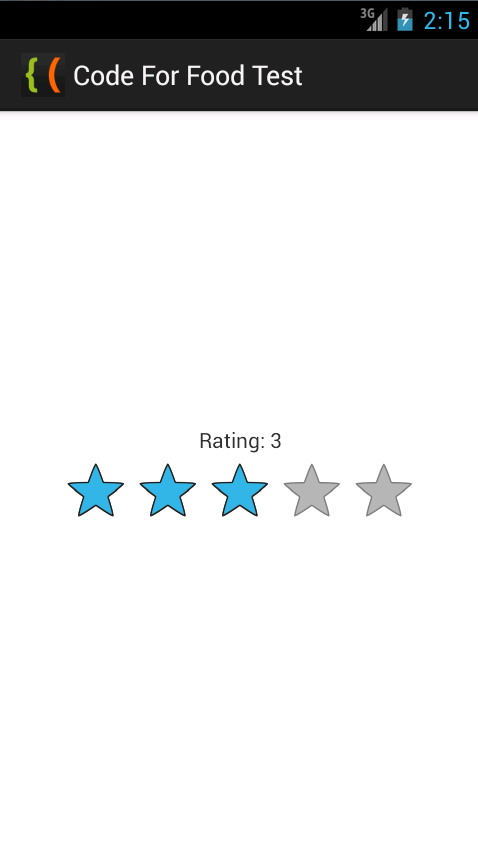
Thats all for today.
Thanks for reading!
Read more »
The RatingBar class is a subcless of ProgressBar and is on the same level as SeekBar. It displays several stars that the user can drag on (similarly to SeekBar) to set a rating value. The number of stars, initial rating, step size and more settings like that are customizable both using xml and java.
Go to activity_main.xml layout file of your testing application and create a simple layout with a TextView and a RatingBar.
<LinearLayout xmlns:android="http://schemas.android.com/apk/res/android"
    xmlns:tools="http://schemas.android.com/tools"
    android:layout_width="match_parent"
    android:layout_height="match_parent"
    android:orientation="vertical"
    android:gravity="center"
    tools:context=".MainActivity" >

    <TextView android:id="@+id/text"
        android:layout_width="match_parent"
        android:layout_height="wrap_content"
        android:gravity="center"
        />

    <RatingBar
        android:id="@+id/rating"
        android:layout_width="wrap_content"
        android:layout_height="wrap_content"/>

</LinearLayout>
Now go to the MainActivity.java class file. Here we will do two things - set the settings for our RatingBar and add an event listener, which changes the TextViews value when the rating is changed.
First, implement an OnRatingBarChangeListener interface in the class definition line:
public class MainActivity extends Activity implements OnRatingBarChangeListener{
Then declare 2 variables - RatingBar and TextView:
private RatingBar ratingBar;
private TextView textView;
Then, inside the onCreate() function, set the values of ratingBar and textView objects to our "rating" and "text" objects in the layout. Set the amount of stars, the step size and default rating for the RatingBar object using setNumStars(), setStepSize() and setRating() methods.
After that, set the text of our TextView to display the current rating. Add an event listener to the RatingBar instance using setOnRatingBarChangeListener() method.
@Override
protected void onCreate(Bundle savedInstanceState) {
super.onCreate(savedInstanceState);
setContentView(R.layout.activity_main);

ratingBar = (RatingBar)findViewById(R.id.rating);
textView = (TextView)findViewById(R.id.text);

ratingBar.setNumStars(5);
ratingBar.setStepSize(1);
ratingBar.setRating(3);

textView.setText("Rating: " + ratingBar.getProgress());
ratingBar.setOnRatingBarChangeListener(this);
}
Note that you can also use decimal values in setStepSize() and setRating() method parameters. If you do so, put (float) before the number values so that the compiler understands these as float type values (because the methods expect floats).
Then create a function called onRatingChanged() and handle the event by updating the TextViews value:
@Override
public void onRatingChanged(RatingBar rb, float rating, boolean fromUser){
textView.setText("Rating: " + ratingBar.getProgress());
}
Full class code:
package com.kircode.codeforfood_test;

import android.app.Activity;
import android.os.Bundle;
import android.view.Menu;
import android.widget.RatingBar;
import android.widget.RatingBar.OnRatingBarChangeListener;
import android.widget.TextView;

public class MainActivity extends Activity implements OnRatingBarChangeListener{

private RatingBar ratingBar;
private TextView textView;

@Override
protected void onCreate(Bundle savedInstanceState) {
super.onCreate(savedInstanceState);
setContentView(R.layout.activity_main);

ratingBar = (RatingBar)findViewById(R.id.rating);
textView = (TextView)findViewById(R.id.text);

ratingBar.setNumStars(5);
ratingBar.setStepSize(1);
ratingBar.setRating(3);

textView.setText("Rating: " + ratingBar.getProgress());
ratingBar.setOnRatingBarChangeListener(this);
}

@Override
public void onRatingChanged(RatingBar rb, float rating, boolean fromUser){
textView.setText("Rating: " + ratingBar.getProgress());
}

@Override
public boolean onCreateOptionsMenu(Menu menu) {
// Inflate the menu; this adds items to the action bar if it is present.
getMenuInflater().inflate(R.menu.activity_main, menu);
return true;
}

}
The results look like this if you test the application:
Thats all for today.
Thanks for reading!
AOC Breeze MW0922 Android Tablet Firmware
AOC MW0922 Breeze 9 inch Android Tablet, Firmware ,Support , Specifications & Review.
Review:
The Aoc MW0922 Tablet is ultra fast duo core tablet. Carrying Android 4x ICS with faster duo core processor and 16:10 widescreen display for movies with 9 inch of display size. Breeze MW0922 have fronter and back camera to capture the special moments.Front camera is 2 MP and rare camera is 5MP with autofocus and zoom. The Tablet quality is good , updates are available , Tabet Support forums and service center is updated as well. In my opinion AOC Tablets are best to buy.
Company Review : Company Review about MW0922
Where to Buy : AOC Breeze MW0922
Specifications:Company Review : Company Review about MW0922
Where to Buy : AOC Breeze MW0922
LCD | 9" Capacitive Touch Screen |
Screen Resolution | 1280 x 800 Pix |
Processor | 1.2GHZ Duo-Core Arm Cortex A8 |
Chipset / Boxchip | Rockchip |
RAM | 1 GB DDR3 DRAM |
Built in Memory | 16 GB |
External Memory | Support Micro Card (upto 32GB) |
Wifi | 802.11 b/g/n supported |
Blue tooth | 2.1 |
Sim | N/A |
Camera | 2 Megapixel front , 5MP Rare with autofocus |
HDMI | Available , Usb 2.0, HDMI (Mini C) |
Speaker | Built IN 1W |
Weight | 0.623 KG |
Android Version | 4X ICS |
The following firmware , ROM file will be used when your Android tablet facing various problems .
1. Forgotten Pattern Lock .
2.Too many pattern attempts / Reset user lock.
3. Tablets PC stuck on Gmail account.
4. Android Tablets PC stuck on Android logo.
5. Tablet Android hang on start up / Multiple errors generating by OS.
6. Google play store having problems or generating errors.
7.Upgrading to new Android OS.
6. Google play store having problems or generating errors.
7.Upgrading to new Android OS.
you can use this Android Tablet firmware, ROM to restore your Android China tablets to generic firmwares or upgrades . Make sure to charge battery . Power failure during flashing may result dead or broken tablets.
Note : Flashing generic tablet firmware should be last option.
Flashing Tools:
Download: RKbatch Tool
Tutorials :
How to Flash, Update AOC Tablets Firmware
You may also like to read : Flashing Tutorial for Rockchip
Downloads
Firmware Updates
Flashing Tools:
Download: RKbatch Tool
Tutorials :
How to Flash, Update AOC Tablets Firmware
You may also like to read : Flashing Tutorial for Rockchip
Downloads
Firmware Updates
Other AOC Tablets Updates
AOC MW0931
AOC MW0811
AOC MW0812
AOC MW0731
Sunday, February 1, 2015
CRONY 7009 Allwinner Android Tablet Pc Firmware
CRONY 7009
Allwinner
Android Tablet Pc Firmware.
Basic steps for flashing tablet firmware for newbies.
What board id ,BoxChip,CPU Chip ,does my tablet pc have ?
Frequently Asked Question
Encyclopedia:-
Read Article About Allwinner Technology
How to Reset a Android tablet:
Read Instructions
Tablet Flashing Tools:
- Tablet Flashing Tool : Firmware upgrade tool LiveSuit & Drivers
- Tablet Flashing Tool: Firmware upgrade Tool Phoenix Usb Pro
Flashing Tutorials for Allwinner Tablets:
- LiveSuit Tutorial : how to flash tablet with LiveSuit
- Phoenix Usb PrO Video Tutorial :Tutorial
- Phoenixcard Tool:Firmware update instruction with microSD card
- See also Phoenixcard Tools
Recommended Tools :
You can also use : Android Multi Tools
When I need to restore my tablet pc ?
In Case of Following
1. Forgotten Pattern Lock on Android Tablets.
2.Too many pattern attempts / Reset user lock.
3. Tablets PC stuck on Gmail account.
4. Android Tablet PC stuck on Android logo.
5. Tablet Android hang on start-up / Multiple errors generating by OS.
6. Android Market having problems or generating errors.
7.Upgrading to new Android version.
6. Android Market having problems or generating errors.
7.Upgrading to new Android version.
you can use this Android Tablet firmware, ROM to restore your Android China tablets to generic firmwares or upgrades . Make sure to charge battery upto 60%. Power failure during flashing may result dead or broken tablets.
Note : Flashing generic tablet firmware should be last option.
Download Stock Rom
Saturday, January 31, 2015
Android beginner tutorial Part 81 RingtonePreference
In this part we will learn how to create and handle a RingtonePreference object.
A RingtonePreference is a settings item that lets the user pick a ringtone from their system. The selected ringtones URI address is saved in the preferences file, which can then be used by the application.
Firstly go to preferences.xml file and add a new RingtonePreference object. The attributes were going to set are android:key, android:title, android:summary, android:showDefault and android:showSilent. The first 3 were already used and explained in the previous tutorials, the last 2 are boolean values that determine whether the ringtone list should display the options to select default ringtone or set ringtone to silent.
So far the preferences.xml file looks like this:
Heres the updated strings.xml file with the new string values:
In the onResume() function of MainActivity.java, add a line that displays the URI of the ringtone:
Full class code looks like this:
And thats it. If you test your application now, youll see that theres a new preference item in the settings of your application.
The ringtone list lets you preview and select from default ringtones as well as the music library.
Thats all for today!
Thanks for reading!
Read more »
A RingtonePreference is a settings item that lets the user pick a ringtone from their system. The selected ringtones URI address is saved in the preferences file, which can then be used by the application.
Firstly go to preferences.xml file and add a new RingtonePreference object. The attributes were going to set are android:key, android:title, android:summary, android:showDefault and android:showSilent. The first 3 were already used and explained in the previous tutorials, the last 2 are boolean values that determine whether the ringtone list should display the options to select default ringtone or set ringtone to silent.
    <RingtonePreference
        android:key="pref_tone"
        android:title="@string/pref_tone"
        android:summary="@string/pref_tone_summ"
        android:showDefault="true"
        android:showSilent="true"/>
So far the preferences.xml file looks like this:
<?xml version="1.0" encoding="utf-8"?>
<PreferenceScreen xmlns:android="http://schemas.android.com/apk/res/android">
    <CheckBoxPreference
        android:key="pref_mute"
        android:title="@string/pref_mute"
        android:summary="@string/pref_mute_summ"
        android:defaultValue="false" />
    <EditTextPreference
        android:key="pref_textsize"
        android:title="@string/pref_textsize"
        android:dialogTitle="@string/pref_textsize_descr"
        android:summary="@string/pref_textsize_summ"
        android:defaultValue="14" />
    <ListPreference
        android:key="pref_theme"
        android:title="@string/pref_theme"
        android:dialogTitle="@string/pref_theme_descr"
        android:summary="@string/pref_theme_summ"
        android:entries="@array/theme_colors"
        android:entryValues="@array/theme_colors"
        android:defaultValue="Blue" />
    <RingtonePreference
        android:key="pref_tone"
        android:title="@string/pref_tone"
        android:summary="@string/pref_tone_summ"
        android:showDefault="true"
        android:showSilent="true"/>
</PreferenceScreen>
Heres the updated strings.xml file with the new string values:
<?xml version="1.0" encoding="utf-8"?>
<resources>

    <string name="app_name">CodeForFood Test Two</string>
    <string name="pref_mute">Mute</string>
    <string name="pref_mute_summ">Disable all the sound in the application</string>
    <string name="pref_textsize">Text size</string>
    <string name="pref_textsize_descr">Enter text size</string>
    <string name="pref_textsize_summ">Set text size of the interface</string>
    <string name="pref_theme">Theme</string>
    <string name="pref_theme_descr">Pick a color</string>
    <string name="pref_theme_summ">Set the applications color theme</string>
    <string name="pref_tone">Ringtone</string>
    <string name="pref_tone_summ">Set ringtone</string>
    <string name="menu_settings">Settings</string>
    <string name="clear_settings">Reset settings</string>

</resources>
In the onResume() function of MainActivity.java, add a line that displays the URI of the ringtone:
Toast.makeText(this, "Ringtone: " + prefs.getString("pref_tone", "none"), Toast.LENGTH_SHORT).show();
Full class code looks like this:
package com.example.codeforfoodtest_two;

import android.app.Activity;
import android.content.Intent;
import android.content.SharedPreferences;
import android.content.SharedPreferences.Editor;
import android.os.Bundle;
import android.preference.PreferenceManager;
import android.view.Menu;
import android.view.MenuItem;
import android.view.View;
import android.view.View.OnClickListener;
import android.widget.Button;
import android.widget.Toast;

public class MainActivity extends Activity{

static final int IDM_SETTINGS = 101;
public SharedPreferences prefs;

@Override
protected void onCreate(Bundle savedInstanceState) {
super.onCreate(savedInstanceState);
setContentView(R.layout.activity_main);

Button btn_clear = (Button)findViewById(R.id.clearButton);
btn_clear.setOnClickListener(new OnClickListener() {

@Override
public void onClick(View arg0) {
Editor editor = prefs.edit();
editor.clear();
editor.commit();
onResume();
}
});
}

@Override
public void onResume(){
prefs = PreferenceManager.getDefaultSharedPreferences(this);
if(prefs.getBoolean("pref_mute", false)){
Toast.makeText(this, "Muted!", Toast.LENGTH_SHORT).show();
}else{
Toast.makeText(this, "Not muted!", Toast.LENGTH_SHORT).show();
}
Toast.makeText(this, "Text size: " + prefs.getString("pref_textsize", "14"), Toast.LENGTH_SHORT).show();
Toast.makeText(this, "Theme color: " + prefs.getString("pref_theme", "Blue"), Toast.LENGTH_SHORT).show();
Toast.makeText(this, "Ringtone: " + prefs.getString("pref_tone", "none"), Toast.LENGTH_SHORT).show();

super.onResume();
}

@Override
public boolean onCreateOptionsMenu(Menu menu){
menu.add(Menu.NONE, IDM_SETTINGS, Menu.NONE, R.string.menu_settings);
return(super.onCreateOptionsMenu(menu));
}

@Override
public boolean onOptionsItemSelected(MenuItem item){
if(item.getItemId()==IDM_SETTINGS){
Intent intent = new Intent();
intent.setClass(this, TestPreferences.class);
startActivity(intent);
}
return true;
}
}
And thats it. If you test your application now, youll see that theres a new preference item in the settings of your application.
The ringtone list lets you preview and select from default ringtones as well as the music library.
Thats all for today!
Thanks for reading!
Friday, January 30, 2015
ONIX TB512 16GB Rk2906 Android Tablet PC Firmware
ONIX TB512-16GB 7 inch Android Tablet PC Firmware
Android Tablet Chipset Information:
RockChip ,RK2906What board id,Software number ,Chipset does my tablet pc have ?
Read Article about Rockchip CPU/Chipset
Tablet PC Short Review :
Onix tb512 7 inch android tablet pc is product of vision tech company. Production was started to keep in mind the customers choice about funky colors . Onix tablets are available in Pink , black and white colors . Onix tablets meets the requirement of of new era tablet pcs . Equipped with all basic function like wifi,capacitive touch ,Cortex A8 CPU with the support of Rockchip . Tablet pc contains 16gb of internal memory which is good enough to save data,Photos,Android apps,games ,movies and songs. Onix tablets are famous in Australia ,Usa and other Countries.
Seller Warranty:
1 Year Vision Tech RTB Warranty
Tablet PC Specifications:
LCD 7 inch Capacitive multi touch Screen Screen Resolution 800 x 600 Pix Processor 1 Ghz Cortex A8 Chipset / Boxchip Rockchip 2906 RAM 1GB Built in Memory 16 GB External Memory Support Micro Card (upto 32GB) Wifi 802.11 b/g/n supported Blue tooth N/A Sim N/A Camera 0.3 Megapixel front , & rear cam HDMI /3g Dongle Support 3G Dongle Microphone Built IN Weight 1.0000 Android Version 4.0 5 Hours Battery Time
Flashing Tools:
Download Flashing Tools for Rockchip tablets: RKbatch ToolTablet PC Specifications:
LCD | 7 inch Capacitive multi touch Screen | |
Screen Resolution | 800 x 600 Pix | |
Processor | 1 Ghz Cortex A8 | |
Chipset / Boxchip | Rockchip 2906 | |
RAM | 1GB | |
Built in Memory | 16 GB | |
External Memory | Support Micro Card (upto 32GB) | |
Wifi | 802.11 b/g/n supported | |
Blue tooth | N/A | |
Sim | N/A | |
Camera | 0.3 Megapixel front , & rear cam | |
HDMI /3g Dongle | Support 3G Dongle | |
Microphone | Built IN | |
Weight | 1.0000 | |
Android Version | 4.0 | |
5 Hours Battery Time |
Flashing Tools:
Tutorials :
Tutorial :How to Flash RockChip Tablets Firmware with RKBatch ToolYou may also like to read : Flashing Tutorial for Rockchip
Common Android Tablets issues :
The following firmware , ROM file will be used when your Android tablet facing various problems .
1. Forgotten Pattern Lock on Android Tablets.
2.Too many pattern attempts / Reset user lock.
3. Tablets PC stuck on Gmail account.
4. Android Tablet PC stuck on Android logo.
5. Tablet Android hang on start-up / Multiple errors generating by OS.
6. Google play store having problems or generating errors.
7.Upgrading to new Android OS.
you can use this Android Tablet firmware, ROM to restore your Android China tablets to generic firmwares or upgrades . Make sure to charge battery upto 60%. Power failure during flashing may result dead or broken tablets.
Note : Flashing generic tablet firmware should be last option.
Downloads:
DOWNLOAD STOCK FIRMWARE
Wednesday, January 28, 2015
Tuesday, January 27, 2015
Inside Sunstech Android Tablet Rockchip
Android Tablet
 |
| Back panel |
 |
| front Panel |
 |
| inside tablet |
Allwinner A13 Zeepad Android Tablet Firmware Download
Allwinner A13 Zeepad Android Tablet Firmware
Firmware ID : A13 AG075 v2.0
board id : AG075 V2.0
 Zeepad is series of Worry Free Gadgets Brand. Zeepad Tablet is 7 inch Allwinner A13 CPU based Android tablet. Zeepad Tab has Cortex A8 Processor ,512MB DDR2 Ram and 4 Gb built in memory. Screen resolution is 1080x720 . Tablet price is 60 US$. You can buy tablet from Amazon.
What if tablet generate System errors ,Stuck on Logo ,forgotten pattern lock ?
First try to hard reset , if does not work then you need flash full firmware of tablet . Allwinner tablet flash with Livesuit flashing utility . first you need to find out CPU information (A10,A13,A20 etc) . Then dowload particular flashing file from link. Flashing tools are flashing tutorials are available in this post.
Tablet Flashing Tools:
- Tablet Flashing Tool : Firmware upgrade tool LiveSuit & Drivers
- Tablet Flashing Tool: Firmware upgrade Tool Phoenix Usb Pro
Flashing Tutorials for Allwinner Tablets:
- LiveSuit Tutorial : how to flash tablet with LiveSuit
- Phoenix Usb Pro Tutorial :Read Instructions
- Phoenix Usb PrO Video Tutorial :Tutorial
- Phoenixcard Tool:Firmware update instruction with microSD card
- See also Phoenixcard Tools
Recommended Tools :
You can also use : Android Multi Tools
Download A13 AG075 V2.0 Firmware
Subscribe to:
Posts (Atom)