Wednesday, March 11, 2015
Apps Script in the classroom
Over the past few years weve seen lots of Apps Script adoption within the EDU community. Educators need lightweight systems that integrate with the Google Apps they already use. Empowered by a cloud-hosted and simple to use platform, non-programmers have been able to create powerful scripts that have a real impact on the lives of their students. In honor of World Teachers Day were highlighting some popular scripts educators have created and other materials teachers can use to get started.
Earlier this year we sat down with Andrew Stillman, Program Officer for Digital Instruction at New Visions for Public Schools and co-founder of youpd.org. We discussed about how he uses Apps Script to build solutions for the New York City school system. Hes the author of many popular scripts in the Script Gallery, including formMule, doctopus, and autocrat, which he uses to create powerful systems that tie together Google Forms, Spreadsheets, Docs and GMail in a way that teachers and administrators can maintain and enhance.
Flubaroo is another popular script among teachers, as it extends the usability of Google Forms for online assignments. After students have submitted their responses this script scores their answers against an answer key, generates histograms of the classs performance, and sends out personalized emails to each student with their grades.
Even more exciting, however, is that teachers have been writing their own scripts to solve problems and make their lives easier. For example, Adelphi University professor Lee Stemkoski wrote a small script that he uses to populate a Google Calendar with the topics for each lecture hell give during the semester. In just 30 lines of code he was able to complete a long, monotonous task with the click of a button.
Teachers looking to get a better idea of how Apps Script works and what it can be used for should watch our video Google Apps EDU Fireside Chat: An Introduction to Apps Script. In it we cover the basic functionality and use cases supported, and even do some live coding to show how easy it is to get started. More than 20 million students, faculty and staff worldwide use Google Apps for Education, so if you build something interesting and worth sharing, consider publishing to the Chrome Web Store.
 | Eric Koleda profile Eric is a Developer Programs Engineer based in NYC on the Google Apps Script team. Hes previously worked with the AdWords API and enterprise content management software. |
Saturday, February 14, 2015
printf scanf and comments in C with example
scanf() in C
#include<stdio.h>

void main()
{
 int a,b,c;
 printf("Enter two values to do multiplication");
 scanf("%d%d",&a,&b);
 c=a*b;
 printf("Your answer is %d",c);
}
, scanf() and comments in C with example")
Why do we use ampersand operator (&)?
C Program to Calculate Simple Interest
/*Program to calculate simple interest
TheCrazyProgrammer date 21/12/14*/

#include<stdio.h>

void main()
{
 int p,n; //Here p is principle amount and n is number of years
 float r,si; //Here r is rate of interest and si is simple interest
 printf("Enter the values of p,n and r");
 scanf("%d%d%f",&p,&n,&r);
 si=(p*n*r)/100;
 printf("Simple interest is %f",si);
}

Comments in C
C allows two types of comments
Friday, February 13, 2015
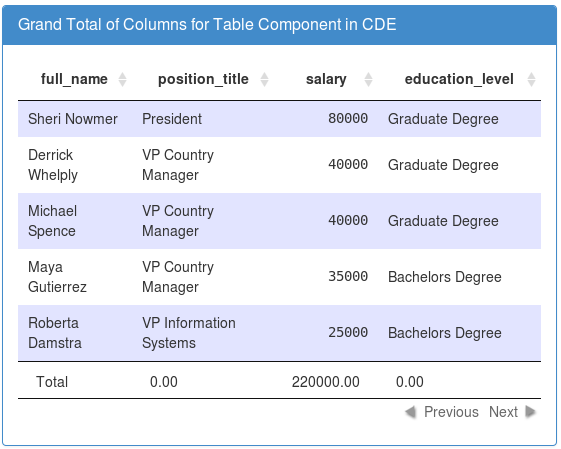
Columns Grand total in Table component of Pentaho CDE
Table component has no direct feature of adding column totals as of this post written date(July 2nd 2013)....
Here is the pentaho community & data tables shared java script to find the Summation of columns in Table component.
Write below code in Draw Function of Table Component.
function f() {
var grandTotalRow = "<tfoot><tr><td>Total</td>";
for(i=1;i<4;i++) {
var total=0;
var rows = $(# + this.htmlObject + tbody tr);
rows.each(function() {
var cellVal = parseFloat($(td:eq(+i+), this).text().replace(,,));
if(!isNaN(cellVal)){
total+=cellVal;
}
});
grandTotalRow += "<td>"+total.toFixed(2);+"</td>";
}
grandTotalRow += "</tr></tfoot>";
if($(#+this.htmlObject+ tfoot).length===0)
$(#+this.htmlObject).find(table).append(grandTotalRow);
}
Sample output:
References :
https://www.datatables.net/forums/discussion/17132/summary-footer-row
http://forums.pentaho.com/showthread.php?94187-Table-Component-Grand-total
Example :
https://metrics.mozilla.com/data/content/pentaho-cdf-dd/Render?solution=metrics2&path=%2FgetInvolved&file=getInvolved.wcdf
Functions in C Programming Part 3
So far we have learnt about the simplest use of functions in C. In serious C programming functions are not used in that way. We have to make them flexible so that we can customize the results as per our requirements. To make generic function we have to pass some values to them. These values are also called parameters or arguments. Based on these parameter our function should return the value to the calling functions.
To make things a bit clear, we want to make such functions which can communicate to its calling function. And it should return the results as per the customization.
Till now we have used the functions like printf() and scanf() in which unknowingly we have passed some arguments like variable names to print it on the screen. We have to obtain similar results in our function. So today I will tell you about passing the values to the functions.
Passing Values to Funtions
Lets understand this concept through a program.
#include<stdio.h>

int multi(int,int);

void main()
{
 int x,y,mul;
 printf("Enter two values to multiply them
");
 scanf("%d%d",&x,&y);
 mul=multi(x,y);
 printf("Answer is %d",mul);
}

int multi(int a,int b)
{
 int ans;
 ans=a*b;
 return(ans);
}
Output

1. In the statement above main() function I have declared the function multi() by writing the instruction int multi(int , int);
int: It is return type. It means which type of value the function should return to the calling function. In this function I have declared that it will return integer value.
multi: It is the name of the function. You can give any name to this function (valid identifier).
(int,int): These are the number of arguments that I will take from the calling functions. I have declared the data type of two arguments as integer. Here I am taking only two arguments, you can take any number of arguments.
2. It is compulsory to declare the function before using it. So that compiler should understand that we will define some custom functions in it.
3. In the first three statements of main() function I have declared some variables and taken some values in it from the user.
4. Now I have passed two parameters or arguments to the my function multi() with the statement mul=multi(x, y);
Here, multi is the name of the function, (x, y) is the arguments that I am passing to the multi() function. These should be integers because as I have declared in the definition of multi() function that I will receive two integer values in it. mul is the variable which will store the value returned by multi() function.
5. Now the control goes to multi() function and the values of variables x and y will automatically be copied in the a and b variables.
6. Now the multiplication takes place inside the multi() function and the result will be stored in ans integer variable.
7. In the last statement I am returning the value stored in ans variable to the calling function i.e. main(). It is done by using the statement return(ans);. Here return is a keyword that returns a single value. It can be also written as return ans.
8. After returning the value the control will again come back to main(). You must remember that as the return statement is encountered the control immediately come back to calling function.
9. Now in last I am printing the answer using printf() function.
I would recommend you to go through the above at least twice to make your basic concepts clear. It is very necessary to understand this concept before proceeding to the further tutorials. If you are finding difficulty in understanding anything then you can ask your question by commenting below.
MySQL installation in remote Ubuntu 12 04 server using PuTTY and accessing 3306 port in local mysql client by Tunneling
Environment:
Client location
1) Ubuntu Server 12.04
Development location
1) Windows 7 64 bit OS ( DEV location)
2) PuTTY installed in Windows.
3) DBVisulalizer(OR any MySQL client tool installed for connecting to remote servers)
4) MySQL installed in Windows and service running state.
This post is divided into two sections.
PART-I : MySQL installation in remote Ubuntu 12.04 Server using PuTTY
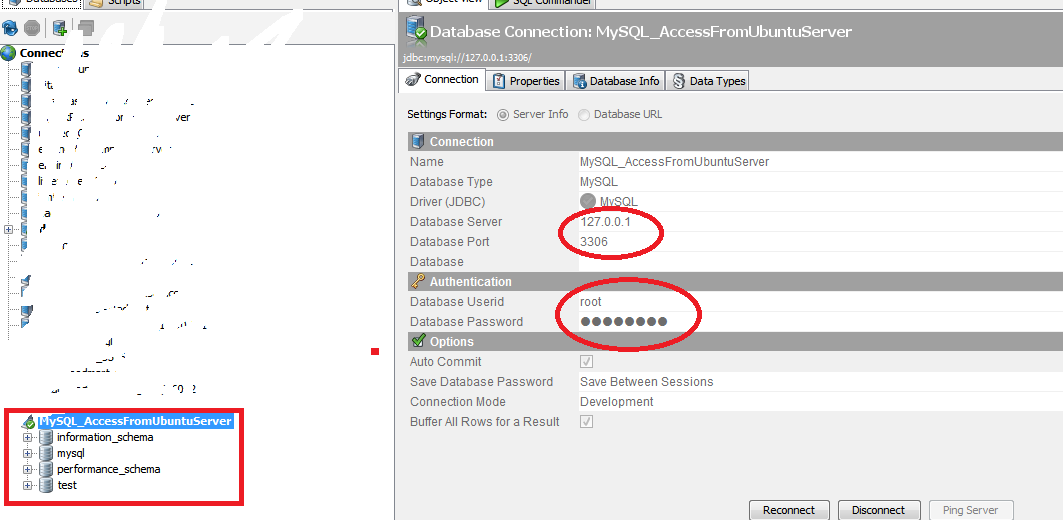
PART-II : How to by pass 3306 port number by Tunneling concept to access the MySQL database.
( Even though if 3306 port number is not opened in the Ubuntu server we can access the mySQL database)
Connect to Ubuntu server using given credentials(Username, password and ppk file)
PART-I : MySQL installation in remote Ubuntu 12.04 Server using PuTTY
1)root@SAD-AKAR-LLM167: aptitude update
2) Download and install using below command
root@SAD-AKAR-LLM167:aptitude install mysql-server
3) The installer should ask you to set a root password : set it as "password" and click on OK.
4) Installation will complete after clicking on OK.
5) MySQL Service status command after installation completed
root@SAD-AKAR-LLM167:/# service mysql status
mysql start/running, process 28645
6) MySQL Start command :
root@SAD-AKAR-LLM167:/# service mysql start
mysql start/running, process 29040
7) MySQL Stop command:
root@SAD-AKAR-LLM167:/# service mysql stop
mysql stop/waiting
8) MySQL installed location:
root@SAD-AKAR-LLM167:/# which mysql
/usr/bin/mysql
9) Connect to MySQL
root@SAD-AKAR-LLM167:/# /usr/bin/mysql -u root -p
Enter password:password
Welcome to the MySQL monitor. Commands end with ; or g.
Your MySQL connection id is 36
Server version: 5.5.34-0ubuntu0.12.04.1 (Ubuntu)
Copyright (c) 2000, 2013, Oracle and/or its affiliates. All rights reserved.
Oracle is a registered trademark of Oracle Corporation and/or its
affiliates. Other names may be trademarks of their respective
owners.
Type help; or h for help. Type c to clear the current input statement.
mysql>
10) Find mySQL version using below command
mysql>SHOW VARIABLES LIKE "%version%";
PART-II : How to by pass 3306 port number by Tunneling concept to access the MySQL database
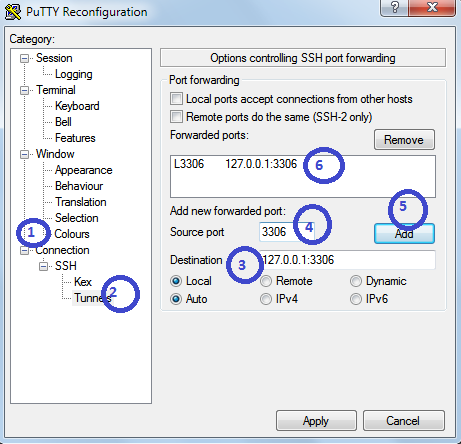
1. On your PuTTY window which will drop down the options in a list shown in below figure.
(Assume that you have already working with PuTTY for MySQL installation and not closed it).
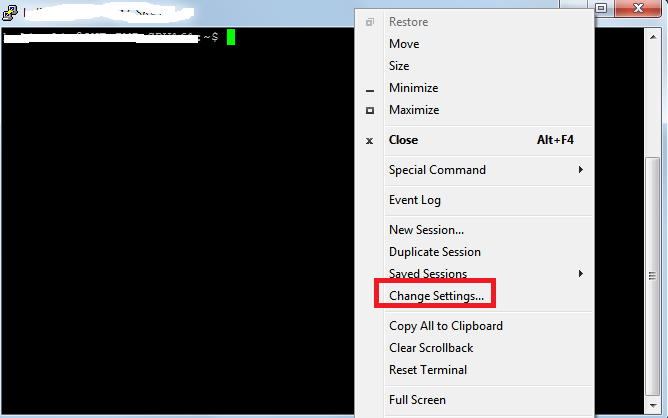
i) On the left side click on "Connections"
ii) Expand SSH then click on Tunnels
iii) Give destination as : 127.0.0.1:3306 or localhost:3306
iv) Give source port as : 3306
v) Now, click on Add
Find OS version
Find which Ubuntu version number using this command
root@SAD-AKAR-LLM167:/usr/bin# cat /etc/*-release
DISTRIB_ID=Ubuntu
DISTRIB_RELEASE=12.04
DISTRIB_CODENAME=precise
DISTRIB_DESCRIPTION="Ubuntu 12.04.3 LTS"
NAME="Ubuntu"
VERSION="12.04.3 LTS, Precise Pangolin"
ID=ubuntu
ID_LIKE=debian
PRETTY_NAME="Ubuntu precise (12.04.3 LTS)"
VERSION_ID="12.04"
Tip Export JPivot output to excel in Pentaho 5 x version By default export to Excel is disabled in 5 x server
This tip is useful to enable the "Print" property of JPivot output to Export into Excel sheet.
By default in pentaho 5.x version servers it is disabled.
Un comment below code in plugin.spring.xml file
<bean id="Print" class="org.pentaho.jpivot.proxies.ProxyPrintServlet"/>
Location of the file is :
<YourDrivePath>/biserver-ce/pentaho-solutions/system/pentaho-jpivot-plugin
NOTE : Once you enable the code, stop the BI server and start again. [Bz it is a configuration file and changes will be affected iff you restart the server.]
Test: In the xml file it was suggested to replace with fop-0.20.5, but I didnt do it instead just uncommented the code and tested which is worked as expected.. If you still unable to get export work , you might have to replace the specified jar file.
:-)
Thursday, February 12, 2015
Table Component Tooltip in Pentaho CDE Showing hidden column values as tool tip on 1st column or any column of table component
A requirement make you go in-depth of subject. Few days back I have got a requirement to show tool tip on table component column(s).
Id like to thank you to pentaho forum for their support in working with java script/jQuery in achieving this functionality.
Requirement :
Take a single query of 4 columns, hide 4th column and its values on table component and show this hidden column values as tool tip on the first column of table component.
In other words, Using CDA get 4 columns output but get only 1st 3 columns on table component and show the 4th column(hidden column) values as tool tip on the 1st column of table component.
Example Environment :
Pentaho C-Tools of TRUNK version(after 14 version trunk)
Pentaho BA server 5.1.0 stable
PostgreSQL foodmart database for querying purpose.
Here Id like to concentrate on the core part of the example hence design your layout.
What you can learn in this post ?
1. Query component usage.
2. How to store result set in a parameter using query component.
3. How to hide columns using java script/jQuery script on table component.
4. How to make use of tipsy function to show tooltip on table component.
Layout section :
Design as per your requirement
Data source section :
Query 1 :
SELECT employee_id,full_name,gender,position_title from employee limit 10
Sample image


Components panel section
Here for this post you need to work out with a parameter, a query component and table component.
first lets have a parameter : Name it as tooltipValues

Query component :
You will be storing the query output in parameter using query component.

Write below Code in PostFetch Expressionof Query Component :
function f2(data){
var tooltipValues = [];
for(var i=0; i <data.resultset.length; i++){
tooltipValues.push(data.resultset[i][3]);
}
alert(tooltipValues);
alert("length="+data.resultset.length);
return tooltipValues;
}
Now the table Component
Add the table component, give a name to it, and the data source for it,(in this example give the same data source i.e., Datasource=query1_table) & the HTML Object here it is Panel_1
Write below code in Post Execution of table component
function myTip()
{
$(th:nth-child(4),td:nth-child(4)).hide();
$(#Panel_1 tr td:first-child).each(
function(index){
$(this).tipsy({title: function(){ return tooltipValues[index][3] ; }});
}
);
}
In the above code
Using hide() function you are hiding the result of 4th column
#Panel_1 is the HTML Object
Using tipsy() function you are showing the 4th column values as tooltip on the 1st column.
td:first-child, you are telling the jQuery to show the tooltip values on 1st column of the table component.
Thats it you are done...!!!
Save the dashboard and see the preview.
Preview/Observations :
Image 1 :

Image 2:

Image-3:

Source Code of this example :
Download here
Thank you for reading this article.
Functions in C Programming Part 1
So lets begin our quest to learn functions in C programming. The very first question that will hit your mind should be.
What are functions in C?
A function is a set of statements which are aggregated to perform some specific task. Generally we use functions to perform basic tasks in a generic way.A good C programmer avoids writing the same set of statements repeatedly. Instead of it, a programmer makes a function and writes all the statements there and call that function whenever needed.
There are two types of functions.
Inbuilt Function
These functions are already defined to perform specific task. For example printf() to print value on screen while scanf() to read value. There are many other inbuilt functions.
User-defined function
The functions that are defined by the programmer or user are called as user-defined functions. In this tutorial you will learn how to define and use such functions.
In functions we have three parts.
Function declaration
return_type function_name(argument list);
Function declaration tells the compiler about the value that it will return, the name of the function and the arguments or values that will be passed to the function. Passing the values is optional so you can skip argument list passed. If you don’t want to return any value then just write void instead of return_type.
Function Definition
return_type function_name(argument_list)
{
Body_of_funtion;
. . . . . .
. . . . . .
}
It defines the actual body of the function and the task that it will perform.
Function calling
function_name(argument list);
This statement will call the function and the control of the program will go to body of the function. After executing all the statements in the function it will come back where calling was done.
Lets checkout the simple C program with two functions.
#include<stdio.h>

//funtion declaration
void msg();

void main()
{
 printf("Hello All");

 //funtion calling
 msg();
}

//funtion definition
void msg()
{
 printf("
TheCrazyProgrammer");
}
Output

- As I said in earlier tutorials, main() is also a function. Every C program starts with the main() function. It is also called starting function and we cannot alter the control from it in the beginning. Our above program also starts with main() function.
- In the main() function I have printed the message "Hello All" using printf() function.
- After that I have called the function msg() which is created by me. Carefully look I called the msg() function by writing msg();
- After encountering the call to msg() function, the control shifts to the msg() function.
- Now a message "TheCrazyProgrammer" is printed on the screen.
- Again control reaches to the main() function. As there are no statements left in the main() function. So the program comes to end.
While transferring the control from main() function to msg() function, the activity of main() function is temporarily suspended. In our above program main() is calling function and msg() is called function.
Function is one of the most important topics in C programming. You cannot write efficient programs without the proper knowledge of functions in C programming. So I recommend you to go through this tutorial at least once to make everything clear. In the next tutorial I will tell you about the multiple calls within one function.
Thursday, February 5, 2015
Android beginner tutorial Part 2 Creating a project in Eclipse
Launch the Eclipse IDE with Android SDK built in. It will ask you to perform some one-time tasks, such as create a workspace on your hard drive.
When thats done, we can start creating our first application. To begin creating a new Android project, select File > New > Android Application Project.
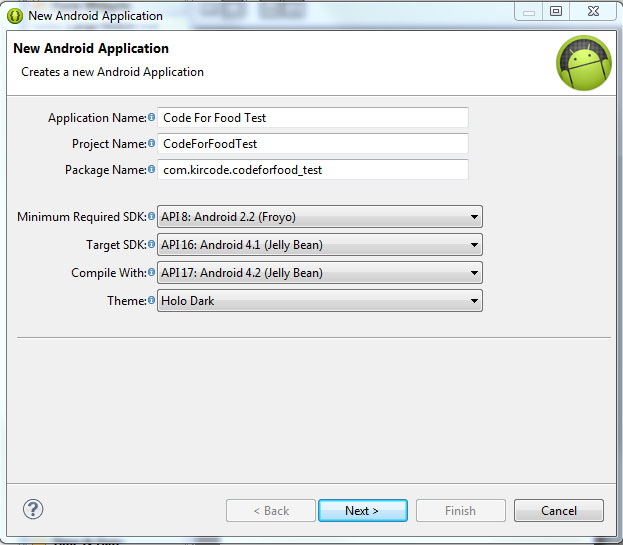
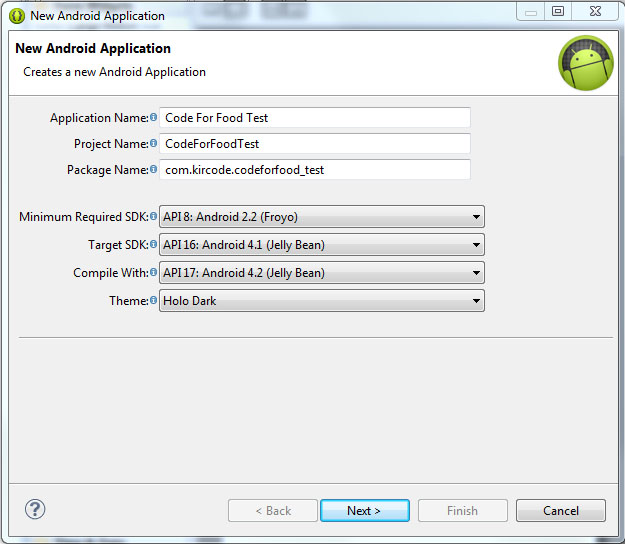
A dialog box pops up, which requires us to fill out some of the general settings for our future application. The first field is called "Application Name". This is the title of your application - it appears as the name of your app in the Play Store, Manage Applications screen, etc.
The second field is called Project Name. Unlike Application Name, this isnt shown to anyone but the developer when using Eclipse. Usually, the Application Name and Project Name are the same.
The third field is called Package Name. This is basically the id of your application - usually its not shown to the user, but it is required to stay the same for all of the versions of your application. This is similar to ids in Adobe AIR descriptor files. The format is the same as packages in AS3, for example - com.kircode.codeforfood_test
Then we are required to select Minimum Required SDK. This is basically the Android version that is required to run your application. Keep in mind that the lower the version is, the bigger your audience is, but your application wont be able to use some of the newer SDK features. It is recommended to set this value to API 8, this way, according to Android development center, youre targeting 95% of the users. Thats good enough.
The next field is Target SDK. Set this to the highest API version that your application will run on. This value informs the system that the application has been tested on this API and is supposed to work without the sytem having to do any compatibility processes. If youre unsure what to select here, pick one of the modern versions - this way your application wont look dated and will still be compatible with older versions (up to Minimum Required SDK).
The next field is Compile With. This is the API version that the application will be compiled with. If the default value isnt the most recent version, its recommended to pick that.
And finally theres Theme. Pick the color theme that will suit your application. You will, of course, be able to customize every element of your application manually if you want, but choosing a Theme here is a good alternative too.
Hit next, and you should be taken to the next configuration step. Here youll see a few check boxes and fields. The first checkbox, "Create custom launcher icon", can be selected if you want to create a custom icon for your application. I do! So I always have this checked.
The next checkbox is "Create activity". Check this, because we want to generate ourselves an Activity. I will explain what an Activity is in details a bit later.
This isnt going to be a library, so dont check "Mark this project as a library". If you have "Create Project in Workspace" checked, the application project folder will be created in the workspace that you defined when you first launched Eclipse. If its unchecked, youll be able to set a custom location for your project. I think its nice to keep things organized and all development projects should be in the development workspace, so I leave this checked.
The next part consists of a checkbox and a selection menu. Its labeled as "Working sets" and the checkbox asks us if we want to add our project to a working set. Working sets are basically groups of projects that are displayed together in the menu when youre working on one of those projects. This is a useful feature and might come in handy when working on multiple applications of the same sort, or of the same purpose, or grouped together for some other reason. Right now we dont want to include our projects in any working sets.
Hit next. We can now set a Launcher Icon for our application. If you have an image ready for that, you can import it here. You can create a new icon using any of the preset clipart images or enter some text to act as an icon. You have several other tools in this window to style your icon.

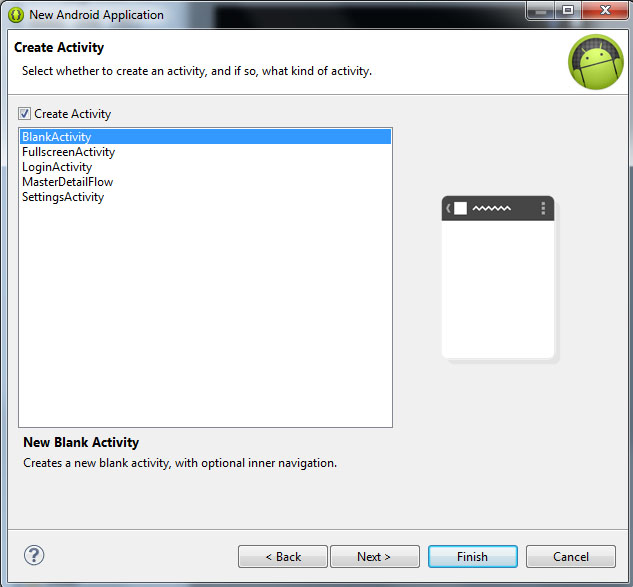
Click next, and now were asked to choose what kind of activity we want to create. Now, simply put, an Activity is a window in Android. You probably know that there arent really any windows in Android at all, except for some dialog boxes, and thats true. But the way Activities behave are similar to windows in computer operating systems. For example, if we launch a game on Android, we are first taken to the main menu screen. This is an Activity. If we click "play", the game itself launches where we can actually play it. This is another Activity. It should be noted that if we didnt purposefully close the previous (main menu) activity when launching the game, it doesnt close. The main menu is still there, under the game, not visible to the user, just "sleeping" and waiting to be opened again.
The Activities have a complex life cycle, which I will explain in later tutorials. For now, you just need to understand that an Activity is a single screen that contains some content, it can be opened, paused, stopped, etc.
So right now were on the Create Activity screen, with 5 available activity types - BlankActivity, FullscreenActivity, LoginActivity, MasterDetailFlow and SettingsActivity. Think of these as of templates.
The BlankActivity is a blank page that we can fill with content.
The FullscreenActivity is a blank page also, but it hides all the UI elements of the device. This is probably most suited for games and video applications.
The LoginActivity is a simple template used for registering or logging in using email and password.
The MasterDetailFlow is a template that has a menu and a content area. It should be noted that the template is displayed differently on tablets and phones (it creates 2 columns on bigger screens where possible, and 1 column on smaller screens).
The SettingsActivity is a simple page with UI components lined up like in the settings screen of your device.
Pick BlankActivity and click Next.
Here we are asked to set the Activity Name, Layout Name and Navigation Type for our main Activity. Leave their values as they are by default - MainActivity, activity_main and None. The names are basically for the developer to remember which Activity is which. The Navigation Type dropdown box lets you select a default navigation method for your Activity. There are multiple nice and useful pre-set navigation features here, but well leave this field None for our first project.
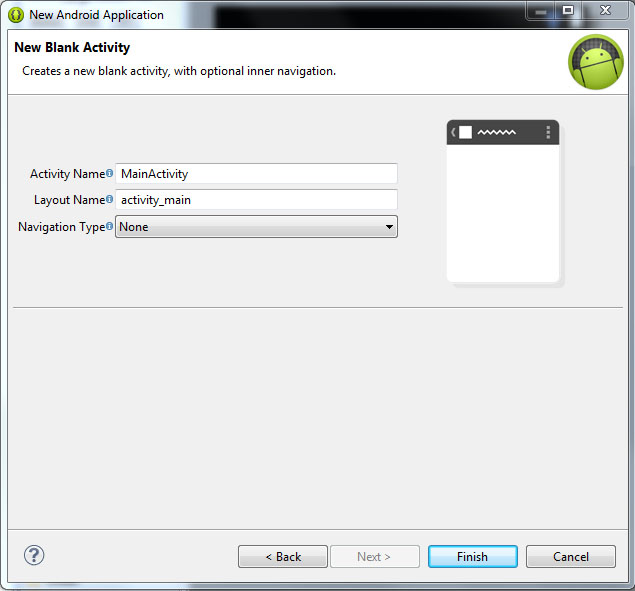
Click Finish, wait, and youre done!
Well continue next time!
Thanks for reading!
Tuesday, February 3, 2015

Sunday, February 1, 2015
Perform Hard Reset in your Samsung Galaxy Y S5360
This is a bit old school phone. But I have still decided to make a tutorial just for the people that do not know how to hard reset / factory reset their Samsung Galaxy Y (S5360).

This procedure is almost identical to high end phone like Galaxy S3, Galaxy S4 and other Samsung devices.
NOTE: As I have always said, this will erase all your data such as contacts, messages, pictures, mp3 etc.. etc..
Here is the procedure
1. Turn off your phone
2. Press and Hold VOLUME UP + Home Button + POWER Button
3. Release the button when you see the Samsung Galaxy Y logo
4. Select wipe / factory reset, to navigate press the volume rocker, to select press the Home button
5. Reboot your phone
NOTE: If the process did not succeed you need to wipe the cache first before performing a wipe / factory reset.
I hope this tutorial help you.
Sunday, January 25, 2015
Preloading in ActionScript 3 0 Part 1
Preloader01_Start.fla
allin.swf
In this tutorial, we are going to learn how to create a preloader in Flash using ActionScript 3.
What is a preloader and what is it for?
Flash movies tend to have larger than average file sizes compared to HTML websites. So when you create a Flash website, chances are, it will take a while to load every time a user visits it. Thats why its important to give the user an indication regarding how much longer he or she has to wait. This can be done by adding a preloader to your Flash website. A preloader is simply a kind of visual feedback that shows the user how much of the Flash website has already been loaded. A simple preloader can show nothing more that just a basic progress bar and some text that displays the loading percentage, while other Flash websites will have fancier preloaders that contain more complex animation and design. Regardless of the complexity of the preloader that you choose to make, its always a good idea to have one for your Flash website. Without a preloader, the visitor might just get a blank browser window at first and think that the website is broken. And instead of waiting for the site to load, the user will more likely end up leaving your website.
How can I create a preloader in Flash?
There are a couple of methods that you can use to create a preloader in Flash. The method that we will take a look at in this tutorial involves the use of 2 Flash movies. One would be your actual Flash movie or website, while the other Flash movie is the one that will preload the Flash website. So here, we have a dedicated Flash movie that will do the actual preloading.

Whats going to happen is that the Flash website gets loaded into the preloader Flash movie.

As the Flash website gets loaded into the preloader Flash movie, the preloader Flash movie will calculate and display the loading progress. To do this, the preloader Flash movie needs to contain the ff:
- the ActionScript code that does the preloading
- the visual elements of the preloader (such as the progress bar and the percentage text field)

This tutorial comes with 2 exercise files:
- Preloader01_Start.fla
This will generate our preloader Flash movie. This is where we will put the ActionScript 3 code for preloading a Flash website or file. - allin.swf
This is the Flash movie that we will be preloading. It just contains a picture of some poker chips and some animated text that says "all in".
Make sure that you save both files in the same folder. Otherwise, the preloader Flash movie might not find the Flash movie that we want to preload.
Lets first take a look at the contents of our preloader Flash movie. So go ahead and open the Preloader01_Start.fla file. On the stage you will see a movie clip instance named progressBar_mc and a dynamic text field named percent_txt.

They will both be used to indicate the loading progress. The progress bar gets fuller as the loading progresses, and the text field shows the percentage value of how much has already been loaded.
If you look at the main timeline, youll see that it has only one frame. But if you go inside the progress bar movie clip, youll see that it contains some animation inside it. You can double-click on the progress bar movie clip to go inside its timeline.
NOTE: If you have trouble selecting the progress bar, make sure that you click on the border.
Once youre inside the progress bar movie clips timeline, youll see that it contains a layer named bar that has a shape tween.

This shape tween shows the progress bar going from empty to full. You can test the movie to see how it looks like. But when you test it, youll just see the progress bar animate and loop endlessly. You wont see the text field update itself, and you wont see anything load yet. Thats because we havent added any code.
This progress bar animation will be used to represent the loading progress. Youll notice that the animation inside the progress bar movie clips timeline is made up of 100 frames.

This is not an arbitrary number. The animation really has to have 100 frames because we want it to represent 100%. Each frame of the animation, represents one percent of the file that we are going to preload. The great thing about this is that you can just replace the animation with something else if you want a different progress bar. Just make sure that it has 100 frames. It doesnt even have to be a progress bar. You can be more creative with your preloader animation if you want. But dont go too overboard with your preloader animation. If you do, then your preloader Flash movie might end up having such a large file size that it will end up needing its own preloader.
REMEMBER: The animation is INSIDE the progress bar movie clips timeline, NOT on the main timeline.
So lets begin adding our ActionScript 3 preloader code. If youre still inside the timeline of the progress bar movie clip, make sure that you go back to the main timeline by clicking on the Scene 1 link.
Once youre back on the main timeline, select frame 1 of the Actions layer and then open up the Actions panel.
STEP 1
First, lets stop the progress bar animation. We dont want the progress bar to start moving right away. We only want it to start moving once the loading process has started. So make it stop using the stop() method.
progressBar_mc.stop();
STEP 2
Then create a Loader and a URLRequest object:
progressBar_mc.stop();

var myLoader:Loader = new Loader();
var myURL:URLRequest = new URLRequest("allin.swf");
What are these objects for?
Loader objects are used to load external SWF files into a Flash movie. So this Loader object is going to be responsible for loading the Flash movie that we want to preload. Without this object, then we would not be able to load our main Flash movie into our preloader Flash movie. In our example, the external file that we want to load would be allin.swf.
NOTE: Aside from being able to load SWF files, Loader objects also have the ability to load JPG, PNG, and GIF files.
The URLRequest object is used to specify the path to the external file that you would like to load. This is what will tell the Loader what its supposed to load. In this example, we want to load the allin.swf file, so thats why we typed the file name inside the parentheses of the URLRequest() constructor.
NOTE: You must pass the file name or path to the URLRequest() constructor as a string. So it should be in quotation marks.
So to recap, the Loader object loads the file, while the URLRequest is used to specify the path to the file that needs to be loaded.
STEP 3
At this point, lets now load the external SWF file into our preloader flash movie. But before we continue, I must warn you: after we load the external SWF file, we wont see it yet. But thats ok. Well fix that later on.
To load the external file, we use the load() method of the Loader class. The load() method needs an argument. It needs to know which file you want to load. Weve already specified that when we created the URLRequest object. So we simply pass the URLRequest object as an argument to the load() method.
So lets go ahead and use myLoader (our Loader object) to load allin.swf (the external SWF file that we want to preload as specified in the myURL URLRequest object) using the load() method. Go back to the code and add the load() statement highlighted in bold:
progressBar_mc.stop();

var myLoader:Loader = new Loader();
var myURL:URLRequest = new URLRequest("allin.swf");

myLoader.load(myURL);
So this new line that weve added tells the myLoader object to begin loading the file requested by the myURL object (which is allin.swf). Without this line, then the loading will not start.
But remember, as Ive mentioned earlier, when we test the movie, we wont see the file come out on the stage just yet. Thats because weve told Flash to load it, but we havent told Flash to display it yet. Loading and displaying are two different things. But dont worry, well fix that later on.
STEP 4
Next, well need some event handlers. These event handlers that were about to add are events that relate to the loading progress and loading completion of our external file. These events are:
1. ProgressEvent.PROGRESS
This event refers to the progress of the loading process. It is active all throughout the time that the external file is being loaded. The event is dispatched every time new data from the external file is being loaded into the Flash document by the Loader.
2. Event.COMPLETE
This event is dispatched when the external file has successfully completed the loading process.
Ill explain what these event handlers will do later on, but for now, add the following code highlighted in bold:
progressBar_mc.stop();

var myLoader:Loader = new Loader();
var myURL:URLRequest = new URLRequest("allin.swf");

myLoader.load(myURL);

myLoader.contentLoaderInfo.addEventListener(ProgressEvent.PROGRESS, loading);
myLoader.contentLoaderInfo.addEventListener(Event.COMPLETE, loaded);

function loading(e:ProgressEvent):void
{
//This will contain the formula that will calculate the loading progress
//as well as the code that will control the progress bar animation
//and the text field output
}

function loaded(e:Event):void
{
//Here, we will specify what will happen once the file has loaded successfully
}
NOTE: These two event listeners that I just mentioned are NOT added directly to the Loader object. You add them to the contentLoaderInfo property of the Loader object instead. So instead of typing myLoader.addEventListener(...), youll type in myLoader.contentLoaderInfo.addEventListener(...).
STEP 5
Right now, we just created 2 empty event listener functions. One for ProgressEvent.PROGRESS, and another one for EVENT.Complete.
Lets go ahead and complete the loading function first. This function is the one that we assigned to the ProgressEvent.PROGRESS event, so this means that this function will get called numerous times - it will be called each time new data from the external file gets loaded into our preloader Flash movie. So basically, this event keeps happening as the loading progress occurs (hence the name ProgressEvent.PROGRESS). Because of that, we can use it to write some code that will calculate and update the user regarding the loading progress.
Go to the loading function, and add the following lines highlighted in bold:
function loading(e:ProgressEvent):void
{
var nPercent:Number = Math.round(e.bytesLoaded / e.bytesTotal * 100);
percent_txt.text = nPercent.toString() + "%";
progressBar_mc.gotoAndStop(nPercent);
}
So now we just added 3 new lines inside the loading function. Lets try to understand what these lines are for.
1st line: var nPercent:Number = Math.round(e.bytesLoaded / e.bytesTotal * 100);
The first line calculates for the loading percentage. In order to calculate for the loading percentage, you will need to get the amount of bytes that have already been loaded, and divide it by the external files total number of bytes. And then we multiply that value by 100 to convert the value into percent.
So how do I get the number of bytes that have been loaded and the total number of bytes?
This information automatically gets passed to the ProgressEvent.PROGRESS listener function (which in this case is our loading function). The number of bytes that have already been loaded can be retrieved using the bytesLoaded property, while the files total number of bytes can be retrieved using the bytesTotal property. To access these properties, we use our event object - e:
e.bytesLoaded - the number of bytes that have been loaded
e.bytesTotal - the external files total number of bytes (or its total file size)
Then divide those two values and multiply by 100 to get the percentage value.
e.bytesLoaded / e.bytesTotal * 100;
Then use Math.round() in order to round the value to a whole number.
Math.round(e.bytesLoaded / e.bytesTotal * 100);
Then we assign the equation to a variable (which I named nPercent):
var nPercent:Number = Math.round(e.bytesLoaded / e.bytesTotal * 100);And that is what the first line in the loading function means.
We will then use this nPercent variable for 2 things: (1) to display the percentage value in the text field and (2) to control the animation of the progress bar.
2nd line: percent_txt.text = nPercent.toString() + "%";
The second line in the loading function displays the value of nPercent in the dynamic text field on the stage. Ive named the dynamic text field percent_txt. The text property of the TextField class lets you assign the text that you want to appear in the text field. So we assign the nPercent variable to it in order to display its value in the text field. However, nPercent is of the Number data type. Text fields can only display strings so we simply convert nPercent to the String data type using the toString() method. If you want the number to appear with a percent sign, then simply concatenate the value with the percent(%) character.
NOTE: The toString() method will not convert the numbers into letters. For example, 4 will not be converted to four. It will still be displayed as 4 but will be treated as a String instead of a Number. We need to do that so that the text field will accept it.
3rd line: progressBar_mc.gotoAndStop(nPercent);
The last line in the loading function controls the timeline of the progressBar_mc MovieClip. Recall that there is a 100 frame animation inside this MovieClip. On frame 1, the progress bar is empty. As the animation progresses, then the progress bar fills up until it is completely filled at frame 100. Theres a reason why we want the animation to have 100 frames. We want to associate each frame number with the percentage of data that has been loaded. If 20% of the external file has been loaded, then we want the playhead to move to frame 20 of the progress bar animation. If 50% of the data has been loaded, then we want the playhead to move to frame 50, and so on... In order to do that, we can use the gotoAndStop() method of the MovieClip class and pass nPercent to it. So as nPercent increases, then the animation moves forward in sync with the percentage value.
NOTE: It is important that nPercent is rounded to a whole number because of this line. Thats why we used Math.round() to round it. We cannot tell Flash to go to a frame no. 25.43, for example, since there is no frame no. 25.43. Frame numbers are always whole numbers.
And that completes our loading function. In the next step, well test the movie, but well simulate the download process when we do the testing. This means well make the movie behave as if were actually viewing it online, so instead of finishing the loading process right away, well wait a while as if we were actually viewing it online. We want to simulate the download so that we can actually see the progress bar update. If we didnt simulate the download, then everything will just load right away.
STEP 6
How do we simulate the download?
First, you must test the movie. The keyboard shortcut for testing the movie is ctrl + enter (Windows) or cmd + return (Mac).
Once you test the movie, you should see the progress indicators go to 100% right away. This means that the external SWF file has already been loaded (but remember, you wont see it yet!). That was pretty fast! We just tested the movie, and all of sudden it loads right away. Thats because our files are just in our hard drive. So lets change a few settings that will make Flash pretend as if we were testing this online instead.
So while the test movie window is still there, go to the View menu. If youre on a Mac, the View menu can be found in the menu bar at the top of your Flash workspace. If youre on Windows, the View menu can be found at the top of the actual test movie window.
So go to View, and then go to Download Settings, and then choose the desired download speed. Lets choose the 56K speed. This means that when we test the movie, Flash is going to behave as if we were viewing it online using a 56K connection. This is a pretty slow connection, so our small external SWF file should take about 7 to 8 seconds to load.
Now that weve chosen a speed, go to View again, and then choose Simulate Download. This will test the movie again, but will behave as if we were viewing it with a 56K connection. This time, you should now see the progress bar update.
At this point, you still wont see the external SWF file appear on the stage. But it is being loaded. Well be fixing the code soon so that we actually get to see the allin.swf file once the loading completes.
STEP 7
Lets now go to the loaded function and put some code inside it. The loaded function is the listener function that we assigned to EVENT.Complete. This means that this function will get called, once myLoader finishes loading the external SWF file. So whatever it is that we want to happen once the loading is complete, we should place in this function.
One of the first things we want to do is to remove the progress bar and text field from the stage. Some people might want to leave these visible, but I prefer to remove them so the stage wont be so cluttered.
So go to the loaded function, and add the following lines:
function loaded(e:Event):void
{
removeChild(progressBar_mc);
removeChild(percent_txt);
}
Once the loading is complete, these 2 lines will remove the progressBar_mc and percent_txt display objects from the stage.
NOTE: Another option would be to use the visible property:
STEP 8
So now, test the movie again. Be sure to simulate the download. You should see the progress bar and text field disapper once it gets to 100%.
STEP 9
So now, lets go ahead and make sure that we actually see the externally loaded SWF file once the loading is complete. To do that, we need to add it to the display list. If we can remove things from the display list using removeChild(), then we can add things to the display list using addChild(). When you add something to the display list, it means that the display object can now be seen.
So go back to the loaded function and add the following line highlighted in bold:
function loaded(e:Event):void
{
removeChild(progressBar_mc);
removeChild(percent_txt);
addChild(myLoader);
}
So here, we are adding myLoader to the display list. We should now see the externally loaded SWF file show up on the stage once the loading is complete.
But why are we adding myLoader? Shouldnt we add allin.swf?
allin.swf is actually inside myLoader. When a Loader object loads an external file, the external file is actually loaded inside the Loader object itself. So the external file becomes a child of the Loader object that loaded it. So if you add the Loader to the display list, then its child gets added as well.
STEP 10
So now, go ahead and test the movie. Be sure to simulate the download as well. And you should now see the externally loaded SWF file appear on stage once the loading is complete.
STEP 11
Lastly, I want to remove a few more things once the loading is complete. I want to remove the event listeners that we created. So go back inside the loaded function and add removeEventListener() statements for the ProgressEvent.PROGRESS and Event.COMPLETE listeners.
function loaded(e:Event):void
{
removeChild(progressBar_mc);
removeChild(percent_txt);
addChild(myLoader);
myLoader.contentLoaderInfo.removeEventListener(ProgressEvent.PROGRESS, loading);
myLoader.contentLoaderInfo.removeEventListener(Event.COMPLETE, loaded);
}
Why are we removing them?
In this case, its because we no longer need them once the loading is complete. Its a good habit to remove listeners that you no longer need. It might help you save more computing resources in the long run, especially if you have a pretty heavy Flash movie. But if your Flash movie needs to preload something again, you might need to keep the event listeners available instead of removing them. Or you can also just add them again at some point in your code. Likewise, you should add the progressBar_mc and percent_txt display objects back to the stage if your Flash movie needs to preload another external SWF file. If you try to remove something thats already been removed using removeChild(), then youll get an error message. So be sure to add those back if you need them again. But in this example, were only loading one external SWF file, so there wont be a need for that.
NOTE: Each Loader object can only load an external file one at a time. If you want to load multiple external files all at once, then you should create multiple Loader objects.
And that completes our preloader. Heres the full code:
progressBar_mc.stop();

var myLoader:Loader = new Loader();
var myURL:URLRequest = new URLRequest("allin.swf");

myLoader.load(myURL);

myLoader.contentLoaderInfo.addEventListener(ProgressEvent.PROGRESS, loading);
myLoader.contentLoaderInfo.addEventListener(Event.COMPLETE, loaded);

function loading(e:ProgressEvent):void
{
var nPercent:Number = Math.round(e.bytesLoaded / e.bytesTotal * 100);
percent_txt.text = nPercent.toString() + "%";
progressBar_mc.gotoAndStop(nPercent);
}

function loaded(e:Event):void
{
removeChild(progressBar_mc);
removeChild(percent_txt);
addChild(myLoader);
myLoader.contentLoaderInfo.removeEventListener(ProgressEvent.PROGRESS, loading);
myLoader.contentLoaderInfo.removeEventListener(Event.COMPLETE, loaded);
}
Go to Part 2 (Preloading in ActionScript 3.0)
How to run windows XP in windows 8 using virtualbox
About VirtualBox
I think you got some of the knowledge about the virtualbox. If you want to learn in depth please refer the documentation or help of the virtualbox. First download the virtualbox from the official site [ https://www.virtualbox.org/ ] and get ready.
install windows xp in virtual box on windows 7

step 2 :- Click new icon in virtual box or CTRL + N.


