Tuesday, February 3, 2015
Android beginner tutorial Part 25 RatingBar widget
The RatingBar class is a subcless of ProgressBar and is on the same level as SeekBar. It displays several stars that the user can drag on (similarly to SeekBar) to set a rating value. The number of stars, initial rating, step size and more settings like that are customizable both using xml and java.
Go to activity_main.xml layout file of your testing application and create a simple layout with a TextView and a RatingBar.
<LinearLayout xmlns:android="http://schemas.android.com/apk/res/android"
    xmlns:tools="http://schemas.android.com/tools"
    android:layout_width="match_parent"
    android:layout_height="match_parent"
    android:orientation="vertical"
    android:gravity="center"
    tools:context=".MainActivity" >

    <TextView android:id="@+id/text"
        android:layout_width="match_parent"
        android:layout_height="wrap_content"
        android:gravity="center"
        />

    <RatingBar
        android:id="@+id/rating"
        android:layout_width="wrap_content"
        android:layout_height="wrap_content"/>

</LinearLayout>
Now go to the MainActivity.java class file. Here we will do two things - set the settings for our RatingBar and add an event listener, which changes the TextViews value when the rating is changed.
First, implement an OnRatingBarChangeListener interface in the class definition line:
public class MainActivity extends Activity implements OnRatingBarChangeListener{
Then declare 2 variables - RatingBar and TextView:
private RatingBar ratingBar;
private TextView textView;
Then, inside the onCreate() function, set the values of ratingBar and textView objects to our "rating" and "text" objects in the layout. Set the amount of stars, the step size and default rating for the RatingBar object using setNumStars(), setStepSize() and setRating() methods.
After that, set the text of our TextView to display the current rating. Add an event listener to the RatingBar instance using setOnRatingBarChangeListener() method.
@Override
protected void onCreate(Bundle savedInstanceState) {
super.onCreate(savedInstanceState);
setContentView(R.layout.activity_main);

ratingBar = (RatingBar)findViewById(R.id.rating);
textView = (TextView)findViewById(R.id.text);

ratingBar.setNumStars(5);
ratingBar.setStepSize(1);
ratingBar.setRating(3);

textView.setText("Rating: " + ratingBar.getProgress());
ratingBar.setOnRatingBarChangeListener(this);
}
Note that you can also use decimal values in setStepSize() and setRating() method parameters. If you do so, put (float) before the number values so that the compiler understands these as float type values (because the methods expect floats).
Then create a function called onRatingChanged() and handle the event by updating the TextViews value:
@Override
public void onRatingChanged(RatingBar rb, float rating, boolean fromUser){
textView.setText("Rating: " + ratingBar.getProgress());
}
Full class code:
package com.kircode.codeforfood_test;

import android.app.Activity;
import android.os.Bundle;
import android.view.Menu;
import android.widget.RatingBar;
import android.widget.RatingBar.OnRatingBarChangeListener;
import android.widget.TextView;

public class MainActivity extends Activity implements OnRatingBarChangeListener{

private RatingBar ratingBar;
private TextView textView;

@Override
protected void onCreate(Bundle savedInstanceState) {
super.onCreate(savedInstanceState);
setContentView(R.layout.activity_main);

ratingBar = (RatingBar)findViewById(R.id.rating);
textView = (TextView)findViewById(R.id.text);

ratingBar.setNumStars(5);
ratingBar.setStepSize(1);
ratingBar.setRating(3);

textView.setText("Rating: " + ratingBar.getProgress());
ratingBar.setOnRatingBarChangeListener(this);
}

@Override
public void onRatingChanged(RatingBar rb, float rating, boolean fromUser){
textView.setText("Rating: " + ratingBar.getProgress());
}

@Override
public boolean onCreateOptionsMenu(Menu menu) {
// Inflate the menu; this adds items to the action bar if it is present.
getMenuInflater().inflate(R.menu.activity_main, menu);
return true;
}

}
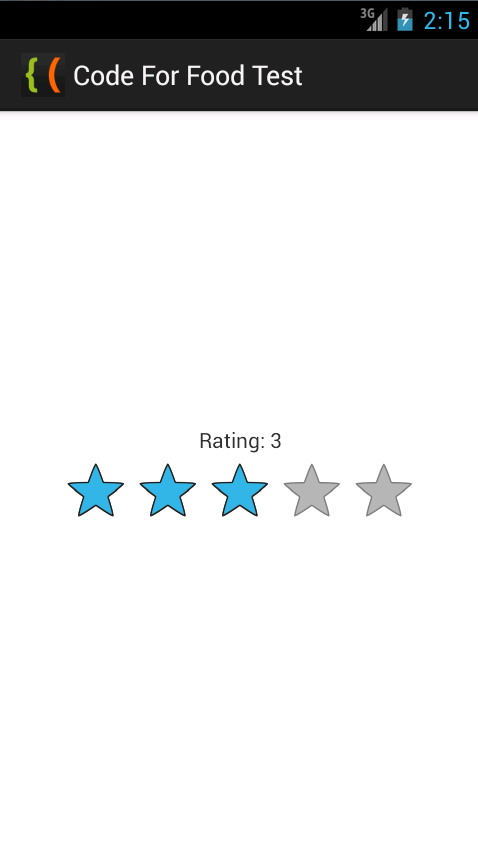
The results look like this if you test the application:

Thats all for today.
Thanks for reading!
Subscribe to:
Post Comments (Atom)
No comments:
Post a Comment
Note: Only a member of this blog may post a comment.