Tuesday, January 27, 2015
Bootstrap Forms Tutorial
Hai everyone today i will show how to create forms using Bootstrap. Twitter Bootstrap is a best front-end framework for developing and designing web applications. Using bootstrap we can easily design the web pages without any designing knowledge, it makes developing css much faster, it is less weight and very helpfull to web designers. I used bootstrap for creating stylish forms, buttons, grids and everything according to your need. First of all download the twitter bootstrap form the official website :[ http://getbootstrap.com/ ] and go to dist folder it will contains js, css, fonts folder.


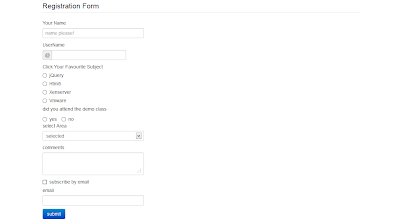
In this tutorial i have included the bootstrap v.3.0.3 and i have designed textbox, textarea, select,
checkbox, button and added characters to form fields everything using bootstrap.
Screenshot


Copy the below code in notepad and save it as .html file or .jsp file (server side technology) and include the exact path of bootstrap.min.css file. If any doubt leave a comment.
Source code
<!doctype html>
<html>
<head>
<meta charset="utf-8">
<title>Twitter Bootstrap Forms</title>
<meta name="viewport" content="width=device-width, initial-scale=1.0">
<link href="css/bootstrap.min.css" rel="stylesheet" type="text/css"/>
</head>
<body>
<div class="container">
<div class="row">
<div class="span12">
<form>
<fieldset>
<legend>Registration Form</legend>
<label>Your Name</label>
<input type="text" name="name" class="span4" placeholder="name please!">
<label>UserName</label>
<div class="input-prepend">
<span class="add-on">@</span><input type="text" name="twitter" class="span3">
</div>
<label>Click Your Favourite Subject</label>
<label class="radio"><input type="radio" name="subject" value="html5">jQuery
</label>
<label class="radio"><input type="radio" name="subject" value="css3">Html5
</label>
<label class="radio"><input type="radio" name="subject" value="jQuery">Xenserver
</label>
<label class="radio"><input type="radio" name="subject" value="javascript">
Vmware</label>
<label>did you attend the demo class</label>
<label class="radio inline">
<input type="radio" name="studywithdemo" value="yes">yes
</label>
<label class="radio inline">
<input type="radio" name="studywithdemo" value="no">no
</label>
<label>select</label>
<select name="continent" size="1" class="span4">
<option selected>selected</option>
<option value="a">Hyderabad</option>
<option value="b">Vijayawada</option>
<option value="c">Bangalore</option>
<option value="d">Bhimavaram</option>
</select>
<label>comments</label>
<textarea name="comments" class="span4"></textarea>
<label class="checkbox"><input type="checkbox" name="subscribe" value="html5">
subscribe by email</label>
<label>email</label>
<input type="text" name="email" class="span4">
<p><button type="submit" class="btn btn-primary">submit</button></p>
</fieldset>
</form>
</div>
</div>
</div>
</body>
</html>
Subscribe to:
Post Comments (Atom)
No comments:
Post a Comment
Note: Only a member of this blog may post a comment.